Stop hooks are the mechanism that turns Claude Code from a turn-by-turn chat assistant into an autonomous loop that grinds against your test suite while you go for a walk. The setup takes about thirty minutes from a cold start. Boris Cherny, who built Claude Code, has reported running this exact pattern for hours and days at a time.
This walkthrough is for anyone with a working test suite who wants Claude to iterate against it without supervision. If you can run npm test and get a clean exit code, you have everything you need.
What a Stop Hook Actually Does
Every time Claude Code is about to stop, meaning it would normally return control to you and wait for your next prompt, it can be configured to run a shell script first. That script is the stop hook. Whatever the hook decides is what happens next. The control plane between you, Claude, and the loop is just three exit codes from a single shell script.
Exit 0 means the hook is satisfied, and Claude actually stops. Exit 2 means the hook is not satisfied, and Claude should keep going, with the script's stderr piped back to the model as fresh context. Any other non-zero exit means a hook configuration error, and Claude surfaces it to you. That is the entire interface. Three numbers and a stderr stream is enough to build hours-long autonomous runs on top of.
The trick is that the hook gets to decide the rubric. You can verify with tests, types, lints, screenshot diffs, a Playwright run, or any combination. Whatever you put in the script is what Claude is held to before it is allowed to walk away.
If the tests don't pass, keep going. Essentially you can just make the model keep going.
That sentence is the entire doctrine. The rest of this article is the implementation detail required to make Claude actually do it.
Stop hooks turn Claude Code from a chat session into a controllable loop. Your test suite becomes the rubric, your hook script is the judge. Once configured, you can walk away while Claude iterates until the tests pass or until you hit a tool-call limit.
Now the setup. We will write one shell script, register it in one JSON file, and run a sanity check. Thirty minutes, tops.
The 30-Minute Setup
Step 1, Create the Hook Script
The hook lives in your repo at .claude/hooks/verify.sh. It is just a bash script. There is no SDK to install, no daemon to run, no service to manage. Claude shells out to this script every time it tries to stop, and the script's exit code decides what happens next.
Below is the minimum useful version. It runs your test suite, captures the combined output, and either exits clean or emits the failure on stderr and exits 2 to keep Claude going. The stderr text becomes the next message Claude sees, so make it clear and actionable.
#!/usr/bin/env bash
# .claude/hooks/verify.sh -- run after every Claude stop
set -uo pipefail

OUTPUT=$(npm test 2>&1)
EXIT_CODE=$?

if [ $EXIT_CODE -eq 0 ]; then
  exit 0
fi

# Tests failed -- emit feedback for Claude on stderr, exit 2 to keep going
cat <<EOF >&2
Tests failed. Output below. Fix the failing tests then verify with npm test.

$OUTPUT
EOF

exit 2
Make the script executable with chmod +x .claude/hooks/verify.sh and check it into git. Hooks are part of the project, not a per-developer setting. When a teammate clones the repo, they get the same loop you do.
Step 2, Register the Hook in settings.json
Claude Code only fires hooks that are declared in .claude/settings.json. The schema supports several events, but the one we want here is Stop, which fires whenever Claude is about to end its turn. The matcher field lets you scope hooks to specific tools or events; "*" means fire for every stop.
{
  "hooks": {
    "Stop": [
      {
        "matcher": "*",
        "hooks": [
          {
            "type": "command",
            "command": ".claude/hooks/verify.sh"
          }
        ]
      }
    ]
  }
}
Commit this file too. The combination of verify.sh plus this settings entry is the whole shipping unit. Anyone who runs claude in this repo will automatically be running the loop. There is no opt-in step beyond having Claude Code installed.
Step 3, Test It Locally
Start a fresh Claude Code session in the repo and ask for something small that will deliberately fail a test. Something like "add a function add(a, b) to src/math.ts that returns a - b, and add a unit test that calls add(2, 3) and asserts the result is 5." Claude will write the buggy code, write the failing test, then try to stop. The hook will fire, see the failing test, push the failure back as stderr, and Claude will keep going. Within a turn or two it will fix add to actually add, the test will pass, and the hook will exit 0.
If that happens end to end without your intervention, you have a working autonomous loop. The same primitive runs for the full eight-hour overnight refactor; the only difference is the scope of the request.
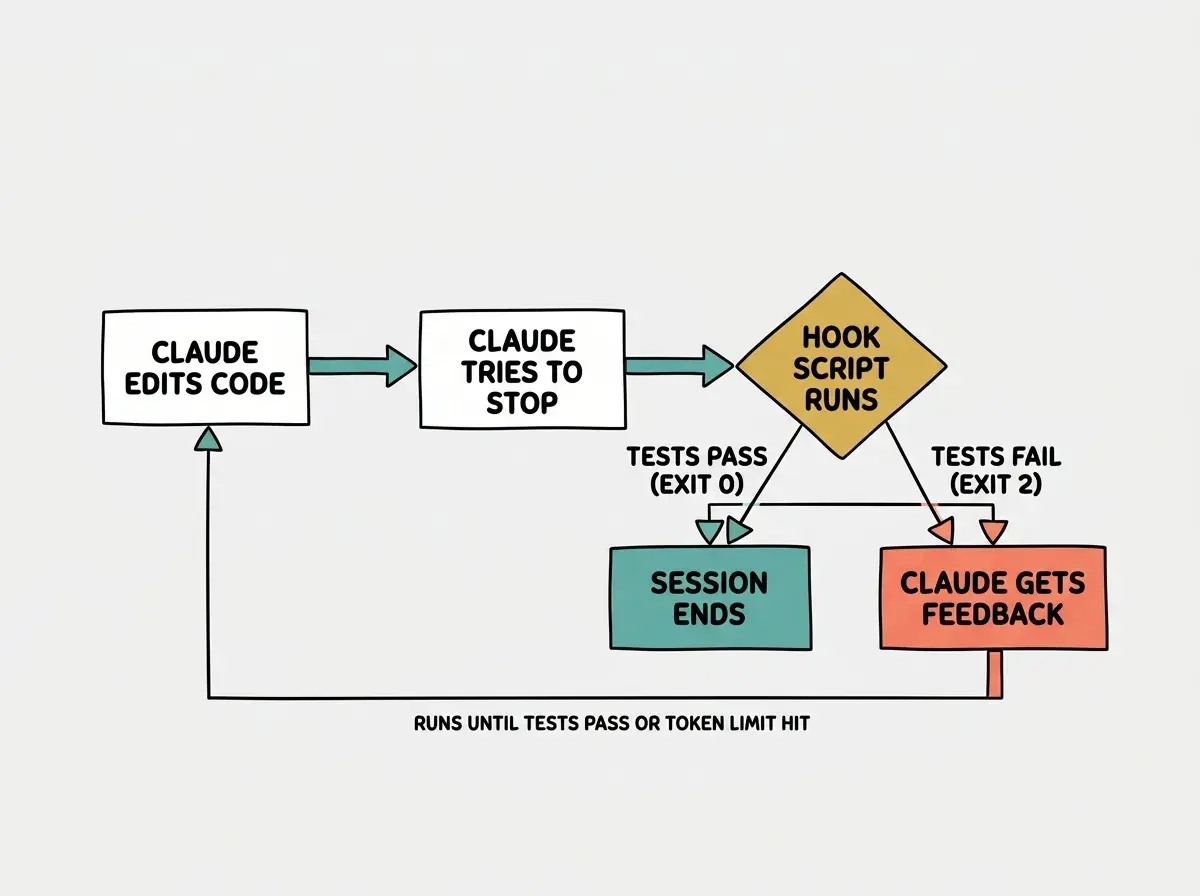
Now that the basic loop works, the interesting question is what else you can put behind that exit code.
Common Patterns Beyond Tests
Tests are the obvious rubric, but the hook script is just a shell script. You can verify against anything that returns an exit code. A few patterns that show up across the teams I have watched run this in production.
The simplest variant is a typecheck-only hook that runs tsc --noEmit and exits 2 with the type errors as stderr. This is useful during a large refactor where the tests are momentarily broken on purpose but the type system must stay consistent. The next step up is a lint-clean hook that runs eslint . or biome check . and refuses to let Claude stop while there are warnings. Beyond that, screenshot-diff hooks built on Playwright or Chromatic let you verify visual output, which is the only way to keep Claude honest on frontend work.
The most useful pattern is a multi-stage hook that runs cheap checks first and expensive checks last, returning on the first failure. Something like this.
#!/usr/bin/env bash
set -uo pipefail

run_stage() {
  local name="$1"; shift
  OUTPUT=$("$@" 2>&1)
  if [ $? -ne 0 ]; then
    echo "Stage failed: $name" >&2
    echo "$OUTPUT" >&2
    exit 2
  fi
}

run_stage "typecheck" npx tsc --noEmit
run_stage "lint" npx eslint .
run_stage "unit tests" npm test
run_stage "e2e tests" npm run test:e2e

exit 0
Cheap stages catch the obvious mistakes in a few seconds, expensive stages only run when the cheap ones pass. Claude gets a sharp, single-stage failure message instead of a hundred lines of mixed output, which materially improves how quickly it converges.
Claude consistently runs for minutes, hours, and days at a time, using Stop hooks.
The pattern scales with the quality of your verification stack. A repo with a fast, comprehensive test suite can run Claude for hours unsupervised. A repo with flaky tests and no types will burn through tokens chasing ghost failures. The leverage point, once you have hooks in place, is your test suite, not your prompt.
Smarter Stop Hooks Using Haiku
The exit-code interface is sharp but rigid. It assumes you can write a deterministic check that returns yes or no. For long-horizon agent runs, especially anything involving tool use against real systems or fuzzy "did the customer support flow actually work" verification, you often cannot. Thariq Shihipar, who works on Claude Code and the Agent SDK, has been sharing a smarter pattern.
The idea is to use the hook as a thin shim that pipes Claude's session state into a fast, cheap model, usually Haiku 4.5, and lets that model decide whether the work is actually done. The hook itself does almost nothing. It calls the API, parses the response, and exits 2 with the model's feedback if the model says "not yet" or 0 if it says "ship it." This gives you a soft rubric instead of a hard one.
Sends hook input to Haiku to decide continue/stop.
Reach for this pattern when your rubric is too fuzzy for an exit code but too cheap for a human to babysit. End-to-end agent flows, content quality checks, and "did the LLM output actually answer the user's question" all fit. For straightforward "did the tests pass" work, the simple exit-code hook is still better, faster, and cheaper.
We're publishing a deep-dive series on how Anthropic engineers actually use Claude Code.
Browse our Claude Code coverageOnce you have the loop working, the next thing you will discover is everything that can go wrong with a loop. None of it is fatal, but all of it is worth knowing before you walk away from a running session.
Gotchas and Safety Limits
The first thing to internalize is that autonomous runs cost real money. A loop that runs for two hours can comfortably consume more tokens than a full day of interactive use. Before you kick off anything long, set a tool-call cap in your hook (a simple counter file in .claude/.hook-state) and decide what your weekly token budget actually is. Anthropic's dashboards make this easy to track; ignoring them does not.
The second is side effects. The hook fires on every stop, which means anything it does runs many times during a long session. Do not put git push, npm publish, deploys, or any destructive command in the hook unless you have thought hard about what it means to do them on a loop. Tests, types, lints, and dry-runs are safe. Anything that writes to a shared system is not.
The third is loop pathology. If your hook can't distinguish "Claude needs to fix this" from "this is genuinely unsolvable," Claude will keep trying forever, or until it runs out of context, whichever comes first. The fix is an iteration counter: have the hook track how many times it has fired this session, and exit 0 (real stop) with a "max iterations reached" message after some ceiling. Ten to twenty iterations is usually plenty for any single bug-fix loop.
Finally, if you are running multiple Claudes in parallel, pair the loop with git worktrees so they cannot trample each other. Each Claude gets its own working directory, its own hook state, its own test run. This is also how you scale from one autonomous Claude to five without descending into merge-conflict hell.
The wrong hook shape costs more than no hook at all. A multi-stage rig on a five-minute edit is friction; a simple npm test exit on an overnight refactor is a recipe for a stuck loop. The matrix above is what most teams converge to after a few weeks of running this in anger.
Scheduling a Claude agent with a stop hook that has no terminal condition. A loop without a clear exit burns tokens forever and produces nothing useful. The team's rule is always, define the rubric (tests pass, screenshot matches, no open issues), then start the loop.
Once you have run a few successful loops, the rhythm of working with Claude shifts. You stop asking "did Claude finish" and start asking "did the rubric pass." The job becomes maintaining the rubric, and the loop takes care of the rest.
What This Means For You
- If you're a founder: Stop hooks let you ship more features per dev hour by removing the supervision tax. Configure once, benefit forever. Pair this with a CI-style test suite and one engineer can ship what used to take three.
- If you're changing careers: The mental model shift from "I drive Claude turn by turn" to "I define the rubric, Claude iterates" is the most important skill in this whole stack. Master the hook script and you have leverage that compounds.
- If you're a student: Start with the simple exit-code hook on a small project, even a toy repo. Graduate to multi-stage and Haiku-judge patterns as your tests get richer. The pattern is the same at every scale.
One script, one settings.json entry, and Claude iterates against your tests until they pass.
See the team's playbook