Debugging is the process of finding and fixing problems in your app. It is not a single action. It is a method of investigation, a way of thinking that helps you track down what went wrong and why. And for vibe coders, it might be the most important skill after prompting.
Here is why. When you build with AI tools, you are working with code you did not write yourself. When that code breaks (and it will), you cannot rely on memory to find the problem because you never memorized the code in the first place. You need a system. Debugging is that system.
The Detective at the Crime Scene
Think of debugging like being a detective arriving at a crime scene. Something has gone wrong. The app crashed, a feature stopped working, or the page looks completely different than it did yesterday. Your job is to figure out what happened, when it happened, and why.
A good detective does not walk in and start guessing. They follow a process. They examine the evidence, establish a timeline, form theories, and test them one at a time until they find the culprit.
You do not need to be a forensic scientist to be a good detective. You do not need deep programming knowledge to follow the clues. You need a systematic approach and the patience to follow it.
Step One, Examine the Evidence
The first thing a detective does is look at what happened. In debugging, your evidence comes in three forms.
The error message. If your app produced an error message, that is your most valuable piece of evidence. It tells you what went wrong and where. Read it carefully before doing anything else.
The behavior. Sometimes there is no error message. The app runs, but it does the wrong thing. The button does not do anything when clicked. The list shows the wrong data. The page loads but looks broken. Describing the incorrect behavior precisely is the first step toward finding the cause.
The timing. When did the problem start? Was the app working five minutes ago? Did you just make a change? Did you just install something new? The answer to "what changed?" is the single most powerful debugging question in existence.
This confuses everyone at first because the instinct is to jump straight to fixing. Something broke, so you want to start changing code immediately. But changing code without understanding the problem is like a detective rearranging the crime scene. You destroy evidence and make the investigation harder.
Before you try to fix anything, answer three questions: What is the error or incorrect behavior? When did it start? What changed right before it started? These three answers narrow down the problem faster than any amount of random code changes.
Step Two, Establish the Timeline
A detective always asks: when did this happen? In debugging, the timeline is everything.
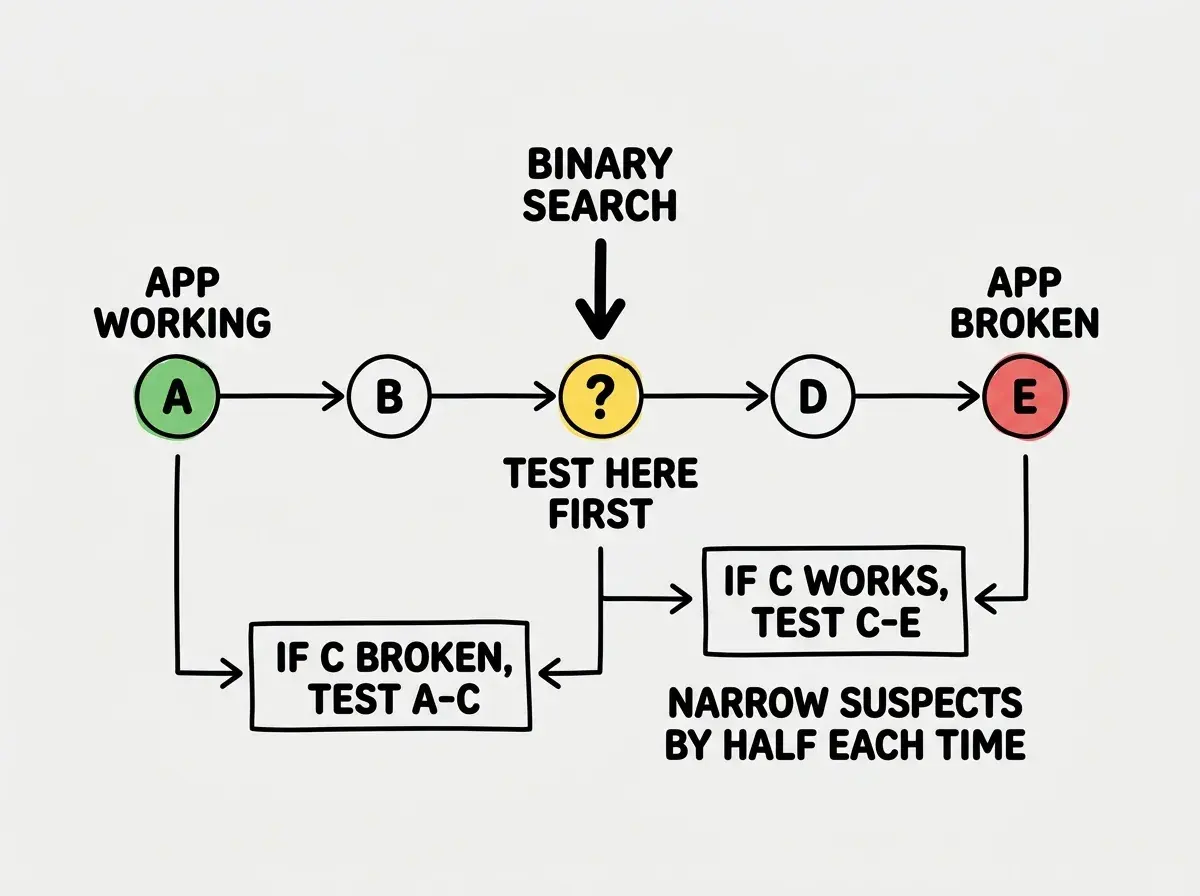
If the app was working an hour ago and is broken now, the problem is almost certainly in whatever changed during that hour. This sounds obvious, but vibe coders regularly skip this step and waste hours searching the entire codebase when the problem is in the three lines they just modified.
Git (the version control system most projects use) is your timeline. It records every change you made and when. If you can look at your recent changes and identify what was modified between "working" and "broken," you have narrowed your list of suspects from thousands of lines to a handful.
The most powerful debugging technique in the world is embarrassingly simple: undo the last change and see if the problem goes away. If it does, you found the culprit. If it does not, undo the change before that. Keep going until the problem disappears. This is called binary search debugging, and professional developers use it constantly because it works.
Step Three, Test One Theory at a Time
Here is where most people go wrong. They have three theories about what might be broken, so they change three things at once and see if the app works. Sometimes it does. But now they do not know which of the three changes actually fixed it, and worse, one of those changes might have introduced a new problem they will not discover until later.
Good detectives test one theory at a time. "I think the problem is in the database query. Let me check just that." If the database query is fine, move to the next theory. "Maybe the API endpoint is returning bad data." Test that. One at a time.
In practical terms, this means making one change, checking if the problem is fixed, and either keeping or reverting that change before trying the next thing. It is slower in the moment but dramatically faster overall because you always know exactly what each change did.
The AI Whack-a-Mole Problem
You might think that AI tools make debugging unnecessary. Just paste the error into the AI, get a fix, and move on. But actually, this is where a dangerous pattern emerges that trips up nearly every vibe coder.
The pattern works like this: your app has a bug, so you paste the error into the AI. The AI suggests a fix. You apply the fix. The original bug is gone, but now a different part of the app is broken. You paste that new error. The AI suggests another fix. You apply it. Two more things break. Fix one, break four. Fix four, break seven.
This is the whack-a-mole problem, and it is the number one cause of frustration in AI-assisted development. Studies have found that 41% of AI-generated code gets reverted within two weeks, often because of cascading fixes that make the codebase worse instead of better.
The way to avoid whack-a-mole is to debug before you fix. Understand what is actually wrong before you start changing things. When you paste an error into an AI tool, do not just say "fix this." Say "explain what is causing this error and why." Once you understand the root cause, you can make a targeted fix instead of applying band-aids that create new wounds.
Debugging is one of the core skills that makes vibe coding work. Start with the fundamentals.
Learn the basicsPractical Debugging for Vibe Coders
Here are the specific techniques that work when you are debugging code you did not write yourself.
Use console.log to see what is happening. This is the simplest and most effective debugging tool. Adding console.log(variableName) at different points in your code shows you what data exists at each step. It is like a detective placing cameras at different locations to track movement. You can ask your AI tool "add console.log statements to this function so I can see what data is flowing through it."
Reproduce the bug first. Before trying to fix anything, make sure you can reliably make the bug happen. If you cannot reproduce it, you cannot verify that your fix actually works. "Click the submit button with an empty form" is a reproducible step. "It just breaks sometimes" is not, and you need more information.
Isolate the change. If the bug started after a big change, break that change into smaller pieces. Which specific part introduced the problem? The narrower you can make the suspect list, the faster you find the answer.
Check the obvious things first. Is the server running? Is the database connected? Is the API key correct? Did you save the file? Professional developers are embarrassed by how often the problem is something this simple. Do not skip the basics.
Applying AI-suggested fixes without understanding what they change. When an AI tool says "replace this function with this new version," take ten seconds to ask it "what does this change and why does it fix the problem?" If the AI cannot explain clearly, the fix might be masking the real issue rather than solving it. Understanding the fix is what prevents the whack-a-mole spiral.
When to Revert vs When to Fix Forward
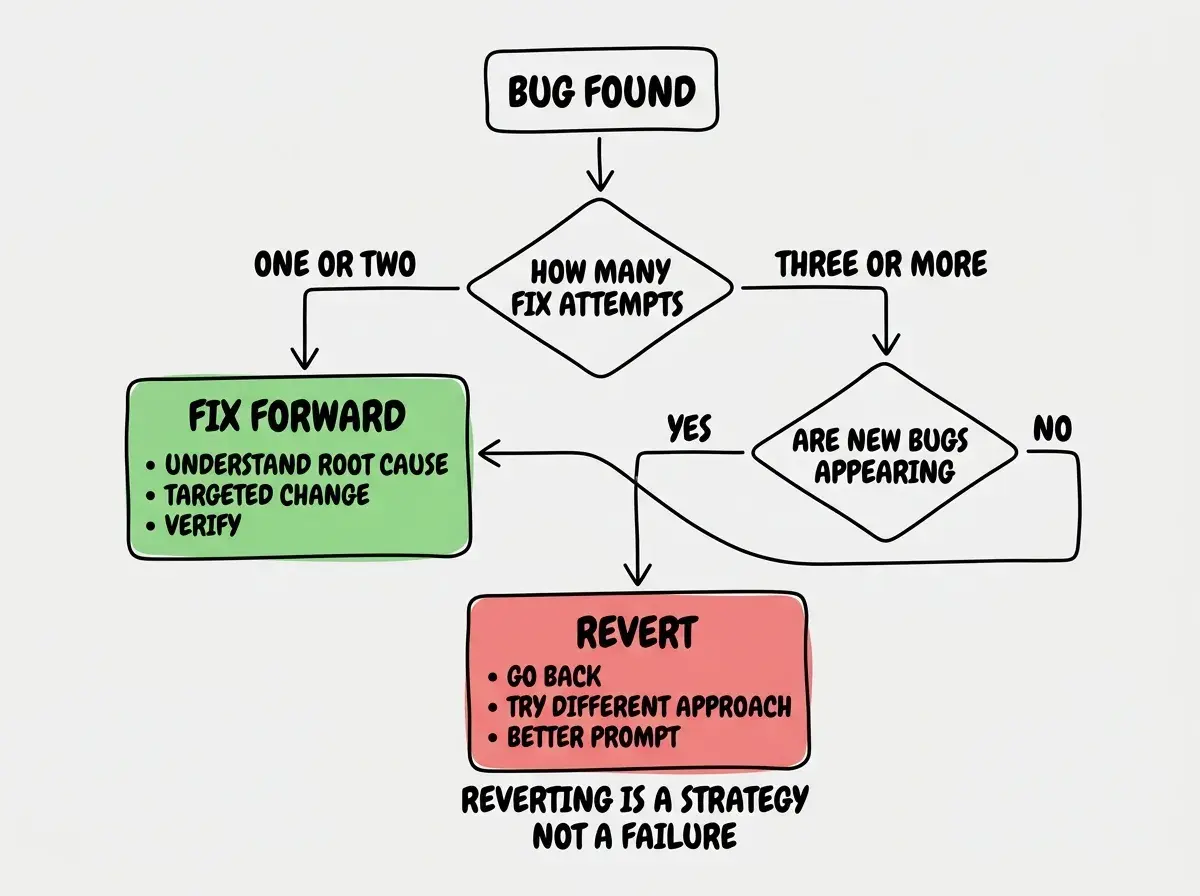
Sometimes the best debugging decision is not to fix the problem at all. Sometimes it is to undo the change that caused it and try a different approach entirely.
This is called reverting, and it feels like giving up. It is not. It is a strategic decision that professional developers make regularly. If you have applied more than three fixes to solve one original problem and new issues keep appearing, revert. Go back to the last working version and try a different approach. Your app will be better for it.
What This Means For You
Debugging is detective work. You examine evidence, establish a timeline, and test one theory at a time. It works even when you did not write the code, and it is the skill that prevents the whack-a-mole spiral that frustrates so many vibe coders.
- If you are a founder building a product: Debugging skills let you unblock yourself instead of waiting for help. When your app breaks at midnight before a demo, knowing how to read the error, check the timeline, and revert to a working version can save your launch. You do not need to understand every line of code. You need the detective process.
- If you are a career changer learning to build: Expect to spend more time debugging than building, especially in the beginning. This is normal. The difference between a frustrated beginner and an effective builder is not fewer bugs. It is a faster, more systematic approach to finding them.
- If you are a student exploring development: Learn to debug before you learn to build complex features. Debugging teaches you how code actually works in a way that tutorials never can. Every bug you investigate deepens your understanding. The 41% revert rate for AI-generated code means there is enormous value in being the person who can identify why something went wrong, not just someone who can generate more code.
Debugging is part of a toolkit. Explore the other fundamentals that make vibe coding click.
Explore more