You can have 100% passing unit tests and still ship a broken UI. A padding change collapses a button. A font swap makes headings unreadable on mobile. A third-party script pushes your nav off-screen. Visual regression testing catches all of that, automatically.
What Visual Regression Testing Catches That Other Tests Miss
Unit tests verify logic. Integration tests verify that systems talk to each other correctly. End-to-end tests verify that user flows complete successfully. None of them look at the screen.
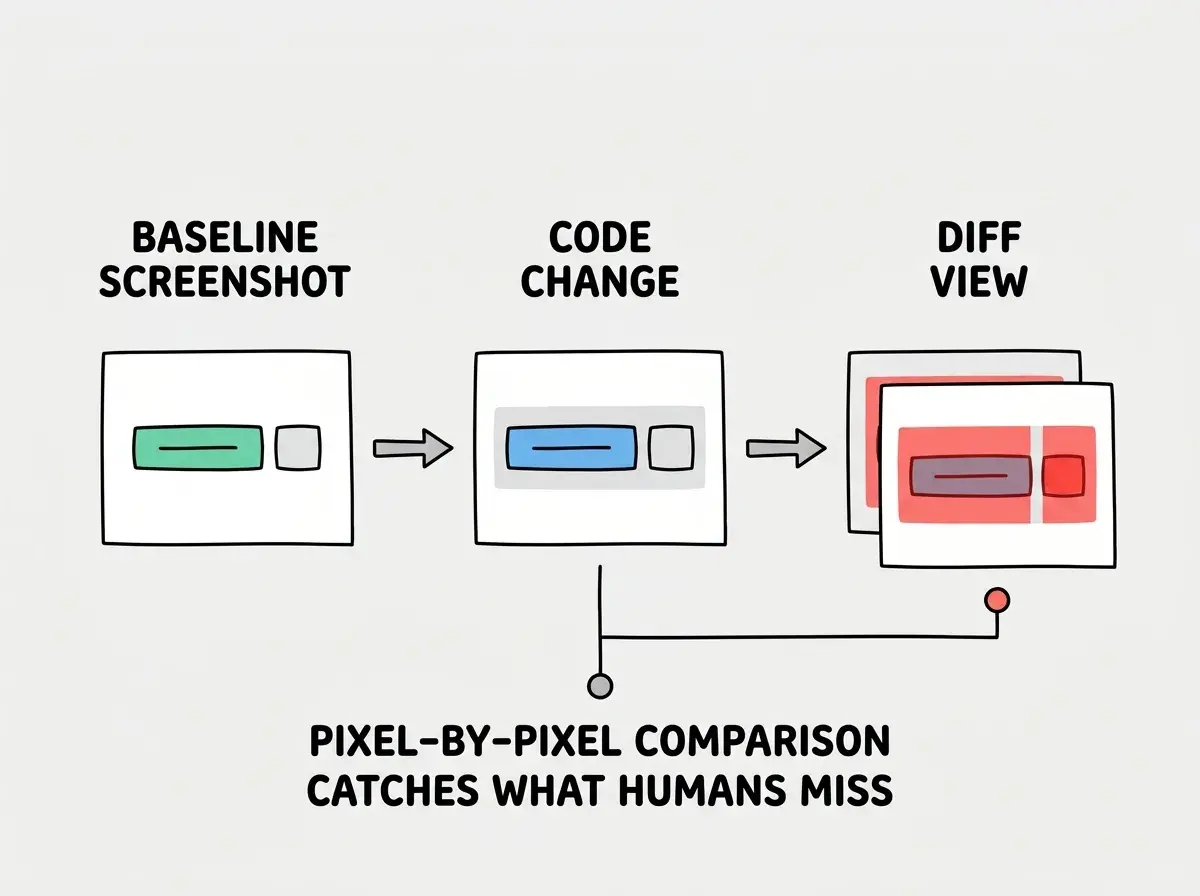
Visual regression testing works differently. It takes a screenshot of a component or page in a known-good state, saves it as a baseline, and then compares future screenshots pixel by pixel. If anything changes visually, the test fails and shows you exactly where.
The category of bugs it catches is distinct from what any other test type covers.
A CSS specificity conflict makes your primary button render in gray instead of your brand color. Passes all unit tests, all end-to-end tests. Fails a visual regression test immediately.
A dependency update changes how a date picker renders. Logic still works, dates still submit correctly, but the calendar is now 40px wider and clips the modal it lives in. Only a visual test catches this.
Your design system gets a spacing token update. The new value is correct in isolation. But on your product dashboard, three components that all relied on that token now combine in a way that breaks the layout. Visual regression catches it in seconds.
For designers building products, this is the category of bugs that matters most. When you ship a feature and something visually breaks two screens away from it, visual regression testing is the only automated system that notices.
The coverage gap is real. A 2024 survey by Sauce Labs found that 67% of teams that shipped a visual regression reported their existing tests had all passed. The bug existed in production before anyone looked at the screen.
Tools Compared
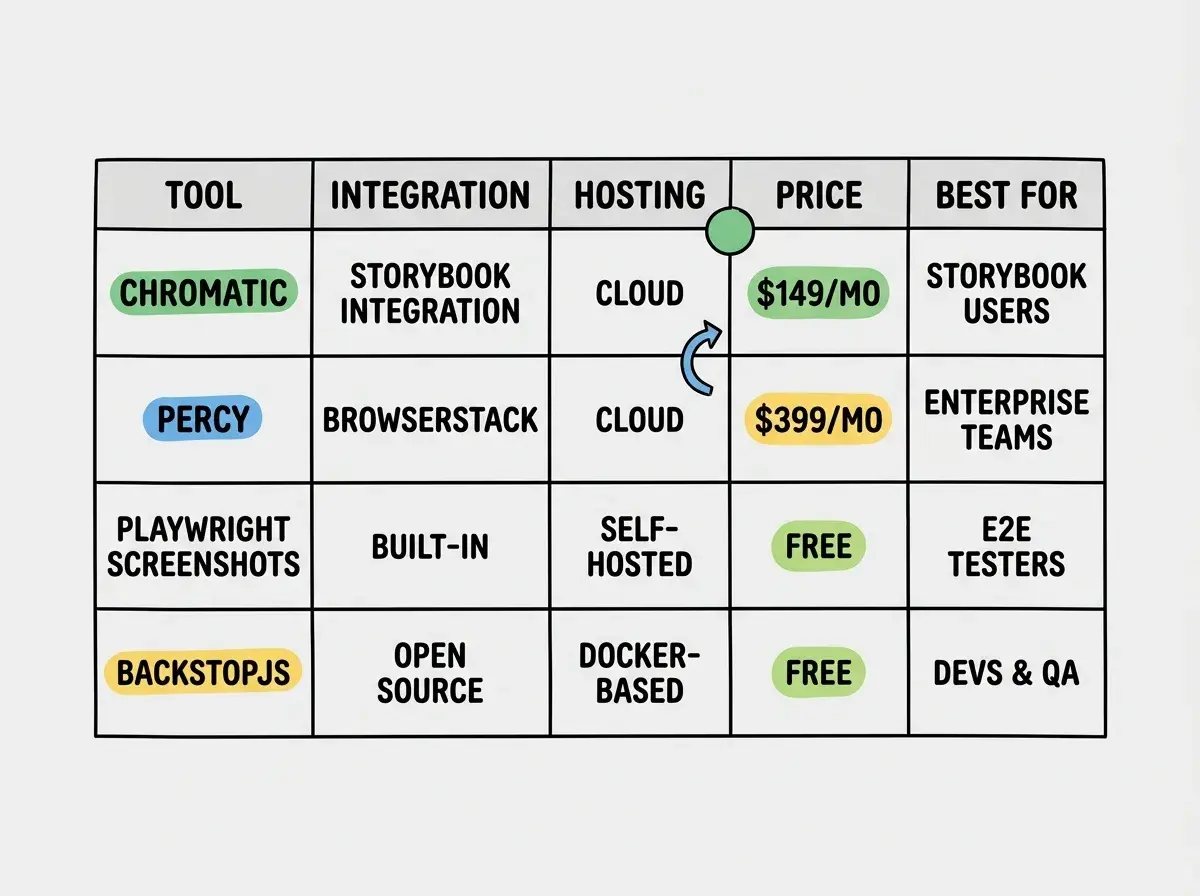
Four tools dominate the visual regression space. They differ in where screenshots are captured, how diffs are handled, and what they cost.
Chromatic is purpose-built for Storybook. If your design system or component library uses Storybook, Chromatic is the most integrated option. It captures components in all their documented states, stores snapshots in the cloud, and gives reviewers a UI to approve or reject changes. Pricing starts free for open source (5,000 snapshots per month), with paid plans starting at $149/month for private repos. The limitation is tight coupling to Storybook. If you are not using Storybook, Chromatic does not apply.
Percy by BrowserStack works with any test framework and supports full-page and component snapshots. It integrates with Playwright, Cypress, Selenium, and others. Diffs run in the cloud with a review UI. Free tier gives 5,000 snapshots per month. Paid plans start at $599/month, making it expensive for solo teams and small studios. Percy is the right choice when you need multi-browser snapshot comparison across a large app and have the budget for it.
Playwright Screenshots is the zero-infrastructure option. Playwright's toHaveScreenshot() assertion takes screenshots during test runs and compares them locally against stored baselines. No external service, no account, no cost. The tradeoff is that you manage the baselines yourself, and cross-machine consistency requires care (more on that below). For teams already using Playwright for end-to-end tests, this is the natural starting point.
BackstopJS is an open-source tool that takes a list of URLs and CSS selectors, screenshots them, and produces an HTML diff report. It runs locally or in CI and costs nothing. Setup requires more configuration than Playwright, but it works independently of any test framework. BackstopJS is the right choice for visual regression on marketing sites and CMS-driven pages where you want to diff full pages or sections rather than individual components.
For most teams starting out, the answer is Playwright Screenshots for component-level tests and BackstopJS for page-level regression on static content. The paid tools make sense when team size, snapshot volume, or multi-browser requirements justify the cost.
Setting Up Visual Tests with Playwright
Playwright includes screenshot comparison built into its expect API. No plugin installation needed.
Start by writing a test that navigates to a page or mounts a component, then calls toHaveScreenshot().
import { test, expect } from "@playwright/test";

test("primary button renders correctly", async ({ page }) => {
  await page.goto("/components/button");
  const button = page.locator('[data-testid="primary-button"]');
  await expect(button).toHaveScreenshot("primary-button.png");
});
Run this test the first time with --update-snapshots. Playwright takes a screenshot and saves it as the baseline in a __screenshots__ directory alongside your test file. Every subsequent run compares the live screenshot against that baseline.
When a visual change is intentional, update the baseline by running npx playwright test --update-snapshots. When a change is unintentional, the test fails and Playwright writes a diff image to your test output directory showing exactly which pixels changed.
A few configuration decisions matter early.
Set a consistent viewport in playwright.config.ts so snapshots always match. Use the screenshot option to configure what gets captured and whether animations are disabled.
use: {
  viewport: { width: 1280, height: 720 },
  screenshot: "only-on-failure",
  animations: "disabled",
},
Disable animations. Animated elements create inconsistent screenshots because a screenshot taken during a transition will never match one taken at rest. Setting animations: "disabled" tells Playwright to fast-forward CSS animations and transitions to their end state before capturing.
Hide dynamic content. Timestamps, user avatars, and any element that legitimately changes between runs will always fail the visual diff. Use Playwright's mask option to black out those elements during comparison.
await expect(page).toHaveScreenshot("dashboard.png", {
  mask: [page.locator('[data-testid="user-avatar"]'), page.locator(".timestamp")],
});
Disable animations before taking visual test screenshots and mask dynamic elements like timestamps and user avatars. These two settings eliminate 80% of false-positive failures in visual regression suites. A test that fails unpredictably gets turned off. A test that only fails when something real breaks stays on and provides ongoing value.
Managing Visual Test Baselines
Baselines are the source of truth for what your UI is supposed to look like. How you store and update them determines whether the test suite stays useful or becomes noise.
Store baseline screenshots in version control. Commit them alongside test files in your repo. This means every developer has the same baseline, pull requests show diffs when visual changes are intentional, and the history of what your UI looked like over time is preserved. Playwright outputs .png files that version control handles without issues.
The update workflow matters. When a designer intentionally changes a component, they run --update-snapshots, commit the updated baseline images with the code change, and the pull request shows both the code diff and the visual diff. Reviewers can see exactly what changed visually, not just what changed in code.
The failure workflow also needs definition before a team uses visual tests. Agree ahead of time that a visual test failure blocks merge until someone explicitly approves the change. Without this agreement, visual failures get ignored, and the tests stop providing signal.
Cross-environment consistency is the hardest part of baseline management. Screenshots taken on a MacBook with a Retina display do not match screenshots taken on a Linux CI runner. Font rendering, subpixel antialiasing, and GPU differences all produce pixel-level variation that fails visual comparisons even when nothing changed.
The solution is to run visual tests inside Docker so every environment renders identically. Playwright provides official Docker images that pin all rendering dependencies.
docker run --rm --ipc=host mcr.microsoft.com/playwright:v1.44.0-jammy \
  npx playwright test --update-snapshots
Generate your baselines inside Docker, run your CI visual tests inside the same Docker image, and cross-environment failures disappear. Teams that skip this step spend more time managing false failures than finding real bugs.
For component-level tests, a good baseline organization is one screenshot directory per component, with separate screenshots for each documented state: default, hover, focus, disabled, error, loading. When a component has ten states and you screenshot all of them, a regression anywhere in that component surfaces immediately.
Updating baselines whenever a test fails without reviewing the diff. The --update-snapshots flag should never run in CI automatically. It should only run locally, intentionally, after a developer has looked at the diff and confirmed the visual change is deliberate. Automatically updating baselines defeats the purpose of the tests. You end up with a suite that always passes because it keeps accepting whatever the current state is, rather than catching when the current state diverges from the intended state.
What This Means For You
If you are a designer on a product team: Visual regression tests are the thing you have been asking for. When you make a design change, you want to know it did not break anything three pages away. When an engineer updates a dependency, you want to know your components still look right. Add visual tests to your components and you get both. You do not need to write them yourself, but understanding what they do and how baselines work lets you have a real conversation with your engineering team about where they are missing coverage.
If you are a developer shipping design systems: Start with Playwright screenshot tests on every component in its documented states. Commit the baselines. Run them in CI. This is a one-time setup that pays dividends every time a dependency updates, a token changes, or a new engineer submits a PR that accidentally breaks something they were not looking at. The tools are free, the setup takes a day, and the test suite catches a category of bugs that nothing else in your pipeline touches.
Visual regression testing is one piece of a reliable ship workflow.
See the full shipping toolkitThe three-hour debugging session that started with "why does this look wrong on staging" and ended with a stale CSS import is the kind of problem visual regression testing exists to prevent. Set up the tests once, keep the baselines in version control, run them in Docker, and that category of surprise disappears from your workflow.
Get the full component testing strategy for teams shipping at speed.
Read the design system guide