You have built an app. It works. Users can see it. But right now, anyone can see everything, and nobody has an account. Your app has no front door. It is a storefront with an open entrance, no lock, and no way to tell who walked in or what they touched. Adding user authentication from scratch is how you install that front door, hang a lock on it, and hand keys only to the people who should have them.
With 92% of developers using AI daily and 46% of production code now AI-generated, the tooling around authentication has gotten dramatically easier to integrate. But AI tools frequently generate auth code that works without being secure. This guide walks you through building email and password authentication the right way, using either Supabase Auth or NextAuth, so your front door actually keeps people out.
Why You Need Auth Before Anything Else
Every feature you build after this point depends on knowing who is using your app. Personalized dashboards, saved preferences, billing, permissions. None of it works without a system that can say "this request came from user #47, and they are allowed to do this."
Without auth, your database is effectively public. Every API route serves data to anyone who asks. Skipping auth is not cutting a corner. It is leaving the front door wide open with a welcome sign for anyone passing by.
The two most practical approaches for founders building with AI tools in 2026 are Supabase Auth and NextAuth (now called Auth.js). Both handle password hashing, session management, and token rotation. But you need to understand what they do under the hood, because AI tools will sometimes override their safe defaults with insecure shortcuts.
Choosing Between Supabase Auth and NextAuth
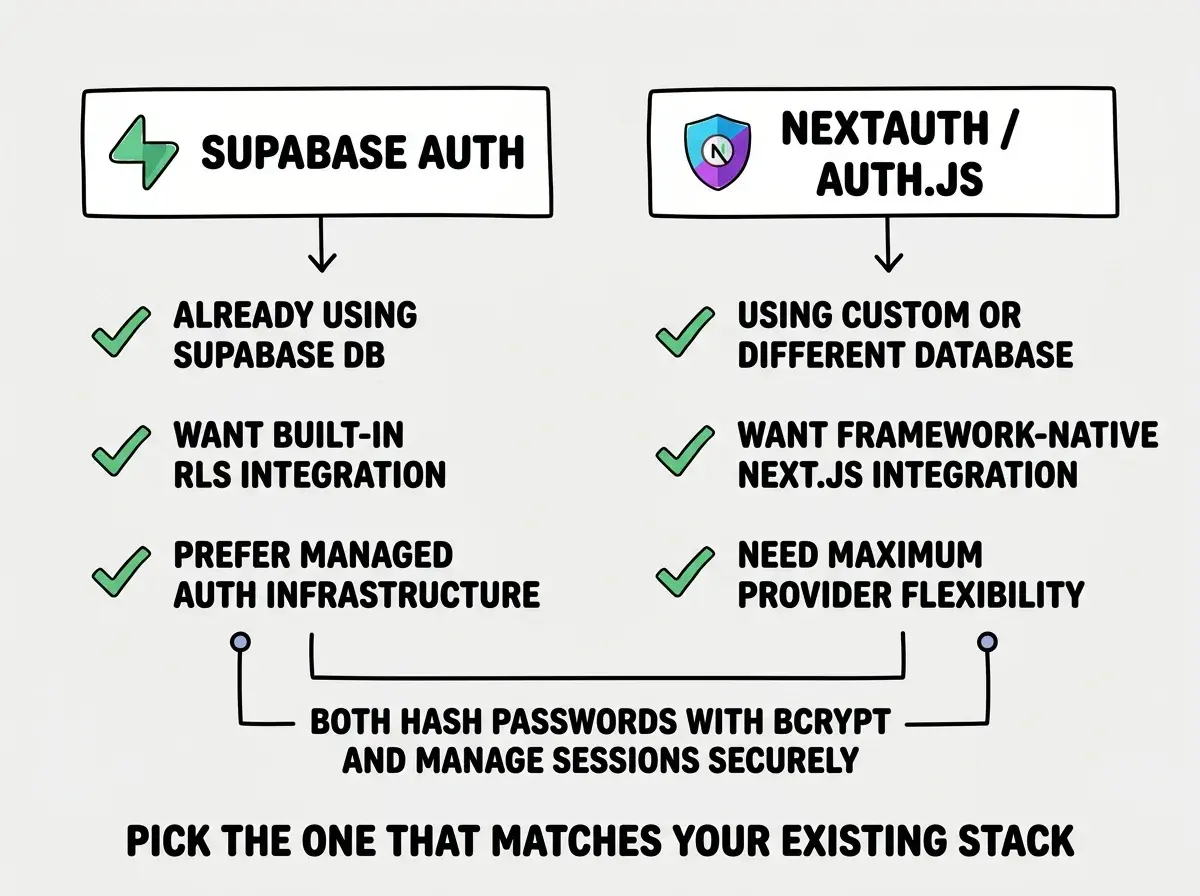
The choice depends on your existing stack. If you are already using Supabase for your database, use Supabase Auth. It is built into the platform, shares the same user table, and integrates directly with Row Level Security policies. If you are using a different database (Postgres, PlanetScale, a serverless DB), NextAuth gives you a framework-native solution that plugs into any data layer.
Think of it this way. Supabase Auth is like the lock that comes built into the front door when you buy it from the manufacturer. It fits perfectly because it was designed for that specific door. NextAuth is like a high-quality aftermarket deadbolt. It works on any door, but you need to install it yourself and make sure the fit is right.
Both hash passwords with bcrypt by default, manage sessions securely, and handle email verification. Do not let an AI tool build a custom auth system from raw primitives when these battle-tested options exist.
Setting Up Supabase Auth With Email and Password
If you are going the Supabase route, the setup is surprisingly short. Supabase handles password hashing, email verification, and session tokens on their infrastructure. Your job is to wire up the client.
First, install the Supabase client library:
npm install @supabase/supabase-js
Then initialize the client with your project credentials:
import { createClient } from '@supabase/supabase-js'

const supabase = createClient(
  process.env.NEXT_PUBLIC_SUPABASE_URL!,
  process.env.NEXT_PUBLIC_SUPABASE_ANON_KEY!
)
To register a new user with email and password:
const { data, error } = await supabase.auth.signUp({
  email: 'user@example.com',
  password: 'their-secure-password',
})
To sign in an existing user:
const { data, error } = await supabase.auth.signInWithPassword({
  email: 'user@example.com',
  password: 'their-secure-password',
})
Supabase automatically hashes the password with bcrypt before storing it. The session token is returned as a JWT and managed by the client library. On the server side, you verify the user by calling supabase.auth.getUser(), which validates the token and returns the user object.
The critical step AI tools often skip is enabling Row Level Security on your database tables after setting up auth. Without RLS, your auth system is the front door lock, but the windows are all open. Every table that stores user data needs an RLS policy restricting access to rows matching the authenticated user's ID.
Setting Up NextAuth With Email and Password
NextAuth takes a different approach. It runs inside your Next.js application, and you configure it with providers and adapters. For email and password, you use the Credentials provider.
Install the dependencies:
npm install next-auth @auth/core bcrypt
npm install -D @types/bcrypt
Create your auth configuration:
import NextAuth from 'next-auth'
import Credentials from 'next-auth/providers/credentials'
import bcrypt from 'bcrypt'

export const { handlers, auth, signIn, signOut } = NextAuth({
  providers: [
    Credentials({
      credentials: {
        email: { label: 'Email', type: 'email' },
        password: { label: 'Password', type: 'password' },
      },
      async authorize(credentials) {
        // Look up user in your database
        const user = await db.user.findUnique({
          where: { email: credentials.email as string },
        })
        if (!user) return null

        // Compare the submitted password with the stored hash
        const valid = await bcrypt.compare(
          credentials.password as string,
          user.passwordHash
        )
        if (!valid) return null

        return { id: user.id, email: user.email, name: user.name }
      },
    }),
  ],
  session: { strategy: 'jwt' },
})
When creating users during signup, hash the password before storing it:
import bcrypt from 'bcrypt'

const SALT_ROUNDS = 12

async function createUser(email: string, password: string) {
  const passwordHash = await bcrypt.hash(password, SALT_ROUNDS)
  return db.user.create({
    data: { email, passwordHash },
  })
}
Notice the salt rounds set to 12. This is important. AI tools sometimes default to a cost factor of 4 or 6, which is fast enough for attackers to brute-force. A cost factor of 12 means each hash takes roughly 250 milliseconds, making brute-force attacks computationally infeasible while adding negligible delay for legitimate users logging in.
Never roll your own password hashing logic. Use bcrypt with a cost factor of at least 12, or Argon2id with default parameters. Both Supabase Auth and NextAuth handle this correctly when configured properly. The risk comes when AI tools generate custom auth code that bypasses these libraries and uses weaker algorithms like SHA-256 or MD5.
Understanding Session Management
After the lock on your front door verifies the key, it needs to remember that the door is open for this specific person. That is session management. Without it, users would need to type their password on every single page load.
For most indie hacker apps, JWTs (the default for both Supabase Auth and NextAuth) are fine. But there are rules you must follow.
Keep tokens short-lived. Access tokens should expire within 15 to 60 minutes. Both Supabase and NextAuth support refresh token rotation, where a long-lived refresh token (stored in an httpOnly cookie) silently fetches new access tokens as needed. Users stay logged in, but a stolen token becomes useless quickly.
Store tokens in httpOnly cookies, not localStorage. This is the single most common mistake AI tools make with authentication. Tokens in localStorage are readable by any JavaScript on the page. If your app has even one cross-site scripting (XSS) vulnerability, an attacker can steal every token in localStorage. httpOnly cookies are invisible to JavaScript entirely.
Implement proper logout. Logout means destroying the session, not just deleting the cookie on the client. For Supabase, call supabase.auth.signOut(). For NextAuth, call signOut(). Both invalidate the session server-side so the token cannot be reused.
Storing auth tokens in localStorage because the AI tool generated it that way. localStorage is accessible to any JavaScript running on your page, making it vulnerable to XSS attacks. Always store tokens in httpOnly cookies. If your AI-generated code uses localStorage.setItem('token', ...) anywhere in the auth flow, that is a security vulnerability you need to fix before launching.
Adding Password Requirements and Rate Limiting
Your front door lock is only as strong as the keys people choose. If users can set their password to "123456" (still the most common password in 2026), your bcrypt hashing will not save them.
At minimum, require 8 characters with a mix of letters and numbers. Better yet, check passwords against the Have I Been Pwned breached password database to reject known compromised passwords.
async function validatePassword(password: string): Promise<boolean> {
  if (password.length < 8) return false

  // Check against breached password database
  const sha1 = crypto.createHash('sha1')
    .update(password).digest('hex').toUpperCase()
  const prefix = sha1.slice(0, 5)
  const suffix = sha1.slice(5)

  const response = await fetch(
    `https://api.pwnedpasswords.com/range/${prefix}`
  )
  const text = await response.text()
  return !text.includes(suffix)
}
Rate limiting on login attempts is equally critical. Without it, an attacker can try thousands of passwords per second against your login endpoint. Limit login attempts to 5 per minute per IP address or email. Both Supabase and Cloudflare offer built-in rate limiting. For NextAuth, use a middleware like rate-limiter-flexible or your hosting platform's built-in protection.
Authentication is just the front door. Check out the full Security from Scratch series for everything else AI tools get wrong.
Read the security seriesTesting Your Auth Setup
Before you ship, run through this checklist. These are the things that work perfectly in development but break or become vulnerable in production.
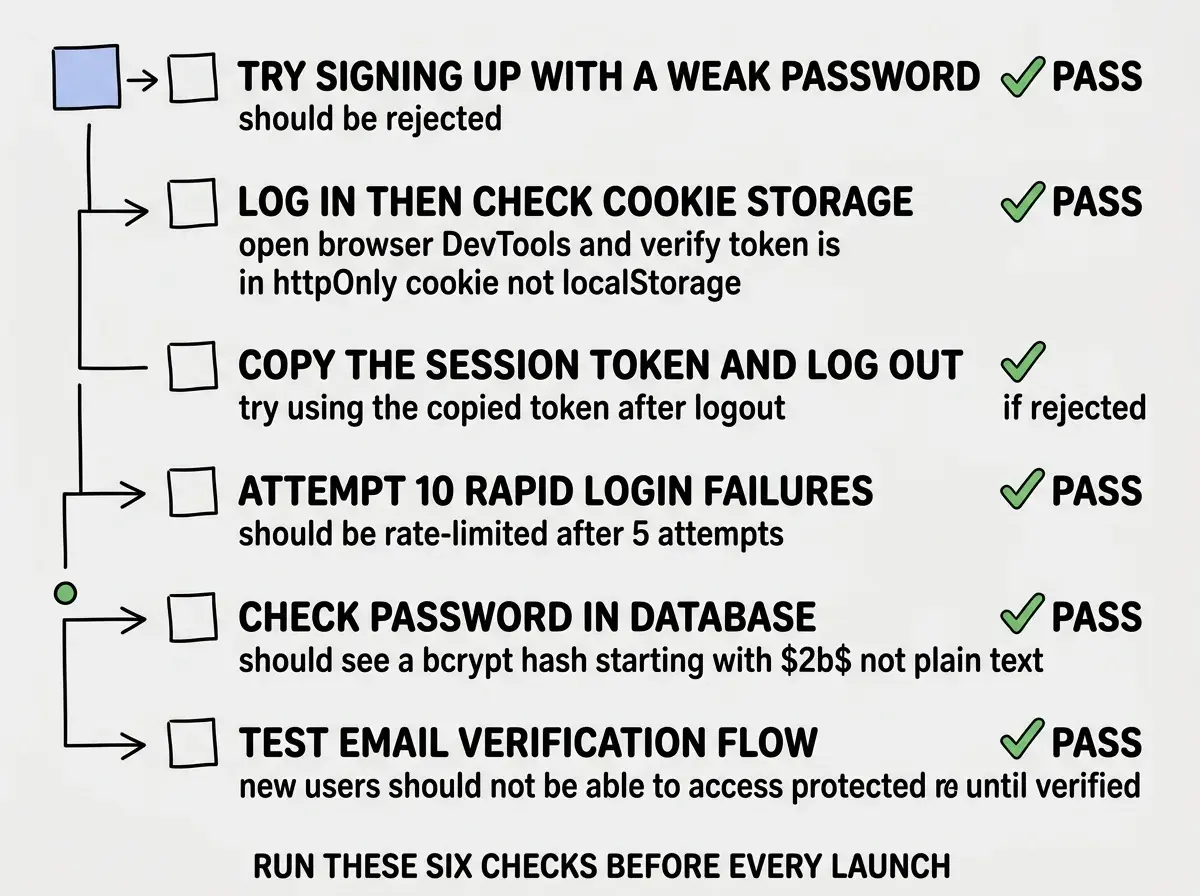
Try to sign up with "password123" and confirm your app rejects it. Open DevTools to verify tokens live in httpOnly cookies, not localStorage. Log out and confirm the session is actually invalidated. Try 10 rapid failed logins and confirm rate limiting kicks in. Check your database to verify passwords are bcrypt hashes (starting with $2b$), not plain text.
If any of these checks fail, do not ship. A working login form that stores passwords in plain text is worse than no login at all.
What This Means For Your App
Building user authentication from scratch is installing that front door and lock on your application. Without it, nothing else you build can work securely. With it done right, you have a foundation that protects your users and earns their trust.
Use Supabase Auth if you are already on Supabase. Use NextAuth if you are not. Hash passwords with bcrypt at cost 12 or higher. Store tokens in httpOnly cookies. Enforce password requirements. Rate-limit login attempts. Test everything before shipping. Your AI tool will generate most of the code, but you need to verify it chose the right defaults.
Get weekly tutorials on shipping secure, production-ready apps with AI tools.
Browse all tutorials