Every time you click "Sign in with Google" on a website, you are participating in an OAuth flow that took years to standardize and seconds to misimplement. With 92% of developers now using AI tools daily, a growing number are generating OAuth integrations from scratch with those tools. The problem is that OAuth has more subtle failure modes than almost any other authentication pattern, and AI-generated OAuth code tends to look correct while being fundamentally insecure.
OAuth social logins are worth implementing because they remove the biggest conversion killer in your signup funnel. Users do not want another password. They want to click one button and start using your product. Properly implemented OAuth social login reduces signup friction by 20-40% and eliminates password-related security vulnerabilities entirely. But "properly implemented" is doing a lot of heavy lifting in that sentence.
The Hotel Keycard System That Explains Everything
The best way to understand OAuth is to think of it as a hotel keycard system. When you check into a hotel, you show your ID at the front desk (authentication). The hotel does not give you a master key to every room. Instead, they issue you a keycard that works on specific rooms for a specific duration (authorization). The hotel is the identity provider (Google, GitHub, or Apple). Your room is the application. The keycard is the access token.
Here is what makes this analogy precise. The hotel never tells the room what your real name is unless you ask them to. The room just knows the keycard is valid. When a user signs in with Google, your application does not receive their Google password. It receives a token that proves Google verified their identity, and it can ask Google for specific user details based on the scopes you requested.
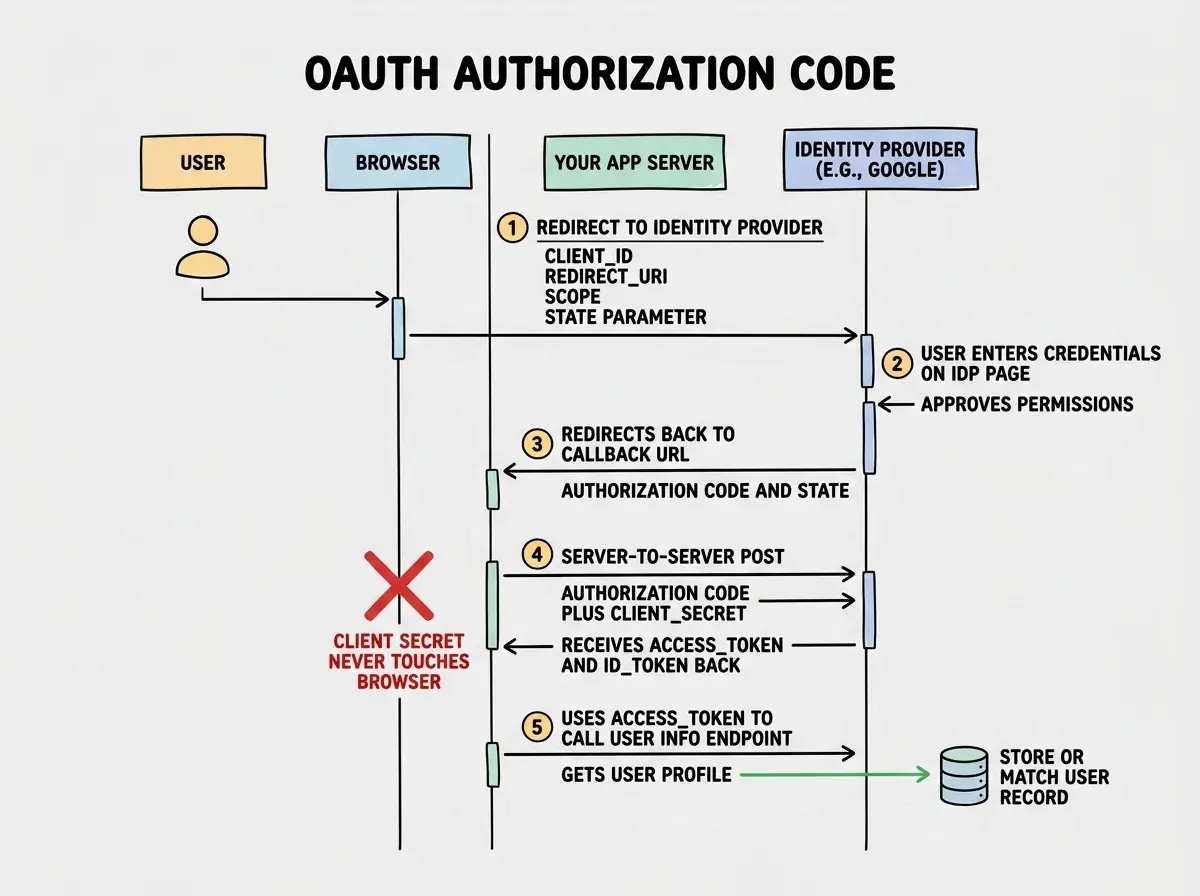
The OAuth 2.0 Authorization Code flow, which is what you should be using for server-side applications, works in five steps:
- Your app redirects the user to the provider's authorization page
- The user logs in and approves the permissions your app requested
- The provider redirects back to your app with a temporary authorization code
- Your backend exchanges that code (plus your client secret) for an access token
- Your backend uses the access token to fetch user information from the provider
That fourth step is critical. The authorization code exchange happens server-to-server, meaning the client secret never touches the browser. AI tools frequently implement the Implicit Flow instead, where the access token comes directly to the browser. The Implicit Flow was deprecated in OAuth 2.1 because it exposes tokens to JavaScript, browser history, and referrer headers. If your AI-generated code has the access token appearing in a URL fragment after the redirect, it is using the wrong flow.
Setting Up Google Sign-In
Google is the most commonly used OAuth provider. Start in the Google Cloud Console by creating an OAuth 2.0 Client ID. Set the application type to "Web application." Add your development redirect URI (http://localhost:3000/api/auth/callback/google) and your production redirect URI.
For social login, you need the openid, email, and profile scopes. Do not request broader scopes unless your application actually needs them. Users see the permissions list during the consent screen, and overreaching kills conversion.
// Server-side token exchange (Next.js API route example)
export async function GET(request: Request) {
  const url = new URL(request.url)
  const code = url.searchParams.get('code')
  const state = url.searchParams.get('state')

  // Always validate the state parameter
  if (state !== getStoredState(request)) {
    return new Response('Invalid state', { status: 403 })
  }

  const tokenResponse = await fetch(
    'https://oauth2.googleapis.com/token',
    {
      method: 'POST',
      headers: { 'Content-Type': 'application/x-www-form-urlencoded' },
      body: new URLSearchParams({
        code,
        client_id: process.env.GOOGLE_CLIENT_ID,
        client_secret: process.env.GOOGLE_CLIENT_SECRET,
        redirect_uri: process.env.GOOGLE_REDIRECT_URI,
        grant_type: 'authorization_code',
      }),
    }
  )

  const { access_token, id_token } = await tokenResponse.json()
  // Decode and verify the id_token for user info
  // Create or match user record in your database
}
That state parameter validation is the most commonly omitted piece of OAuth code. It prevents CSRF attacks where an attacker tricks a user into connecting the attacker's account. AI tools skip it roughly half the time.
Setting Up GitHub Sign-In
GitHub OAuth is simpler than Google. Go to Settings, then Developer Settings, then OAuth Apps. Create a new OAuth app with the same callback URL pattern.
For basic social login, you only need the read:user and user:email scopes. The user:email scope is necessary because some GitHub users have private email addresses, and without it you get null for their email.
// GitHub token exchange
const tokenResponse = await fetch(
  'https://github.com/login/oauth/access_token',
  {
    method: 'POST',
    headers: {
      Accept: 'application/json',
      'Content-Type': 'application/json',
    },
    body: JSON.stringify({
      client_id: process.env.GITHUB_CLIENT_ID,
      client_secret: process.env.GITHUB_CLIENT_SECRET,
      code,
    }),
  }
)

// Fetch email separately if not included in profile
const emailsResponse = await fetch('https://api.github.com/user/emails', {
  headers: { Authorization: `Bearer ${access_token}` },
})
const emails = await emailsResponse.json()
const primaryEmail = emails.find(e => e.primary && e.verified)?.email
Notice the separate email fetch. This trips up every AI tool I have tested. They assume the email comes back with the profile, but GitHub often requires an additional API call.
Setting Up Apple Sign-In
Apple Sign-In is the most complex of the three providers and the one AI tools struggle with most. Apple has requirements that no other provider shares.
Apple requires you to generate a client secret dynamically using a private key. Unlike Google and GitHub where the client secret is a static string, Apple's client secret is a JWT that you sign with a key downloaded from the Apple Developer Portal. Best practice is to generate a fresh one for each token exchange.
Apple also has a privacy feature called "Hide My Email" that generates a unique relay address for each app. Your user might sign up as abc123@privaterelay.appleid.com. These relay addresses are permanent and functional for receiving email, but they will not match the user's real email if they later sign in with Google. This directly impacts account linking.
The state parameter in your OAuth redirect is your primary defense against CSRF attacks. It should be a random, unguessable string stored in the user's session before the redirect and validated when the callback arrives. If your AI-generated OAuth code does not generate, store, and validate a state parameter, it is vulnerable to account hijacking. Check every provider's callback handler.
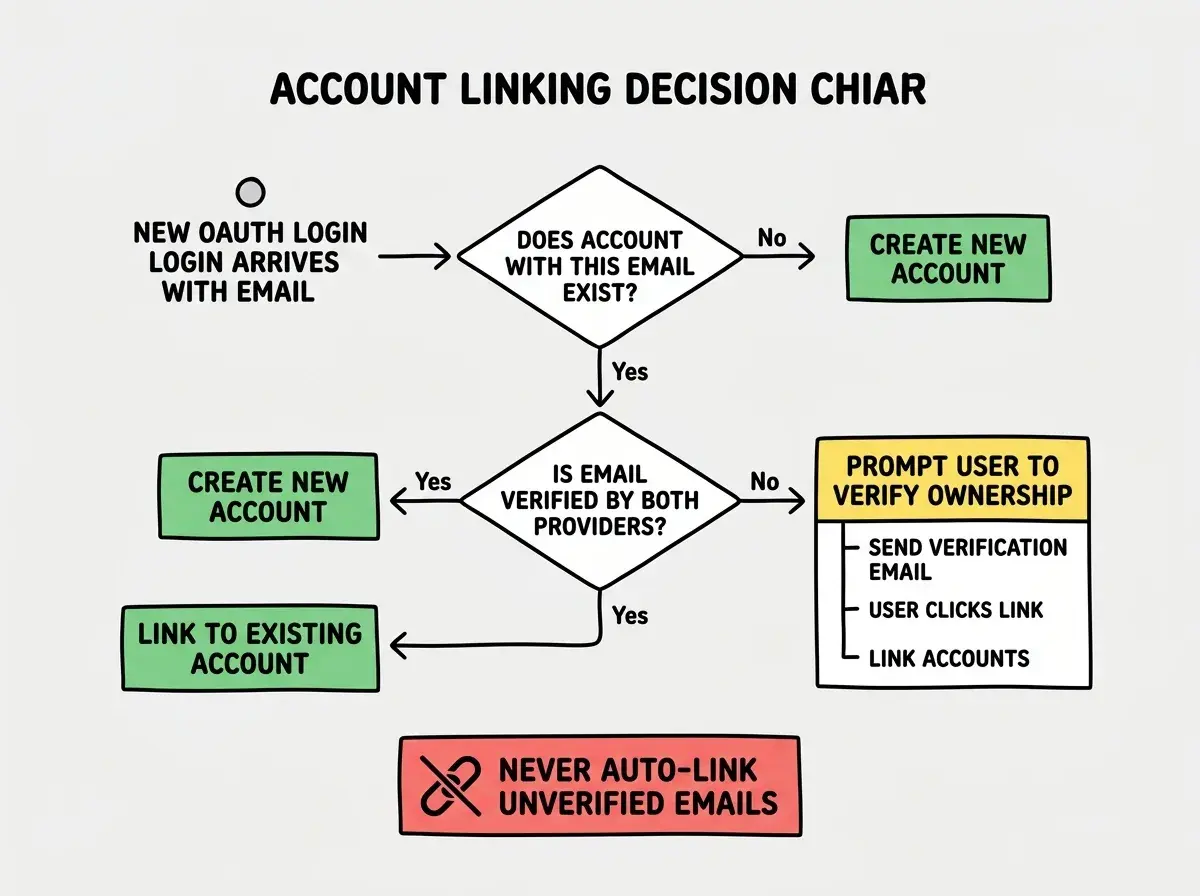
The Account Linking Problem Nobody Warns You About
Here is the scenario that breaks most AI-generated OAuth implementations. A user signs up with Google using jane@gmail.com. A week later, they click "Sign in with GitHub," and their GitHub account also uses jane@gmail.com. Should your application create a second account or link the two providers to the same account?
If you create a second account, the user loses access to all their data from the first account. If you automatically link based on email, an attacker who controls a GitHub account with a stolen email could gain access to the victim's Google-linked account. Neither option is safe by default.
The standard approach is to auto-link only if the email is verified by both providers. Google and Apple always verify emails. GitHub provides a verified boolean on each email. If both providers have verified the same email, it is reasonably safe to link automatically. If either is unverified, require the user to prove ownership before linking. AI tools almost never implement this logic, creating duplicate accounts constantly.
Auto-linking OAuth accounts by email without checking verification status is an account takeover vulnerability. An attacker can create an account on a provider using someone else's unverified email, then sign into your app to access the victim's data. Always check that both the existing and new provider emails are verified before auto-linking.
The decision tree for account linking is straightforward once you see it laid out, but AI tools almost never generate this logic.
Token Storage and Session Management
Once the OAuth flow completes, you have user information and an access token from the provider. The provider's access token is for calling the provider's API. It is not for authenticating the user to your application. This distinction is fundamental and frequently confused.
Your application should create its own session after OAuth completes. Store the provider's tokens in your database, associated with the user record. Issue your own session cookie (httpOnly, Secure, SameSite=Lax) that authenticates the user to your app. Do not pass the provider's access token back to the browser.
// After successful OAuth callback
const user = await findOrCreateUser({
  email: profile.email,
  provider: 'google',
  providerId: profile.sub,
})

// Create YOUR OWN session, not the provider's token
const sessionToken = crypto.randomUUID()
await storeSession(sessionToken, user.id, {
  expiresAt: new Date(Date.now() + 7 * 24 * 60 * 60 * 1000),
})

// Set httpOnly cookie with your session token
return new Response(null, {
  status: 302,
  headers: {
    Location: '/dashboard',
    'Set-Cookie': `session=${sessionToken}; HttpOnly; Secure; SameSite=Lax; Path=/; Max-Age=${7 * 24 * 60 * 60}`,
  },
})
This keeps your authentication self-contained. Provider tokens live in your database for future API calls, while your session cookie handles day-to-day auth.
Start with the fundamentals before diving into implementation details.
Read the beginner's guideWhen to Use an Auth Library Instead
If you have read this far and thought "this is a lot of moving parts," you are right. OAuth is a protocol with a large surface area, and each provider has quirks that take time to learn. For most developers building products, using an auth library is the pragmatic choice.
Auth.js (formerly NextAuth.js) handles Google, GitHub, and Apple with correct flows, state validation, and PKCE. Clerk and Supabase Auth provide managed OAuth with account linking built in. These libraries encode years of edge-case handling that neither you nor an AI tool will replicate quickly.
Use a library when authentication is a means to an end. Implement OAuth yourself when you need fine-grained control or want to deeply understand what your library does. The hotel analogy holds here. You can build your own keycard system from scratch, or buy a proven system from a vendor who has handled thousands of hotels. The question is whether building keycards is your core business or a feature of it.
OAuth is one piece of the authentication puzzle. Learn about password hashing, session management, and authorization.
Explore the full seriesThe best OAuth implementation is the one you actually validate. Whether you write it yourself or use a library, test every flow. Try signing in with each provider. Try the same email across providers. Try manipulating the callback URL parameters. The five minutes you spend testing will save you from the security incident that starts with "I can log in as any user."