Building REST APIs with AI assistance is how most backend code gets written now. 92% of developers use AI tools daily, and 46% of committed code is AI-generated. But here is the problem: AI is great at generating code fast, and terrible at generating code that follows conventions unless you tell it exactly what conventions to follow. Left to its own devices, an AI will give you an API that technically works but violates half the principles that make APIs maintainable.
Think of a REST API like a restaurant kitchen. Your frontend is the customer sitting at the table. The API is the waiter who takes orders from the customer and delivers food from the kitchen (your database and business logic). A good waiter does not make the customer walk into the kitchen to grab their own plate. A good waiter follows a consistent system so every customer gets the same reliable experience. That is exactly what a well-built REST API does.
This tutorial walks you through prompting AI to build a REST API that follows real-world best practices. Proper resource routes, input validation, structured error handling, and authentication. Not a toy. A production-grade foundation.
What Are the 4 Pillars of REST API
Before you prompt a single line of code, understand what makes an API "RESTful." These four pillars separate a clean API from a random collection of endpoints.
Resource-based URLs. Every endpoint represents a noun, not a verb. You request /users/42, not /getUser?id=42. Resources are the dishes on the menu. Each one has a name, and you order it by that name.
Standard HTTP methods. GET reads data. POST creates data. PUT replaces data. PATCH updates part of the data. DELETE removes data. These are the types of orders your waiter (the API) understands. You do not invent a new hand signal for every request.
Statelessness. Every request contains all the information needed to process it. The waiter does not remember your face from last Tuesday. Every time you sit down, you hand over your order and your table number. The server handles it fresh every time. This is what makes APIs scalable.
Consistent response format. Every response follows the same structure. Status codes tell the client what happened (200 for success, 404 for not found, 500 for server error). The response body always uses the same JSON shape. Customers should never guess what format the food arrives in.
When you prompt AI to build your API, explicitly state these pillars. Otherwise the AI will generate endpoints like POST /createUser and GET /fetchAllProducts, and you will spend hours refactoring.
The single most impactful thing you can do when building REST APIs with AI is to specify your route naming conventions, HTTP methods, and response format in the very first prompt. AI follows patterns. Give it the right pattern once, and every endpoint it generates afterward will be consistent. Skip this step, and you will fight inconsistency across every route.
Setting Up Your Project With the Right Foundation
Start by telling the AI exactly what stack you want and how you want it structured. Vague prompts produce vague architecture.
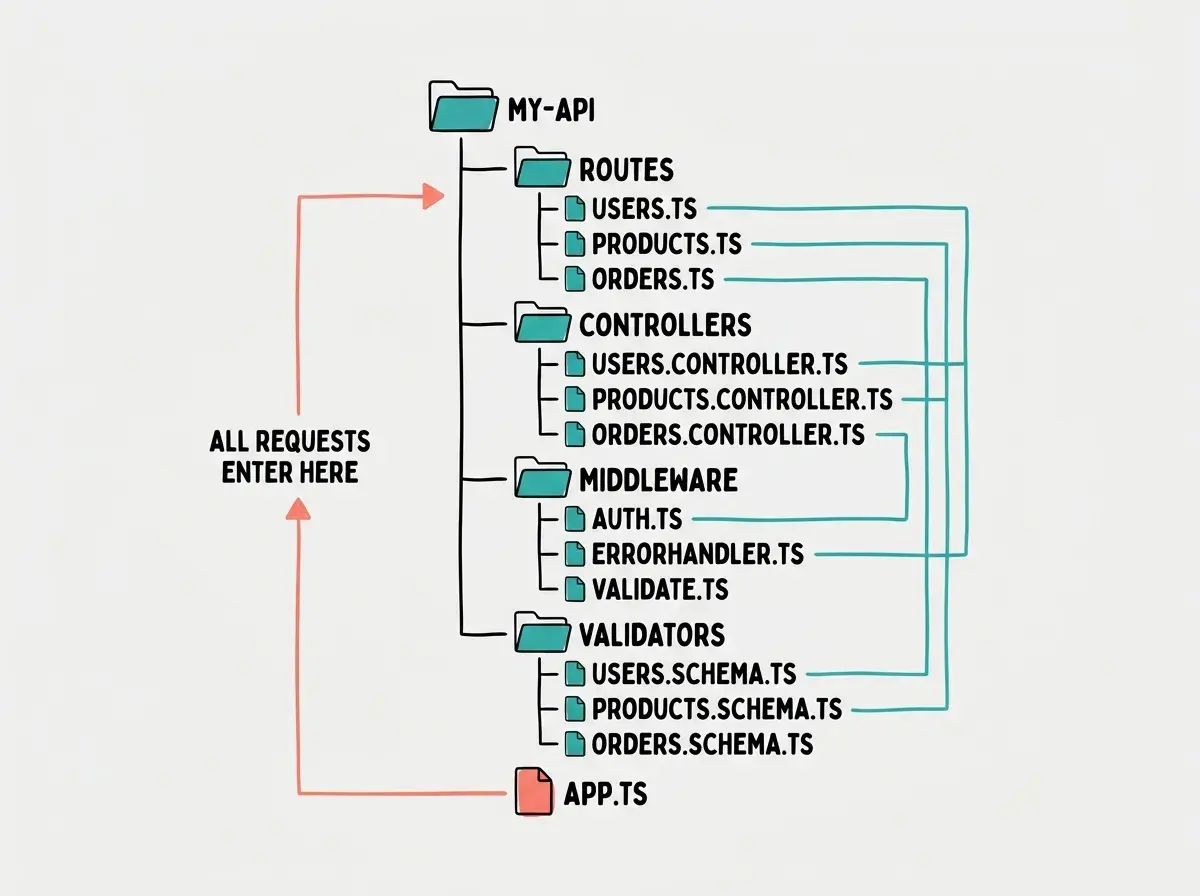
"Create a Node.js REST API using Express and TypeScript. Set up the project with the following structure: routes in /routes, controllers in /controllers, middleware in /middleware, and validation schemas in /validators. Use Zod for request validation. Use a consistent response wrapper that returns { success: boolean, data: any, error: string | null } for every endpoint. Set up CORS, JSON body parsing, and a global error handler."
This prompt does three things that matter. It specifies the folder structure so the AI does not dump everything into one file. It requires Zod for validation (not just "add validation"). And it defines the response wrapper upfront so every endpoint returns the same shape.
The AI will scaffold your project and set up the Express app with middleware. Review the entry point file carefully. Make sure the global error handler catches both synchronous exceptions and rejected promises. This is where most AI-generated APIs fall apart in production.
Building Your First Resource Endpoints
Now build a complete set of CRUD endpoints for a single resource. Going back to the restaurant analogy, this is like training your waiter to handle every type of order for one dish before adding the rest of the menu.
Prompt: "Create a /users resource with the following RESTful endpoints: GET /users (list all, with pagination via ?page and ?limit query params), GET /users/:id (get one), POST /users (create, requires name and email in body), PATCH /users/:id (update, all fields optional), DELETE /users/:id (remove). Use Zod schemas for validating request bodies and query parameters. Return 201 for successful creation, 200 for everything else, 404 when a user is not found, and 422 for validation errors."
This prompt is specific about status codes, which is critical. Without that specificity, AI will return 200 for everything, including resource creation (which should be 201) and validation failures (which should be 422).
Test each endpoint as the AI generates it. Send a POST request with missing required fields and verify you get a 422 with a clear error message. Send a GET for a non-existent user and verify you get a 404. Once the first resource works cleanly, adding more resources is fast because the AI will replicate the patterns you established.
Adding Validation That Actually Protects You
Validation is where AI-generated APIs go from "works in demos" to "works in production." Your Zod schemas are the kitchen's quality control. Every order gets inspected before the chef starts cooking.
Prompt: "Create Zod validation schemas for the users resource. The create schema requires name (string, 2-100 chars), email (valid email format), and role (enum: admin, user, viewer). The update schema makes all fields optional but validates any that are present. Create a validation middleware that takes a Zod schema and validates req.body, req.params, or req.query. On validation failure, return a 422 with the specific field errors."
The key detail is asking for specific field errors. A response that says "Validation failed" is useless. A response that says "email must be a valid email address" and "name must be at least 2 characters" tells the frontend exactly what to display. Your waiter should say "the steak needs a temperature preference," not just "the kitchen rejected your order."
Letting AI generate validation that only checks whether fields exist, not whether they contain valid data. AI defaults to simple required/optional checks and skips format validation, length constraints, and enum restrictions. Always specify exact constraints in your prompt. If you just say "validate the request body," you will get validation that accepts an email containing "asdf" and a name containing a single space.
Error Handling and Authentication Patterns
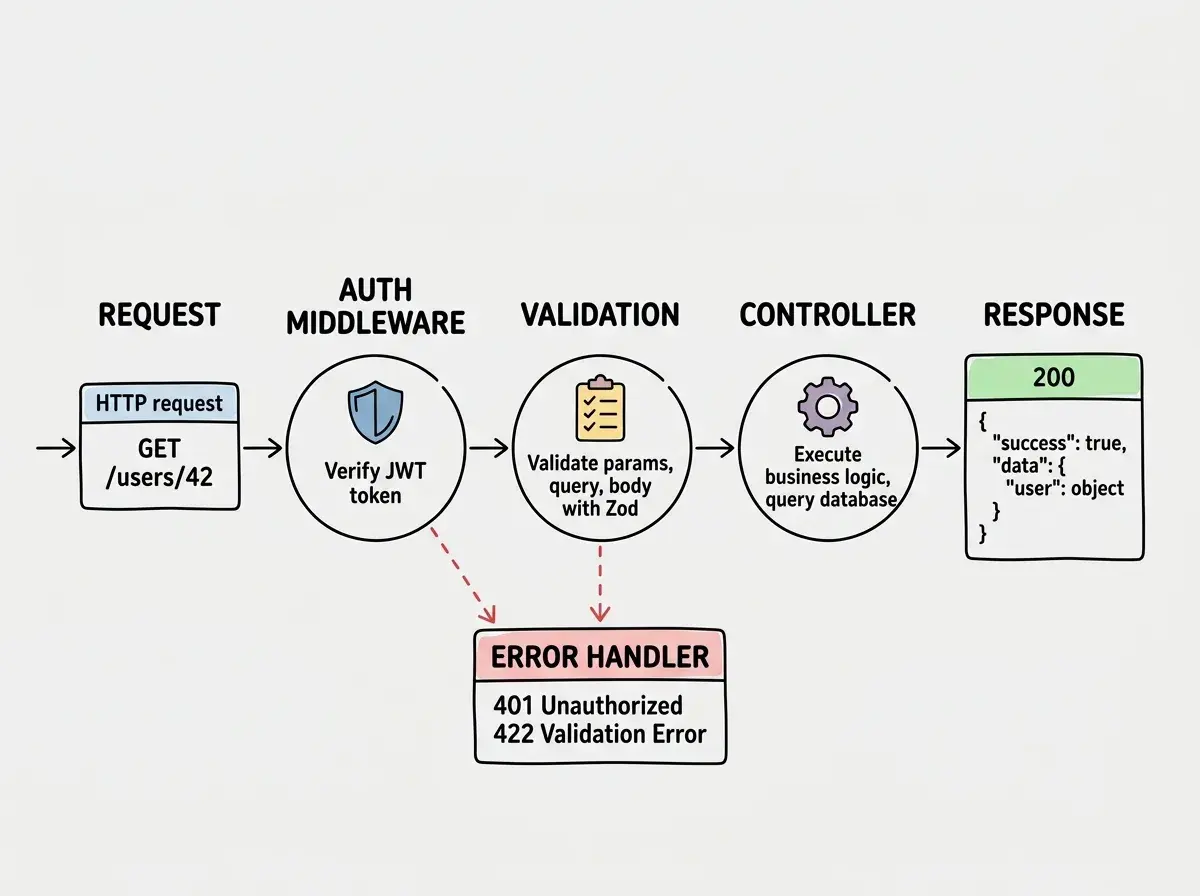
A clean API handles errors gracefully at every layer. Prompt: "Add structured error handling. Create custom error classes: NotFoundError (404), ValidationError (422), UnauthorizedError (401), and ForbiddenError (403). Each includes a status code and message. Update the global error handler to catch these and return the appropriate status code in the standard response wrapper. For unexpected errors, log the full error server-side but return a generic 500 to the client."
That last part is a security requirement. Leaking stack traces or database errors to the client is one of the most common vulnerabilities in AI-generated code. Your waiter tells the customer "we are out of that dish," not "the walk-in cooler compressor failed at 2:47 AM."
For authentication, JWT tokens are the standard. Prompt: "Add JWT authentication middleware. Create POST /auth/login that accepts email and password, returns an access token (15 min expiry) and refresh token (7 day expiry). Create POST /auth/refresh that accepts a refresh token and returns a new access token. Create auth middleware that verifies the JWT on protected routes and attaches the decoded user to req.user."
Test the authentication flow end-to-end. Log in, use the access token on a protected route, let it expire, refresh it, and verify the new token works.
Testing Your API Before It Ships
Testing is the step most tutorials skip and most AI-generated APIs lack entirely. Prompt: "Write integration tests for the users resource using Vitest and Supertest. Test creating a user with valid data returns 201, creating with missing fields returns 422, getting by ID returns the correct user, getting a non-existent user returns 404, and deleting returns 200 with subsequent GET returning 404. Set up a test database that seeds before each suite and cleans up after."
Run the tests, fix anything that fails, then add tests for authentication and authorization. A tested API is one you can refactor with confidence.
Build your foundation with the concepts that make everything else click.
Start with the basicsDeploying and Documenting Your API
Your API works locally. Now deploy it. Prompt: "Create a Dockerfile for this Express API using a multi-stage build with node:20-alpine. Copy only compiled TypeScript output and production dependencies into the final image. Expose port 3000. Add a health check endpoint at GET /health that returns 200."
For documentation, prompt: "Generate an OpenAPI 3.0 specification for all endpoints. Include request body schemas, response schemas, query parameter descriptions, and authentication requirements. Serve the Swagger UI at /docs using swagger-ui-express." This gives every frontend developer who consumes your API an interactive reference without reading source code.
Explore complete project tutorials you can build in a weekend with AI.
Browse build tutorialsWhat This Means For You
You just built a production-grade REST API with proper routes, validation, error handling, authentication, tests, and documentation.
- If you are a senior dev integrating AI into your workflow: You now have a repeatable prompting pattern. Specify conventions first, build one resource completely, then replicate. The AI becomes dramatically more useful when you front-load the architectural decisions.
- If you are a student learning backend development: You have a working API that demonstrates every concept your coursework covers, built in hours instead of weeks. More importantly, you understand why each piece exists, not just that a tutorial told you to add it.
The restaurant kitchen is built. The waiter knows the menu, handles every type of order, and delivers consistent results. Now add new dishes, train new staff, and open for business.