Testing payment integrations safely means running every billing scenario (success, decline, subscription lifecycle, webhook delivery) against Stripe's sandbox environment before a single real card number ever touches your server. Get this right and you ship payment features with the same confidence as any other feature. Skip it and you find out about broken billing logic from angry customers.
Most developers treat payment testing as an afterthought. They manually click through checkout once, see money move in the Stripe dashboard, and call it done. That works until a card gets declined, a subscription renews at the wrong price, or a webhook fires and your fulfillment logic silently fails. By then, the damage is done.
This tutorial walks through how to test Stripe integrations properly: from setting up your test environment and running every payment scenario to automating the whole thing in CI. The patterns apply to any Stripe-powered product, from a simple one-time charge to a multi-tier subscription with metered billing.
Why Payment Testing Terrifies Developers
Payment code sits at the intersection of two fears: breaking something that touches real money, and the paranoia that any test might accidentally charge someone. Both fears are reasonable. Both are solved by Stripe's test mode.
The actual barrier is that payment flows have more failure branches than almost any other feature. A user submits a card. That card might be declined for insufficient funds, flagged as stolen, expired, or blocked by the issuer. If the charge succeeds, a webhook fires to your server. That webhook might arrive out of order, arrive twice, or not arrive at all if your endpoint was briefly down. If the payment is for a subscription, the lifecycle continues for months: renewals, upgrades, downgrades, cancellations, failed renewal retries.
Testing all of this manually, before every deploy, is not realistic. That is why most teams do not do it. And that is why billing bugs make it to production more often than bugs in almost any other system.
The fix is a proper test environment plus a suite of automated checks you can run in CI. Stripe provides everything needed. Most teams just never set it up.
Setting Up Stripe Test Mode
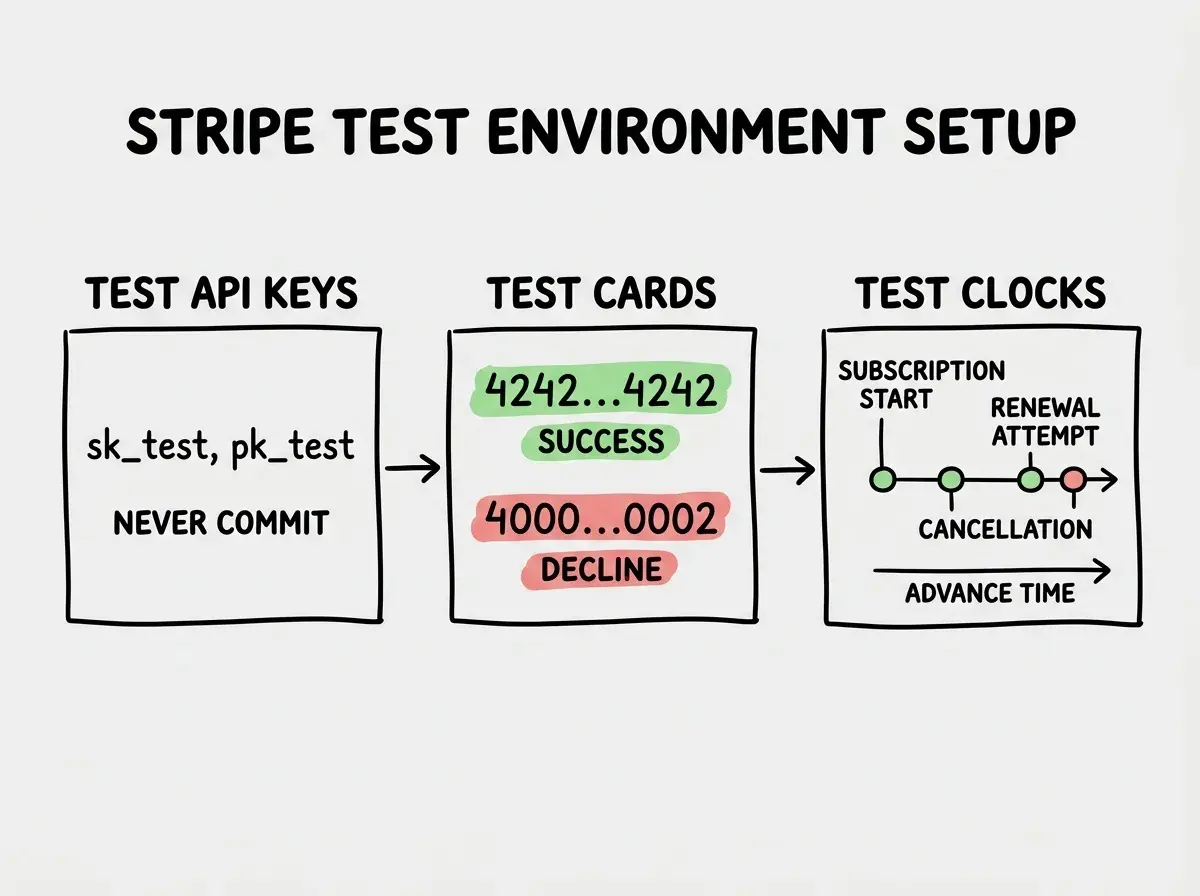
Stripe gives every account two parallel sets of API keys: live keys (prefix sk_live_ and pk_live_) and test keys (prefix sk_test_ and pk_test_). Test mode is completely isolated. Charges in test mode never move real money. Test customers, subscriptions, and invoices are separate from live data.
Start by grabbing your test keys from the Stripe Dashboard. Go to Developers > API keys and copy the test secret key into your local .env:
STRIPE_SECRET_KEY=sk_test_your_key_here
STRIPE_PUBLISHABLE_KEY=pk_test_your_key_here
STRIPE_WEBHOOK_SECRET=whsec_your_webhook_secret
Never commit these to your repository. Add .env to .gitignore if you have not already.
Stripe provides a set of test card numbers that trigger specific behaviors. Memorize the two you will use constantly:
4242 4242 4242 4242triggers a successful charge. Use any future expiry date and any 3-digit CVC.4000 0000 0000 0002triggers a generic card decline. Useful for testing how your UI handles payment failures.
There is a full list of test cards in the Stripe docs covering specific decline codes (insufficient funds, stolen card, expired card), 3D Secure authentication, and cards that require additional confirmation steps. For most testing, 4242 and 0002 cover the cases that matter most.
The third piece of setup is test clocks. Stripe test clocks let you simulate the passage of time in test mode. You create a test clock, attach a subscription to it, and then advance the clock by days or months to see how renewals, dunning, and cancellations behave. This is the only reliable way to test subscription lifecycle without waiting for real time to pass. Create one in the Stripe Dashboard under Billing > Test clocks.
Testing Common Payment Scenarios
With test mode configured, work through each scenario systematically. Do not test only the happy path.
Successful charge. Submit 4242 4242 4242 4242 through your checkout form. Confirm the charge appears in your Stripe test dashboard. Confirm your database (or wherever you track payment status) updates correctly. Confirm the user gets the expected confirmation email or UI feedback.
Declined card. Submit 4000 0000 0000 0002. Confirm your frontend shows a helpful error message (not a generic "something went wrong"). Confirm no record is created in your database for a failed charge. This is the test most developers skip, and it is where users abandon checkout permanently.
Subscription lifecycle. Create a subscription using a test card and a test clock. Advance the clock to just before the renewal date. Confirm a renewal invoice is created. Advance past the renewal date. Confirm the charge succeeds and the subscription period updates. Then test a failed renewal: switch the card to a test card that declines on future charges (4000 0000 0000 0341) and advance the clock again. Confirm your dunning logic fires.
Webhooks. This is the piece most teams get wrong. Payment logic that depends on webhook events (fulfilling an order on payment_intent.succeeded, downgrading access on customer.subscription.deleted) needs to be tested against real webhook payloads, not mocked HTTP calls. The Stripe CLI makes this straightforward, covered in the next section.
Test the decline scenario before you test the success scenario. Your success path probably works because you built it. Your decline path was probably an afterthought. If a user sees a confusing error message or gets charged despite a decline, they leave and do not come back. The 4000 0000 0000 0002 test card takes sixty seconds to use and tells you exactly how your app behaves when payment fails.
For webhook testing, a common mistake is writing unit tests that mock the HTTP request object with a hardcoded payload. This works until Stripe changes the event schema, or until you realize your test was calling the handler directly and bypassing the signature verification middleware that protects against spoofed requests. Test with real webhook events against a running server instead.
Automated Payment Testing in CI
Manual testing catches bugs before launch. Automated testing catches bugs before every merge. The Stripe CLI enables both webhook forwarding for local development and fixture-based testing that runs in CI without a browser.
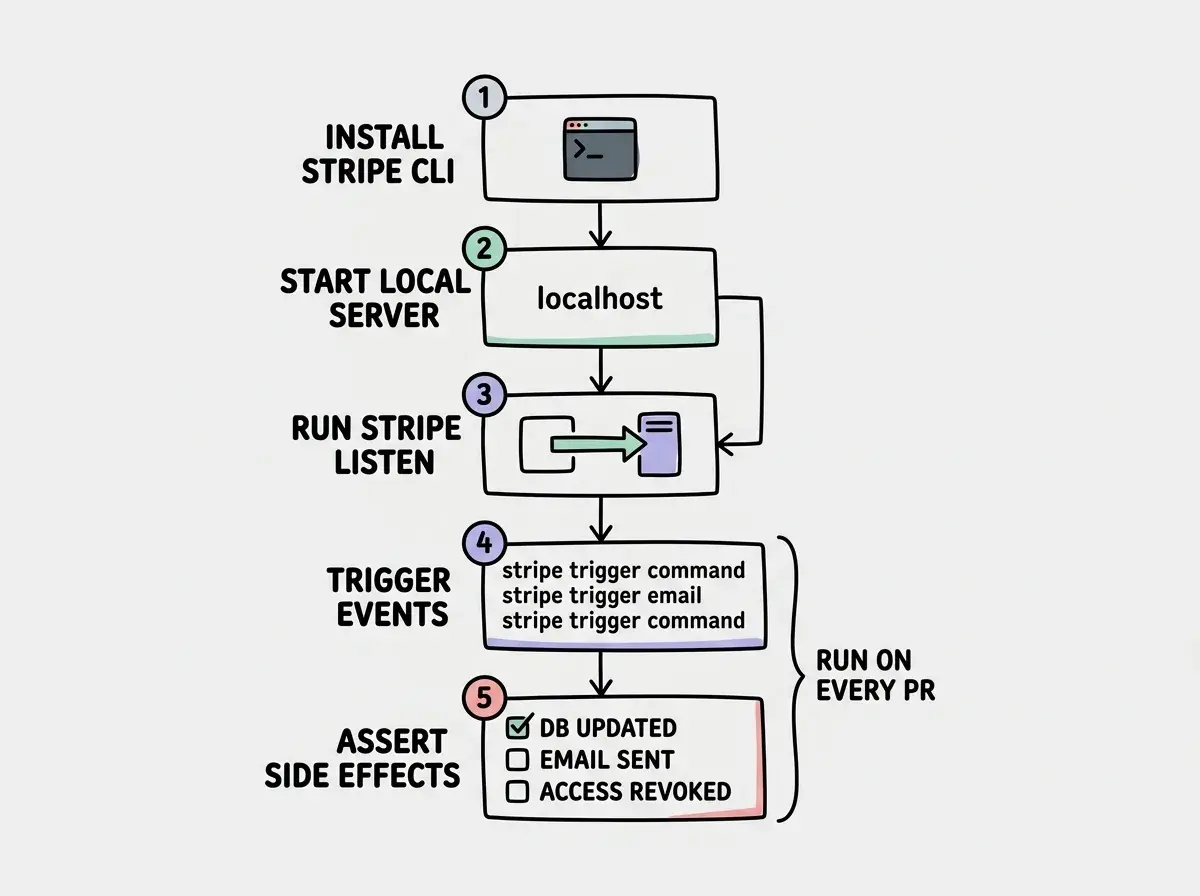
Install the Stripe CLI and authenticate it once:
brew install stripe/stripe-cli/stripe
stripe login
For local development, forward webhook events to your running server:
stripe listen --forward-to localhost:3000/api/webhooks/stripe
The CLI prints a webhook signing secret (starts with whsec_). Copy that into your .env as STRIPE_WEBHOOK_SECRET. Every event Stripe sends in test mode will now forward to your local endpoint, and your signature verification middleware will accept it.
For CI, the Stripe CLI supports fixtures: JSON files that describe a sequence of API calls to replay. Create a file at stripe/fixtures/checkout.json describing the objects you need for your test, then trigger it with stripe fixtures trigger:
stripe fixtures trigger stripe/fixtures/checkout.json
Combine this with your test suite to run end-to-end payment flows in a CI pipeline without a Stripe account token exposed to every developer. Your CI environment gets a restricted test key with read-only access; the fixture runner uses a separate key with write access scoped to test mode.
For webhook event testing specifically, the CLI can trigger any event type directly:
stripe trigger payment_intent.succeeded
stripe trigger customer.subscription.deleted
stripe trigger invoice.payment_failed
These commands send a real event (with a real signature) to your --forward-to endpoint. Write one test per webhook event type your application handles, fire the event with the CLI, and assert that your handler produced the expected side effects (database update, email sent, access revoked).
Running stripe listen in CI and expecting it to stay connected while your test suite runs. The listener is a long-running process; your test runner is not. The reliable pattern is to run stripe listen as a background process in your CI job (most CI systems support this with & or a dedicated service container), give it two to three seconds to establish the connection, then run your tests, then kill the listener. Without the startup delay, your first trigger command fires before the forwarding tunnel is ready and the event goes nowhere.
One more pattern worth implementing: keep a stripe/fixtures/ directory in your repository and commit fixture files for every major billing scenario. New team members can run stripe fixtures trigger to seed their local environment without needing to manually create test customers, products, and prices in the Stripe dashboard. It also makes your test setup self-documenting.
What This Means For You
The tooling covered here solves different problems depending on where you are in your career.
-
If you are a senior dev or tech lead: Stripe CLI fixtures plus
stripe triggerbelong in your CI pipeline the same way database migrations and lint checks do. The cost of adding them is an afternoon. The cost of shipping broken billing logic is a support escalation, a refund cycle, and a conversation about why this was not caught in testing. Set up the pipeline once and it pays for itself on the first deploy it catches. -
If you are an indie hacker: You are shipping fast, probably alone, and you do not have the luxury of a QA engineer. Test mode and test clocks are your QA engineer. Running through the six scenarios above (success, decline, subscription creation, renewal, failed renewal, cancellation) before you launch takes twenty minutes and gives you confidence that no user will be charged incorrectly or locked out of something they paid for. That confidence is worth more than any feature you could ship in that same twenty minutes.
-
If you are a student or early-career developer: Payment integrations show up on nearly every product that charges money, which is most products eventually. Understanding how to test them properly puts you ahead of developers who only tested the happy path. Add a
stripe/fixtures/directory to your next project, commit it, and reference it in your next technical interview as an example of how you approach testing non-trivial integrations.
Payment bugs are uniquely painful: they affect the thing users care most about (their money) and create the most distrust in a product. Stripe gave you the tools to prevent them. The test cards, test clocks, and Stripe CLI are free, they work in minutes, and they cover scenarios that would take days to reproduce manually. There is no good reason to ship without them.
Check the deployment fundamentals before you go live with real payments.
See the deployment checklistThe path from "I wired up Stripe" to "I have confidence in my billing system" is not long. Set up test mode, run the six scenarios, add stripe listen to your CI pipeline, and commit your fixture files. That is the whole job.
Get the complete guide to shipping reliable, production-ready features.
Browse all tutorials