Payment integration is the feature that looks finished until real money is involved. You paste in the Stripe API key, the test charge goes through, and the dashboard turns green. Then you ship, and users start reporting failed charges with no error message. Or their subscription is active on their end but your database says otherwise. Or mobile users in Europe get a blank screen where the payment form should be.
This is the gap between happy-path payment code and production-ready payment code, and it runs deep in AI-built apps. 92% of US developers use AI coding tools daily. AI handles the straightforward Stripe integration confidently: create a PaymentIntent, mount the card element, confirm the payment. What it skips is everything that happens at the edges. Webhook signature verification, idempotency keys, 3D Secure redirect flows, and the dozen ways a card decline can play out. Each of those gaps is a potential revenue leak you will not notice until a user tells you.
This guide covers the four main failure modes in Stripe integrations and how to trace each one.
Why Does My Stripe Payment Keep Failing
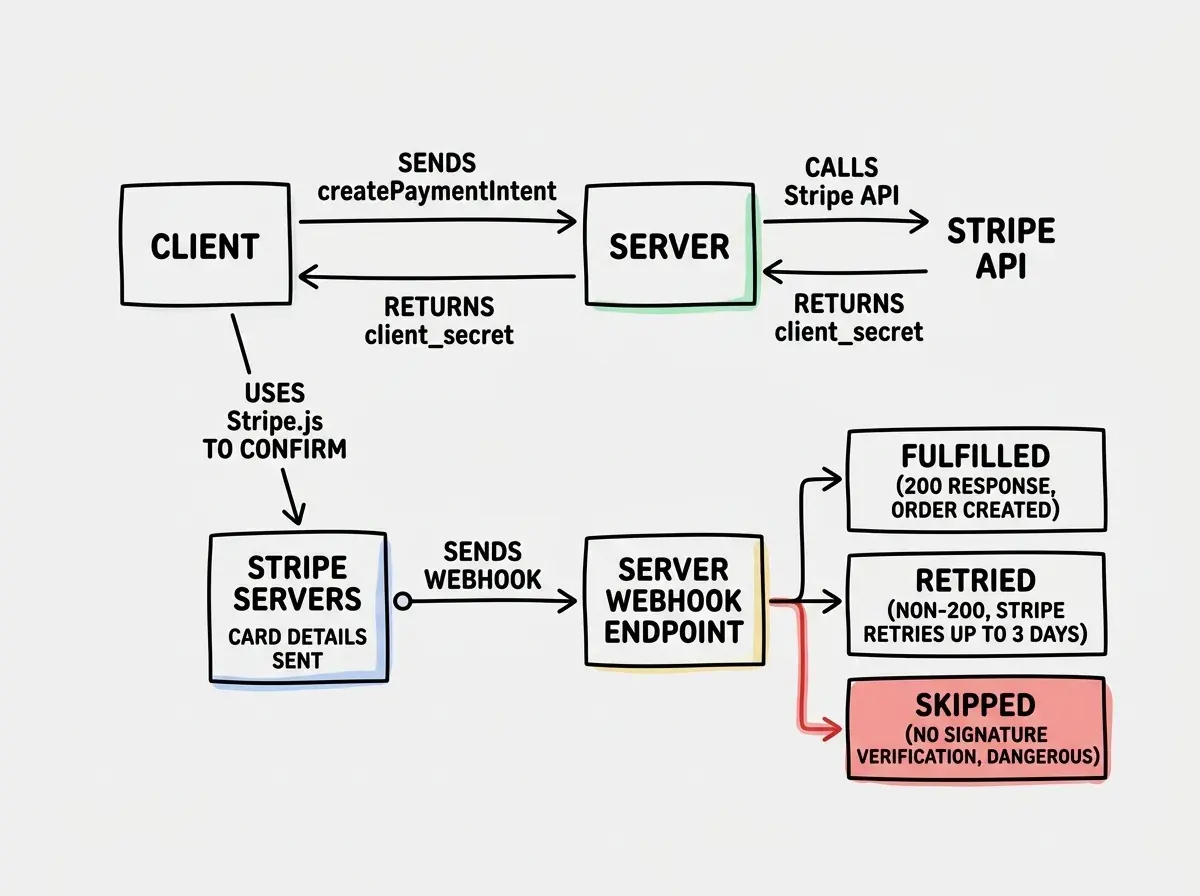
The most common reason a charge appears to succeed but nothing actually happens is missing or broken webhook handling. Stripe does not finalize payment status synchronously on your server. You create a PaymentIntent, the client confirms it, and then Stripe sends a webhook event to tell your server the payment actually completed. If that webhook is not received, verified, and processed correctly, your fulfillment logic never runs.
AI-generated webhook handlers have two consistent problems. First, they skip the signature verification step. Second, they do not return a 200 response fast enough, causing Stripe to retry the webhook indefinitely.
Signature verification exists because anyone can POST to your webhook endpoint. Stripe signs every event with your webhook secret, and you verify that signature before processing the payload. Without this, a malicious request could trigger fulfillment without a real payment.
// What AI typically generates (dangerous)
export async function POST(request: Request) {
  const payload = await request.json();

  if (payload.type === "payment_intent.succeeded") {
    await fulfillOrder(payload.data.object);
  }

  return Response.json({ received: true });
}

// What you actually need
import Stripe from "stripe";

const stripe = new Stripe(process.env.STRIPE_SECRET_KEY!);
const webhookSecret = process.env.STRIPE_WEBHOOK_SECRET!;

export async function POST(request: Request) {
  const body = await request.text(); // Must be raw text, not parsed JSON
  const signature = request.headers.get("stripe-signature")!;

  let event: Stripe.Event;

  try {
    event = stripe.webhooks.constructEvent(body, signature, webhookSecret);
  } catch (err) {
    console.error("Webhook signature verification failed:", err);
    return new Response("Webhook signature verification failed", { status: 400 });
  }

  if (event.type === "payment_intent.succeeded") {
    const paymentIntent = event.data.object as Stripe.PaymentIntent;
    await fulfillOrder(paymentIntent);
  }

  return Response.json({ received: true });
}
The raw body issue is subtle but critical. If you parse the request as JSON before passing it to constructEvent, the signature check will fail even with a legitimate Stripe event. The verification requires the exact raw bytes Stripe sent.
Get your webhook secret by running stripe listen --forward-to localhost:3000/api/webhooks/stripe with the Stripe CLI. The CLI prints a whsec_ secret for local testing. Your production webhook secret comes from the Stripe dashboard under Developers > Webhooks > your endpoint.
Is There a Problem With Stripe Payments Today
When payments fail and you cannot reproduce it, the first place to look is the Stripe dashboard, not your code. Stripe logs every API call and every event, and the logs tell you whether the problem is on Stripe's side, on your server, or in your client code.
Go to Stripe Dashboard > Developers > Events. Find the event matching the failed payment. The event detail shows you exactly what happened: whether the PaymentIntent was created, whether it was confirmed, what the final status is, and whether your webhook endpoint received and acknowledged the event.
If the webhook shows a failed delivery (red X instead of green checkmark), click through to see the HTTP response your server returned. A 400 or 500 response means Stripe got through to your server but your handler rejected it or crashed. A connection error means your server was not reachable.
For card declines, the event log shows the exact decline code. Stripe provides over 20 specific decline codes:
// Handling specific decline codes
if (event.type === "payment_intent.payment_failed") {
  const paymentIntent = event.data.object as Stripe.PaymentIntent;
  const lastError = paymentIntent.last_payment_error;

  console.error("Payment failed:", {
    paymentIntentId: paymentIntent.id,
    code: lastError?.code,           // "card_declined", "insufficient_funds", etc.
    declineCode: lastError?.decline_code, // "do_not_honor", "insufficient_funds"
    message: lastError?.message,
  });

  // Show the right message to the user based on the code
  if (lastError?.code === "card_declined") {
    if (lastError.decline_code === "insufficient_funds") {
      // Tell user their card has insufficient funds
    } else {
      // Tell user to contact their bank or use a different card
    }
  }
}
The decline code distinction matters because the user action is different. Insufficient funds means try a different card. Do-not-honor usually means the bank blocked it as suspicious and the user needs to call their bank. Generic "card declined" means try another card. AI-generated code collapses all of these into a single "payment failed" message, which frustrates users who could have fixed the issue easily.
Idempotency and Duplicate Charges
Idempotency is the payment problem that only shows up under specific conditions: a network timeout between your server and Stripe, or a user double-clicking the submit button. Without idempotency keys, retrying a failed request creates a duplicate charge.
Stripe supports idempotency keys on all write operations. You pass a unique key with each request, and Stripe guarantees that two requests with the same key produce the same result without creating duplicate records.
// Creating a PaymentIntent with an idempotency key
const idempotencyKey = `pi_${userId}_${orderId}_${Date.now()}`;

const paymentIntent = await stripe.paymentIntents.create(
  {
    amount: orderTotal,
    currency: "usd",
    customer: stripeCustomerId,
    metadata: {
      orderId,
      userId,
    },
  },
  {
    idempotencyKey,
  }
);
The key needs to be stable across retries for the same logical operation. Using ${userId}_${orderId} without a timestamp means you can safely retry the same order creation without creating duplicates. Adding a timestamp means every retry is treated as a new request, defeating the purpose.
On the client side, disable the submit button after the first click to prevent double submission while the payment is processing. This is the simplest fix and AI tools consistently skip it.
// Client-side: prevent double submission
const [isSubmitting, setIsSubmitting] = useState(false);

async function handleSubmit(event: React.FormEvent) {
  event.preventDefault();

  if (isSubmitting) return; // Guard against double submission
  setIsSubmitting(true);

  try {
    const result = await stripe.confirmCardPayment(clientSecret, {
      payment_method: { card: cardElement },
    });

    if (result.error) {
      setError(result.error.message);
    } else {
      // Payment succeeded
    }
  } finally {
    setIsSubmitting(false);
  }
}
When debugging Stripe payment failures, check the Stripe dashboard event log before touching your code. The event detail shows you exactly what happened at each step: whether the PaymentIntent was created, whether your webhook received and acknowledged the event, and what the exact decline code was. Most debugging problems become obvious once you see the full event trace rather than guessing from client-side errors.
Debugging 3D Secure and Authentication Flows
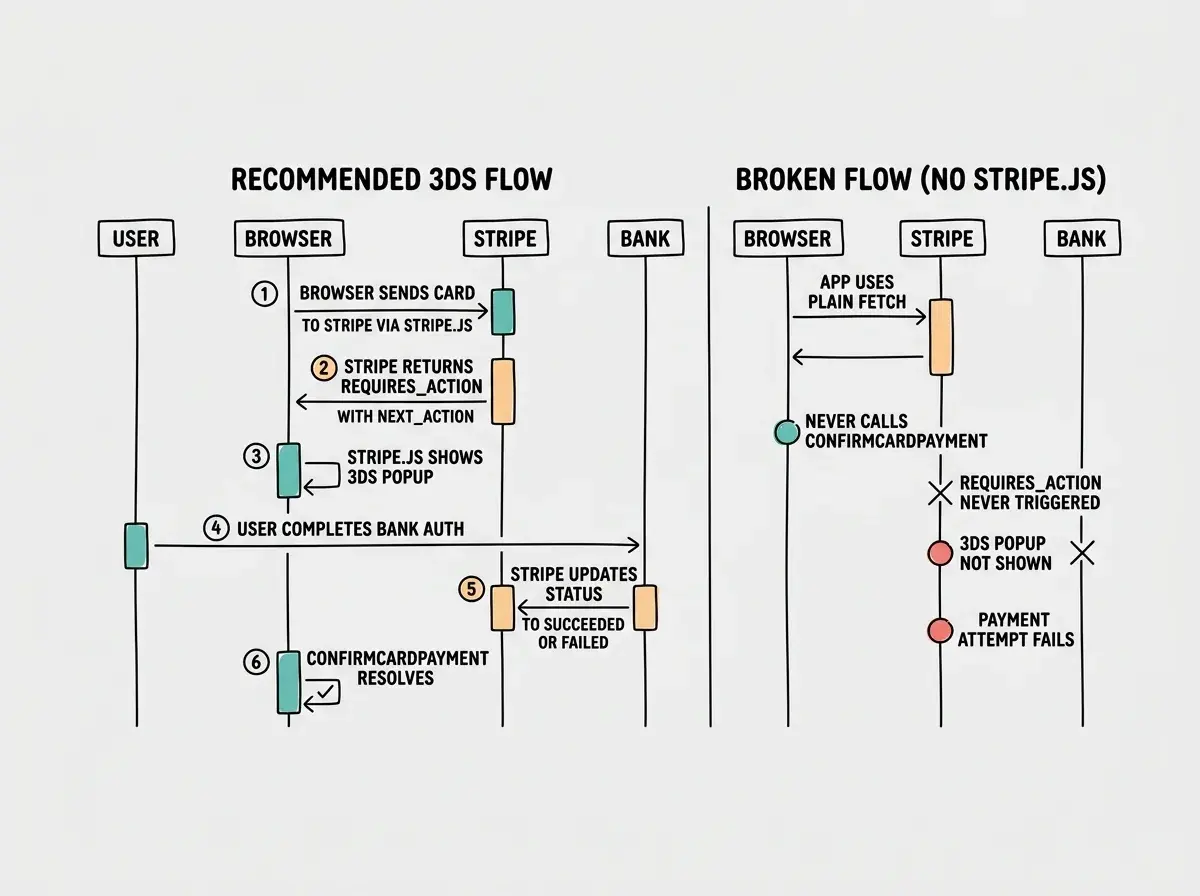
3D Secure (3DS) is the step where users see a bank authentication popup or redirect during payment. European cards (SCA regulation) require it frequently. Some US bank-issued cards trigger it too. When 3DS is required and your integration does not handle the redirect, the payment silently fails.
The specific failure looks like this: the user submits their card, the PaymentIntent is created with status requires_action, your code does not handle requires_action, so nothing happens. The user sees a spinning button or a blank screen. The PaymentIntent expires after 24 hours.
// AI-generated code that breaks on 3DS
const result = await stripe.confirmCardPayment(clientSecret, {
  payment_method: { card: cardElement },
});

// Only checks for errors, ignores requires_action
if (result.error) {
  setError(result.error.message);
} else {
  // Assumes success here, but payment might need 3DS
  onSuccess();
}

// What you actually need
const result = await stripe.confirmCardPayment(clientSecret, {
  payment_method: { card: cardElement },
});

if (result.error) {
  // Card was declined or other error
  setError(result.error.message ?? "Payment failed");
} else if (result.paymentIntent.status === "requires_action") {
  // 3DS required - Stripe.js handles the popup/redirect automatically
  // when using confirmCardPayment, but you need to handle the case
  // where the user cancels or fails 3DS
  setError("Additional verification required. Please complete the authentication step.");
} else if (result.paymentIntent.status === "succeeded") {
  onSuccess();
} else {
  // Handle other statuses: requires_payment_method, processing
  console.log("Unexpected payment status:", result.paymentIntent.status);
}
The good news is that when you use stripe.confirmCardPayment() from Stripe.js (not a manual API call), Stripe handles the 3DS flow automatically. It shows the authentication modal and resolves the promise once authentication is complete. The problem is that AI-generated code often does not handle the resolution correctly.
To test 3DS flows without real cards, use Stripe's test card numbers. 4000002500003155 always requires 3DS authentication. 4000002760003184 simulates a 3DS failure. Run these through your checkout before shipping to any real users.
# Stripe CLI: listen for events and forward to local server
stripe listen --forward-to localhost:3000/api/webhooks/stripe

# Trigger a test event to verify your webhook handler
stripe trigger payment_intent.succeeded

# Tail events in real time during testing
stripe events tail
Webhook Reliability and Error Recovery
Webhooks fail. Your server might be down during a deployment. A database write inside your webhook handler might time out. Stripe retries failed webhooks for up to 72 hours with exponential backoff, which means your handler needs to be idempotent too.
If your fulfillment logic runs twice for the same payment_intent.succeeded event, you should not create two orders or send two welcome emails.
// Idempotent webhook handler
export async function POST(request: Request) {
  const body = await request.text();
  const signature = request.headers.get("stripe-signature")!;

  let event: Stripe.Event;

  try {
    event = stripe.webhooks.constructEvent(body, signature, webhookSecret);
  } catch (err) {
    return new Response("Signature verification failed", { status: 400 });
  }

  if (event.type === "payment_intent.succeeded") {
    const paymentIntent = event.data.object as Stripe.PaymentIntent;

    // Check if we already processed this event
    const existing = await db.query.orders.findFirst({
      where: eq(orders.stripePaymentIntentId, paymentIntent.id),
    });

    if (existing) {
      // Already processed, return 200 so Stripe stops retrying
      return Response.json({ received: true, skipped: "duplicate" });
    }

    await fulfillOrder(paymentIntent);
  }

  return Response.json({ received: true });
}
The important detail is returning 200 even when you skip a duplicate event. If you return a non-200 status, Stripe will keep retrying, and eventually the retry will land on a server where the record has not been written yet (due to replication lag or a crash between writes) and you will get double fulfillment anyway.
AI tools almost always generate webhook handlers that parse the request body as JSON using request.json(). Stripe's signature verification requires the raw request body as a string. Parsing to JSON first changes the byte representation and causes constructEvent to throw a signature verification error on every legitimate webhook event. Use request.text() and pass the raw string to constructEvent.
A Debugging Workflow for Payment Failures
When a user reports a payment problem, work through these steps before changing anything.
Open the Stripe dashboard and search for the user's email or the payment amount in the Customers or Payments section. Find the PaymentIntent and check its status. Note the exact decline code if it was declined. Check the event timeline to see what events fired and when.
Look at the webhook delivery log for that event. Confirm your endpoint received it and returned 200. If it returned an error, check your server logs for that timestamp to find the exception.
Run stripe listen locally and replay the event from the dashboard against your local server. This lets you step through your webhook handler with the actual event data rather than guessing.
Check for the raw body issue if signature verification is failing. Add a log line that prints body.length before the constructEvent call. If it is 0 or the body is already an object, you have the parsing problem.
Test the 3DS flow with 4000002500003155 if users on European cards are failing. If that card reproduces the issue, your confirmCardPayment result handling is incomplete.
What This Means For You
Stripe's happy path is genuinely easy. AI tools generate working checkout code in a few minutes. The problems show up in the operational layer: webhook verification, idempotency, 3DS handling, and decline code granularity. Each gap is a revenue leak that only surfaces under specific conditions, which is why AI-generated payment code can pass testing and still fail in production.
The fixes are not complex. Each one is a targeted change to a specific part of the integration. Raw body for signature verification. Idempotency keys on PaymentIntent creation. Status checks after confirmCardPayment. A duplicate check at the start of your webhook handler. Work through them in order and your payment integration becomes as reliable as the happy path always appeared to be.
Make sure Stripe is set up correctly before you charge your first real user.
See the payments integration guidePayment bugs are expensive in two ways: directly when charges fail, and indirectly when users lose trust and do not try again. Getting the integration right means understanding what Stripe actually does after confirmCardPayment returns, not just what it does in the success case. The Stripe CLI and the dashboard event logs give you everything you need to trace any failure. Use them before you change a single line of code.
A quick check now is cheaper than debugging a production payment failure later.
Read the pre-launch checklist