Every app you build needs a backend. It needs somewhere to store user data, a way to handle logins, and a place to keep uploaded files. Traditionally, that meant stitching together three or four separate services, writing glue code between them, and praying nothing broke when you changed one piece. Supabase flips that model on its head.
Think of Supabase as a Swiss Army knife for your backend. A Swiss Army knife gives you a blade, a screwdriver, a bottle opener, and a pair of scissors in one compact package. Supabase gives you a PostgreSQL database, authentication, file storage, and real-time subscriptions in one dashboard. You open the tool you need, use it, and everything stays connected because it was designed to work together from the start. No glue code. No prayer.
92% of developers now use AI coding tools daily, and the most common thing those tools generate is frontend code that needs a backend to talk to. This Supabase tutorial walks you through setting up all three core pieces from scratch so your AI-built app has a real, production-ready backend behind it.
Create Your Supabase Project
Head to supabase.com and create a free account. Click "New Project," give it a name, choose a strong database password (save this somewhere safe), and pick the region closest to your users. Supabase spins up a full PostgreSQL database, an auth server, and a storage bucket system in about two minutes.
Once the project is ready, go to Settings then API. You will see two keys. The anon key is public and safe to use in client-side code. The service_role key is secret and should never leave your server. Copy both and store them in your environment variables.
Install the Supabase client library in your project:
npm install @supabase/supabase-js
Then initialize the client:
import { createClient } from '@supabase/supabase-js'

const supabase = createClient(
  process.env.NEXT_PUBLIC_SUPABASE_URL!,
  process.env.NEXT_PUBLIC_SUPABASE_ANON_KEY!
)
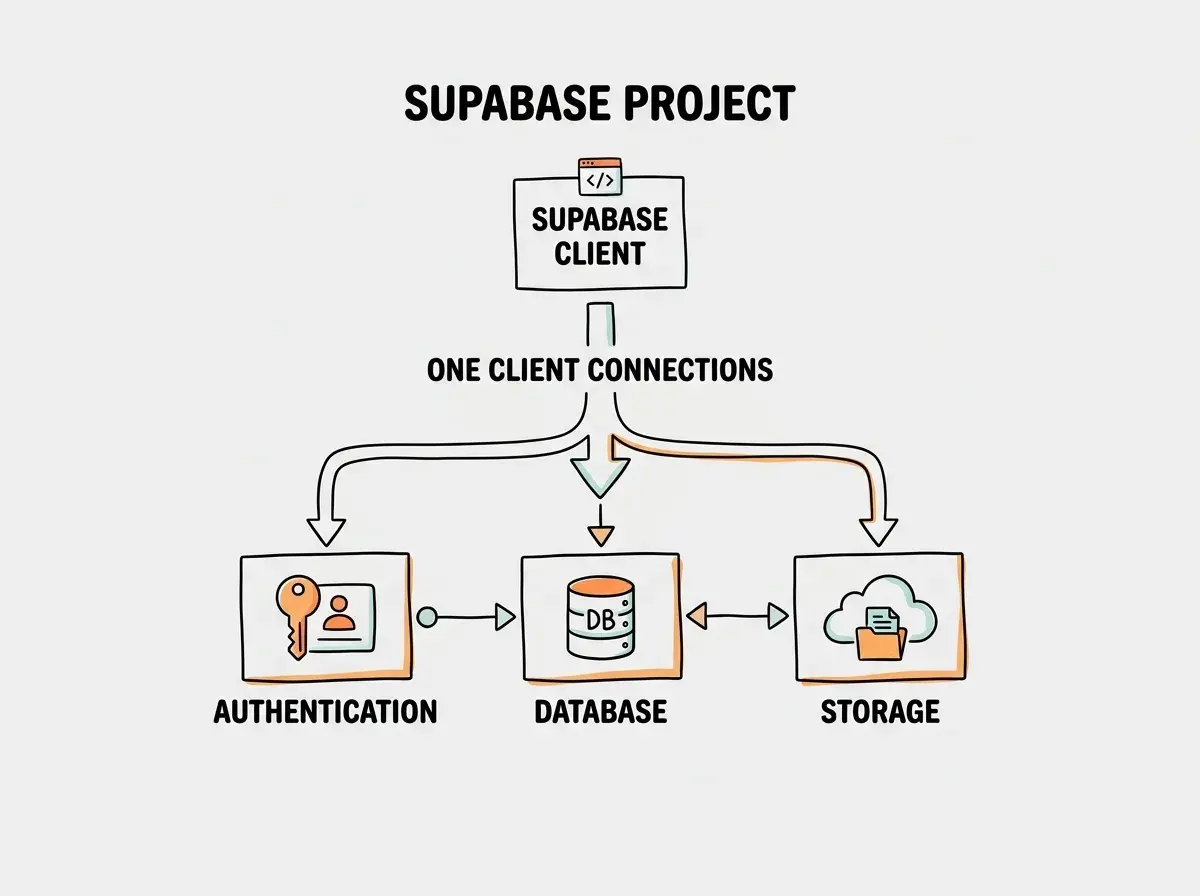
That single client object is your Swiss Army knife handle. Every feature you use, from database queries to auth to storage, goes through this one connection.
Set Up Authentication That Actually Works
Can Supabase handle auth? Yes, and it handles it well. Supabase Auth supports email/password, magic links, OAuth providers like Google and GitHub, and even phone number login. You do not need a separate auth service like Auth0 or Firebase Authentication. It is all built in.
For most apps, start with email/password plus Google OAuth. Here is how to enable Google login:
- Go to Authentication then Providers in your Supabase dashboard
- Find Google and toggle it on
- Add your Google OAuth client ID and secret (get these from the Google Cloud Console)
- Set the redirect URL to your app's callback endpoint
Now implement the signup and login flows in your app:
// Sign up with email
const { data, error } = await supabase.auth.signUp({
  email: 'user@example.com',
  password: 'secure-password-here'
})

// Sign in with Google
const { data, error } = await supabase.auth.signInWithOAuth({
  provider: 'google',
  options: {
    redirectTo: 'https://yourapp.com/auth/callback'
  }
})

// Get the current user anywhere in your app
const { data: { user } } = await supabase.auth.getUser()
Every authenticated user gets a unique ID (user.id) that you will use everywhere. This ID connects their auth session to their database rows and their storage files. It is the thread that ties the whole Swiss Army knife together.
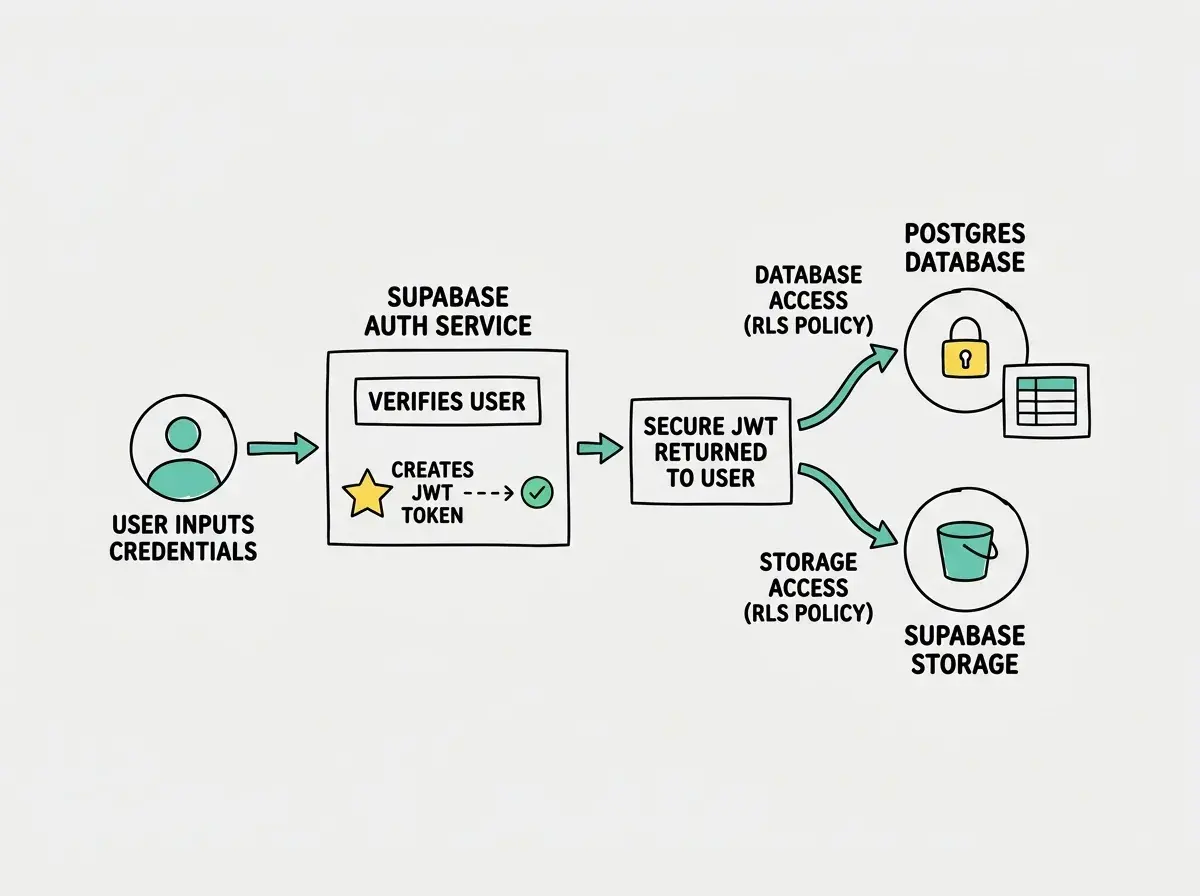
Supabase Auth is not just login and signup. It generates a JWT token for every session, and that token is automatically included in every database query and storage request. This means Row Level Security policies can use auth.uid() to filter data per user without any extra code on your part. Auth is the foundation that makes everything else secure.
Build Your Database Schema
The database is the blade of your Swiss Army knife. It is the tool you will use most often. Supabase gives you a full PostgreSQL database with a visual table editor, a SQL editor, and auto-generated REST APIs for every table you create.
Start by creating your first table. Go to the Table Editor, click "New Table," and create a profiles table:
CREATE TABLE profiles (
  id UUID REFERENCES auth.users(id) PRIMARY KEY,
  display_name TEXT,
  avatar_url TEXT,
  created_at TIMESTAMPTZ DEFAULT now()
);

ALTER TABLE profiles ENABLE ROW LEVEL SECURITY;

CREATE POLICY "Users read own profile"
  ON profiles FOR SELECT
  USING (auth.uid() = id);

CREATE POLICY "Users update own profile"
  ON profiles FOR UPDATE
  USING (auth.uid() = id);
Notice the pattern. Every table gets Row Level Security enabled, and every policy uses auth.uid() to ensure users only access their own data. This is non-negotiable. Without RLS, anyone with your public API key can read every row in the table.
Now query the database from your app:
// Read the current user's profile
const { data: profile } = await supabase
  .from('profiles')
  .select('*')
  .eq('id', user.id)
  .single()

// Update the profile
const { error } = await supabase
  .from('profiles')
  .update({ display_name: 'New Name' })
  .eq('id', user.id)
Every .from() call hits the auto-generated REST API. You never write SQL in your application code. The client library translates your JavaScript into API calls, and RLS filters the results on the server before they reach the browser. That is the beauty of the approach. You get the convenience of a frontend SDK with the security of server-side access control.
Step-by-step guides for building real features with AI coding tools.
Browse More Build TutorialsAdd File Storage for Uploads
Does Supabase provide storage? It does, and it works the same way as the rest of the platform. Supabase Storage is an S3-compatible file storage system that lives inside your project and respects the same auth tokens your database uses.
Create a storage bucket in the dashboard by going to Storage and clicking "New Bucket." Name it avatars and set it to private (you can also create public buckets for assets that do not need access control).
Set up a storage policy so users can only upload and read their own files:
CREATE POLICY "Users manage own avatars"
  ON storage.objects FOR ALL
  USING (
    bucket_id = 'avatars' AND
    auth.uid()::text = (storage.foldername(name))[1]
  );
This policy uses a folder-based approach. Each user's files go into a folder named after their user ID. The policy checks that the folder name matches the authenticated user's ID.
Now upload and retrieve files from your app:
// Upload an avatar
const { error } = await supabase.storage
  .from('avatars')
  .upload(`${user.id}/avatar.png`, file, {
    upsert: true
  })

// Get the public URL
const { data } = supabase.storage
  .from('avatars')
  .getPublicUrl(`${user.id}/avatar.png`)
Storage, auth, and database all share the same authentication context. When a user uploads a file, Supabase checks their JWT token against the storage policy. When they query the database, the same token gets checked against RLS policies. One login session secures everything. That is the Swiss Army knife advantage over bolting together separate services.
Do not create public storage buckets for user-uploaded content. A public bucket means anyone with the URL can access any file, regardless of authentication. Use private buckets with storage policies for anything users upload. Reserve public buckets only for static assets like logos or marketing images that genuinely need to be accessible to everyone.
Wire It All Together
Here is a practical example that ties all three features into one flow. A user signs up, creates a profile, and uploads an avatar. This is the pattern you will repeat in every feature of your app.
// 1. User signs up (auth)
const { data: authData } = await supabase.auth.signUp({
  email,
  password
})

// 2. Create their profile (database)
const { error: profileError } = await supabase
  .from('profiles')
  .insert({
    id: authData.user.id,
    display_name: name
  })

// 3. Upload their avatar (storage)
const { error: uploadError } = await supabase.storage
  .from('avatars')
  .upload(`${authData.user.id}/avatar.png`, avatarFile)

// 4. Save the avatar URL to their profile (database)
const { data: urlData } = supabase.storage
  .from('avatars')
  .getPublicUrl(`${authData.user.id}/avatar.png`)

await supabase
  .from('profiles')
  .update({ avatar_url: urlData.publicUrl })
  .eq('id', authData.user.id)
Four steps, one client, zero glue code. The auth session carries through every operation automatically.
What to Build Next
You now have a complete backend with auth, a relational database, and file storage. That covers about 80% of what most apps need. When you are ready to expand, Supabase has more blades on the Swiss Army knife waiting for you.
Real-time subscriptions let you listen for database changes and update the UI instantly. Think chat messages, live dashboards, or collaborative editing. You add .subscribe() to any query and Supabase pushes changes to your app over WebSockets.
Edge Functions give you server-side logic when you need it. Payment processing, third-party API calls, or any operation that requires your secret keys can run in a Deno-based edge function that deploys alongside your project.
Database Functions and Triggers let you automate tasks inside PostgreSQL itself. Automatically create a profile row when a user signs up. Send a notification when an order status changes. Run validation logic before an insert completes.
The free tier gives you 500 MB of database storage, 1 GB of file storage, 50,000 monthly active users for auth, and unlimited API requests. For most indie projects, that is more than enough to launch and validate your idea before spending a dollar.
More practical guides for building real apps with AI coding tools and modern backends.
Explore All TutorialsStart with the three pieces from this tutorial. Get auth working first, because everything else depends on it. Build your tables with RLS enabled from the beginning, not as an afterthought. Use private storage buckets with folder-based policies. Then layer on real-time and edge functions as your app grows. The Swiss Army knife is already in your hand. Start opening the blades.