If you have used any AI coding tool in the past year, you have almost certainly seen Supabase show up in the generated code. This Supabase guide exists because 92% of vibe coders use AI tools daily, and those tools overwhelmingly default to Supabase as the backend. Understanding why it won that default slot, and how to use it well, is essential for anyone building AI-assisted apps in 2026.
Why AI Tools Default to Supabase
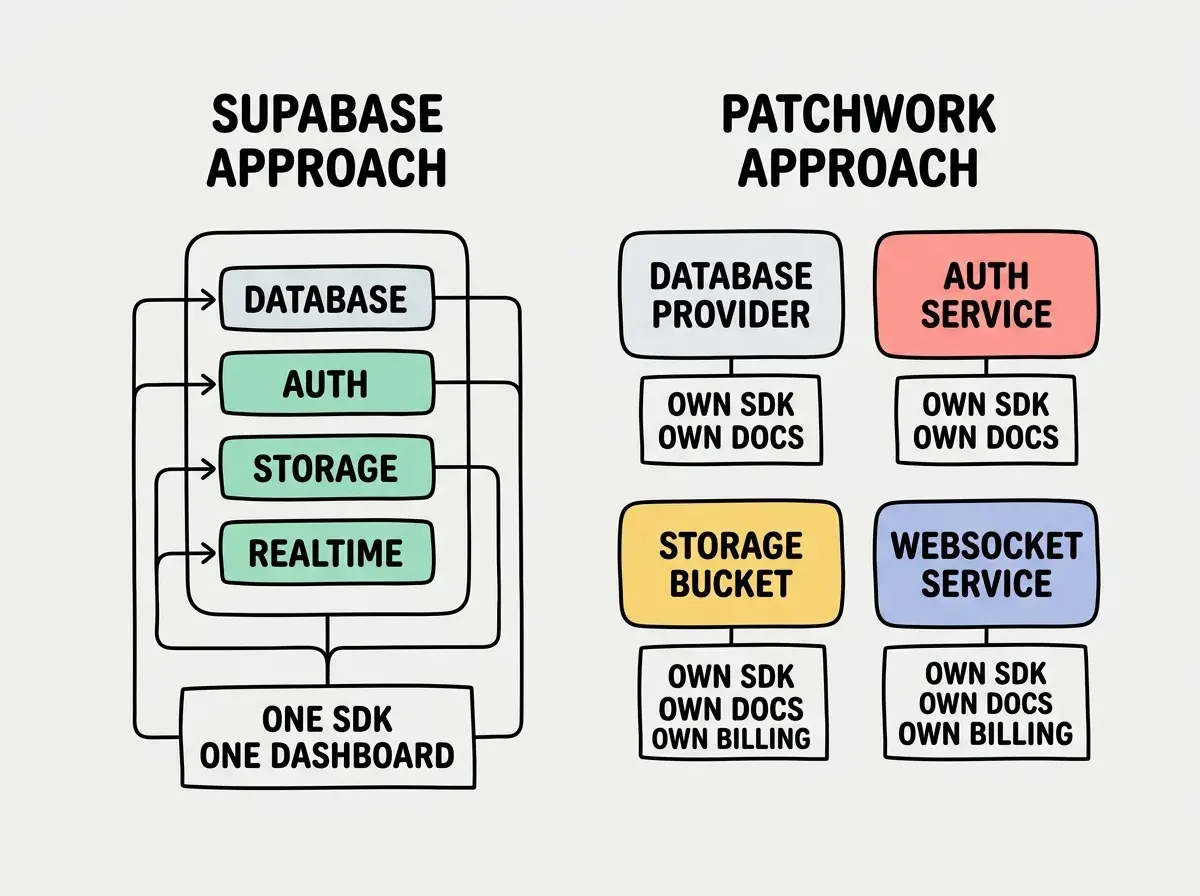
Every AI coding tool needs to recommend a backend, and Supabase keeps winning that recommendation for one simple reason. It bundles four services that every app needs into a single platform: a PostgreSQL database, authentication, file storage, and realtime subscriptions. When Cursor, Lovable, Bolt, or Replit generates backend code, picking Supabase means one SDK, one dashboard, one set of credentials, and one billing relationship.
The alternative is stitching together separate services. You would need a managed database from one provider, an auth service from another, an S3-compatible storage bucket from a third, and a WebSocket service from a fourth. Each service has its own SDK, documentation, pricing model, and configuration. AI tools could generate that patchwork, but the surface area for errors multiplies with every integration. Supabase collapses all of that into a single createClient() call.
This is not just convenience for the AI. It is convenience for you. When something breaks, you have one dashboard to check. When you need to understand how auth connects to database permissions, the answer lives in one system. When you want to add file uploads to an app that already has user accounts, you do not need to wire up a new service.
Setting Up Your First Supabase Project
Go to supabase.com and create an account. Click "New Project," pick a region close to your users, and set a strong database password. Supabase provisions a full PostgreSQL database, an auth system, a storage system, and a realtime server in about two minutes.
Once your project is ready, grab two values from the Settings page under API: your project URL and your public anon key. These go into your application code and are safe to expose in client-side JavaScript. The anon key is not a secret. It is a public identifier that, combined with Row Level Security policies, controls what unauthenticated and authenticated users can access.
Install the Supabase client library in your project:
npm install @supabase/supabase-js
Then initialize the client:
import { createClient } from '@supabase/supabase-js'

const supabase = createClient(
  process.env.NEXT_PUBLIC_SUPABASE_URL!,
  process.env.NEXT_PUBLIC_SUPABASE_ANON_KEY!
)
That single client gives you access to the database, auth, storage, and realtime. Every feature you need flows through this one object.
The Database Layer
Supabase runs PostgreSQL, the most battle-tested open-source relational database in existence. You get full SQL, constraints, indexes, triggers, functions, and views. This is not a simplified database-as-a-service. It is real PostgreSQL with a nice dashboard on top.
You can create tables through the Supabase dashboard using the Table Editor, or you can write SQL directly in the SQL Editor. For vibe coders, the Table Editor is the fastest starting point. Click "New Table," name your columns, pick types, and set a primary key. Supabase auto-generates an id column with UUID by default, which is the right choice for most applications.
Querying data from your application uses a clean, chainable API:
const { data, error } = await supabase
  .from('todos')
  .select('*')
  .eq('user_id', userId)
  .order('created_at', { ascending: false })
This translates to a SQL query behind the scenes. The API supports filtering, sorting, pagination, joins across related tables, and aggregate functions. For 90% of what vibe-coded apps need, this API covers it without writing raw SQL.
Supabase queries go directly from the browser to the database through a REST API. There is no server in between filtering results. This means Row Level Security is not optional. It is the only thing preventing any user from reading every row in your database. Enable RLS on every table immediately after creating it, and write policies before writing application code.
Authentication Built In
Most backend setups require a separate auth provider, but Supabase ships with a full authentication system. It supports email and password, magic links, OAuth providers like Google and GitHub, and phone authentication.
Adding Google sign-in to your app takes about five minutes. Enable the Google provider in the Supabase dashboard under Authentication, add your OAuth credentials, and then call:
const { data, error } = await supabase.auth.signInWithOAuth({
  provider: 'google',
})
Supabase handles the redirect flow, token exchange, and session management. The user's session is automatically included in every subsequent database query, which is how RLS policies know who is making the request. When you write a policy like auth.uid() = user_id, Supabase extracts the user ID from the session token and compares it against the row. No extra code needed.
Session management works automatically. The client library stores tokens in the browser, refreshes them before they expire, and includes them in every request. You can check the current user at any time:
const { data: { user } } = await supabase.auth.getUser()
File Storage That Connects to Everything
Supabase Storage is an S3-compatible file storage system that integrates with auth and RLS. You create buckets, upload files, and control access using the same policy system that protects your database tables.
Create a bucket called avatars in the dashboard, then upload from your application:
const { data, error } = await supabase.storage
  .from('avatars')
  .upload(`${userId}/profile.png`, file)
You can make buckets public for assets like product images, or private for user-specific files like documents and receipts. Private buckets require a signed URL to access, which Supabase generates for you:
const { data } = await supabase.storage
  .from('documents')
  .createSignedUrl('path/to/file.pdf', 3600) // expires in 1 hour
The reason this matters is that AI-generated code frequently needs file upload functionality. Profile pictures, document uploads, image galleries. With Supabase, the storage system already knows who the user is because it shares the auth layer. You do not need to build a separate upload service or manage access tokens between systems.
Realtime Subscriptions
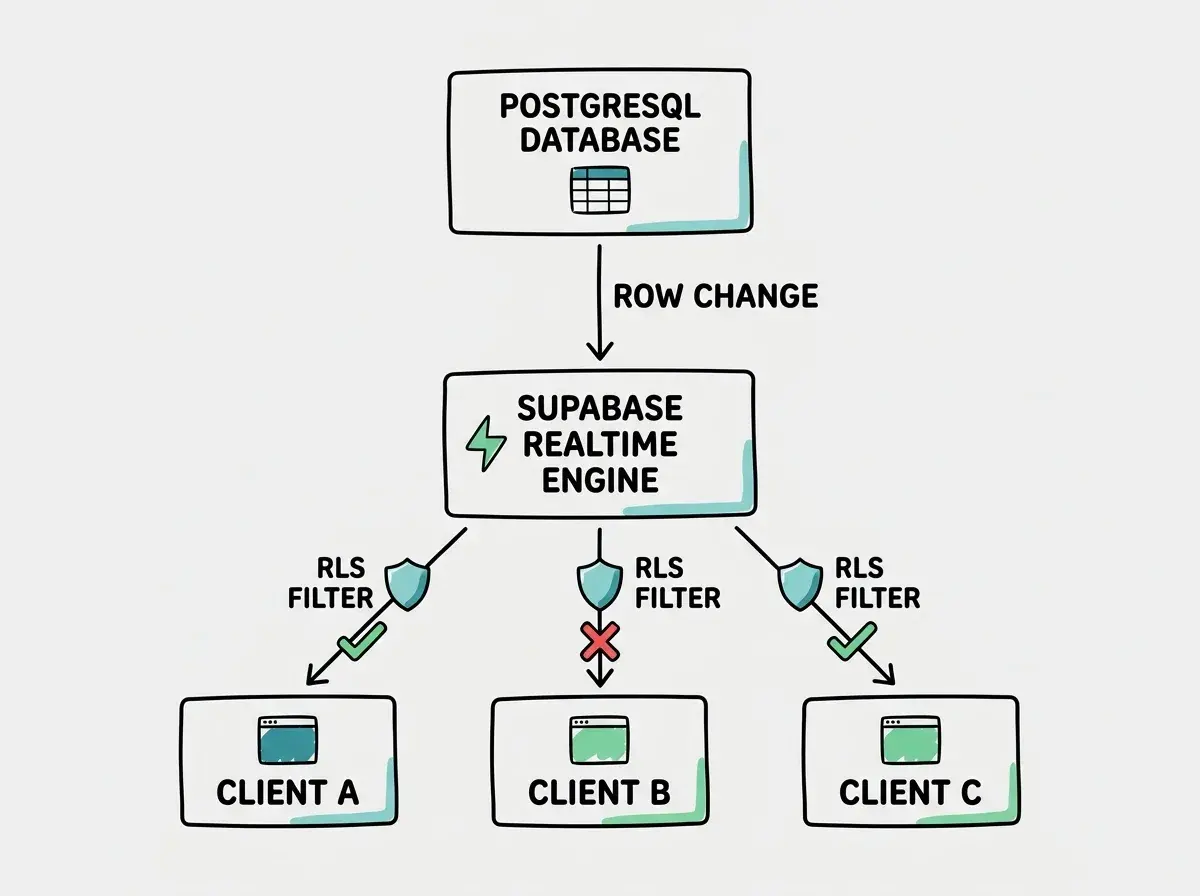
Realtime is the feature that most vibe coders underestimate until they need it. Supabase can push database changes to connected clients instantly using WebSockets. When a row is inserted, updated, or deleted, every subscribed client gets notified.
const channel = supabase
  .channel('todos')
  .on('postgres_changes', {
    event: 'INSERT',
    schema: 'public',
    table: 'todos',
  }, (payload) => {
    console.log('New todo:', payload.new)
  })
  .subscribe()
This powers features like live chat, collaborative editing, real-time dashboards, and notification systems. Without Supabase, building realtime features requires setting up a WebSocket server, managing connections, handling reconnections, and syncing state. Supabase makes it a few lines of code.
Realtime also respects RLS policies. A user subscribed to changes on the todos table only receives events for rows they are allowed to see. This means you get live updates without building a separate authorization layer for your WebSocket connections.
Start with the fundamentals before diving into specific tools.
Learn the basicsRow Level Security Is Not Optional
This deserves its own section because it is the most common security mistake in vibe-coded applications. Supabase exposes your database to the client. The public anon key is visible to anyone who opens browser developer tools. The only thing controlling data access is RLS.
When you create a new table, immediately enable RLS:
ALTER TABLE your_table ENABLE ROW LEVEL SECURITY;
Then create policies for each operation. The most common pattern is "users can only access their own rows":
CREATE POLICY "Users read own data"
  ON your_table FOR SELECT
  USING (auth.uid() = user_id);

CREATE POLICY "Users insert own data"
  ON your_table FOR INSERT
  WITH CHECK (auth.uid() = user_id);
AI tools are getting better at generating RLS policies, but they still miss edge cases. Always review the generated policies manually. Check that every table has RLS enabled, that every operation type has a policy, and that the policies reference the correct column for user identification.
Trusting AI-generated RLS policies without reviewing them. AI tools frequently generate overly permissive policies like USING (true) which grants access to every row, or they forget to create policies for UPDATE and DELETE operations. After every AI-generated database setup, open the Supabase dashboard, check every table's RLS status, and read each policy line by line. Ten minutes of review prevents a data breach.
Pricing and Limits You Should Know
Supabase has a generous free tier that includes 500 MB of database storage, 1 GB of file storage, 50,000 monthly active users for auth, and 5 GB of bandwidth. For side projects and MVPs, this is more than enough.
The Pro plan at $25 per month expands those limits significantly: 8 GB database storage, 100 GB file storage, and 250 GB bandwidth. Most production apps with moderate traffic fit within Pro comfortably. You only need to think about the Team or Enterprise plans when you are handling serious scale.
The one cost that catches people off guard is database compute. The free tier runs on a shared instance that pauses after one week of inactivity. If your app has not received traffic in seven days, the next request will take a few seconds while the database wakes up. The Pro plan keeps your database running continuously.
What This Means For You
Supabase has become the default backend for AI-built applications because it solves the right bundle of problems in one place. Database, auth, storage, and realtime, all accessible through a single client, all protected by the same security model. Understanding how these pieces fit together gives you a significant advantage over vibe coders who just accept whatever the AI generates.
- If you are a founder building an MVP: Supabase on the free tier gets you to launch with zero backend costs. You get a production-grade PostgreSQL database, authentication, and file storage without configuring separate services. Upgrade to Pro only when you have paying users, and you will likely stay on Pro for a long time before needing anything more.
- If you are an indie hacker shipping fast: The bundled approach means less integration work and fewer things that can break between services. Spend your time on features, not plumbing. But invest thirty minutes learning RLS properly. It is the one area where AI tools consistently generate insecure defaults, and getting it right protects both you and your users.
- If you are evaluating backend options: Supabase is the strongest choice when you want speed of development, a familiar SQL database, and built-in auth. Consider alternatives if you need a NoSQL data model, if you want to avoid vendor lock-in at all costs, or if your app requires heavy server-side processing that does not fit the client-to-database architecture.
Learn the full vibe coding workflow from first prompt to deployment.
Start building