Setting up VS Code for AI coding is like setting up a workshop before you build anything. You would not start woodworking by grabbing random tools off the floor. You would organize your workbench, lay out the tools you need, make sure everything is sharp and within reach. The same principle applies to your code editor. A well-configured VS Code environment with the right AI extensions turns a blank screen into a productive workspace where AI handles the repetitive work and you focus on the creative decisions.
92% of developers now use AI tools daily, and VS Code is where most of that work happens. Whether you just installed VS Code yesterday or you have been poking around for a few weeks, this tutorial walks you through the exact setup that makes AI-assisted development feel natural instead of clunky. Think of it as building your workbench, one shelf at a time.
Why Your VS Code AI Setup Matters
Your editor configuration directly affects how useful AI tools feel. A poorly configured setup creates friction. You fight autocomplete suggestions that appear at the wrong time, miss keyboard shortcuts that would save minutes per hour, and never discover features that other developers rely on constantly.
A well-configured VS Code AI coding environment does three things well. It surfaces AI suggestions at the right moment, lets you accept or reject them with minimal keystrokes, and gives you multiple AI tools that complement each other instead of stepping on each other's toes.
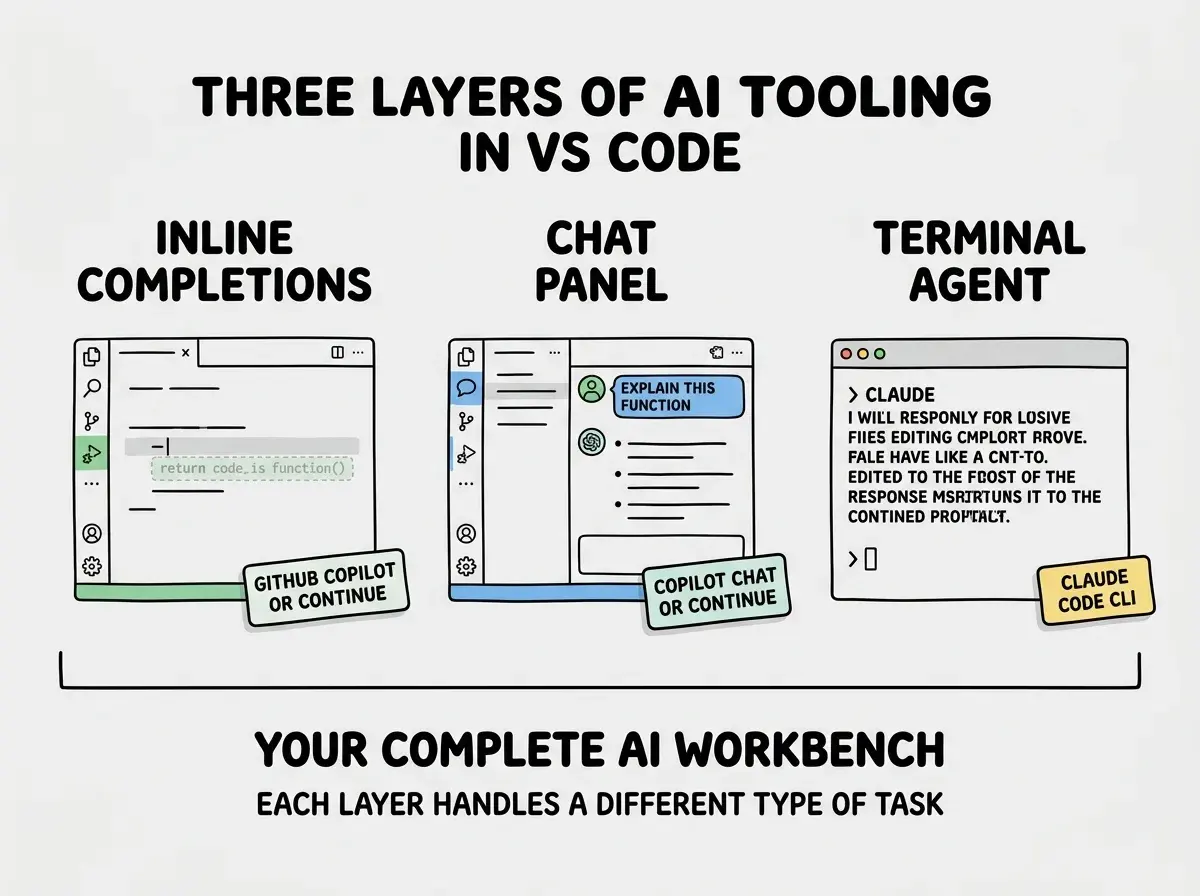
Back to the workbench analogy. You need a vise (something that holds your work steady), hand tools (for precise adjustments), and power tools (for heavy lifting). In VS Code terms, that translates to inline autocomplete, chat-based AI assistance, and terminal-level AI agents.
Install the Essential AI Extensions First
Open VS Code and head to the Extensions panel (Cmd+Shift+X on Mac, Ctrl+Shift+X on Windows). These are the extensions worth installing right now, in order of importance.
GitHub Copilot is the most widely used AI extension for VS Code. It provides inline code suggestions as you type, a chat panel for asking questions about your code, and the ability to explain or refactor selected code. If you are a student, you likely qualify for free access through the GitHub Student Developer Pack. Install both "GitHub Copilot" and "GitHub Copilot Chat" from the extensions marketplace.
Continue is an open-source alternative that connects to multiple AI providers. If you want to use Claude, GPT-4, or local models through Ollama, Continue gives you that flexibility without being locked into a single provider. It offers inline completions and a chat panel similar to Copilot, but with more control over which model handles which task.
Claude Code (CLI) is not a VS Code extension but a terminal tool that works beautifully inside VS Code's integrated terminal. It gives you an AI agent that can read your entire project, edit multiple files, and run commands. Install it globally with npm install -g @anthropic-ai/claude-code and run it from VS Code's terminal panel.
After installing these extensions, restart VS Code. This ensures all extensions load properly and register their keyboard shortcuts.
Configure Settings for a Smooth Experience
Installing extensions is laying out the tools. Now you need to arrange them on the workbench so nothing gets in your way.
Open VS Code settings with Cmd+, (Mac) or Ctrl+, (Windows). Switch to the JSON view by clicking the icon in the top-right corner of the settings panel. Add these configurations.
Control when suggestions appear. By default, Copilot suggests code constantly, which can feel overwhelming for beginners. You can set it to only suggest when you pause typing.
{
  "editor.inlineSuggest.enabled": true,
  "editor.inlineSuggest.showToolbar": "onHover",
  "github.copilot.enable": {
    "*": true,
    "markdown": true,
    "plaintext": false
  }
}
This keeps AI suggestions active for code files and Markdown, but turns them off for plain text files where they are usually more distracting than helpful.
Set up your preferred AI chat position. The chat panel works best as a secondary sidebar so it does not compete with your file explorer. In VS Code, you can drag the chat panel to the right sidebar. Then add this to your settings to control its behavior.
{
  "workbench.sideBar.location": "left",
  "chat.editor.wordWrap": "on"
}
Configure your terminal for Claude Code. If you installed Claude Code, make sure your terminal is set up for a comfortable experience.
{
  "terminal.integrated.fontSize": 14,
  "terminal.integrated.lineHeight": 1.3,
  "terminal.integrated.scrollback": 10000
}
A larger scrollback buffer matters because AI agents produce verbose output, and you want to scroll back through their reasoning.
Learn the Keyboard Shortcuts That Matter
This is where the workbench analogy really clicks. A skilled woodworker does not look down to find their chisel. The tool is always in the same spot, and muscle memory takes over. VS Code AI coding works the same way once you internalize a handful of shortcuts.
For inline suggestions (Copilot/Continue):
- Tab accepts the full suggestion
- Cmd+Right Arrow (Mac) or Ctrl+Right Arrow (Windows) accepts word by word
- Escape dismisses the suggestion
- Alt+] and Alt+[ cycle through alternative suggestions
For AI chat:
- Cmd+Shift+I (Mac) or Ctrl+Shift+I (Windows) opens Copilot Chat
- Cmd+L in Continue opens the chat panel
- Select code, then right-click for "Explain This" or "Fix This" options
For Claude Code in the terminal:
- Ctrl+` opens the integrated terminal
- Type
claudeto start a session - Use
/helpinside Claude Code for available commands
You do not need to memorize all of these on day one. Start with Tab to accept, Escape to dismiss, and the chat shortcut for your chosen tool. Add the others as they become relevant.
The best AI VS Code setup is not about installing every available extension. It is about picking two or three tools that cover different needs (inline, chat, agent), configuring them so they do not conflict, and learning the keyboard shortcuts that let you flow between them without breaking concentration.
Going Deeper With Workspace Configuration
Once your basic workbench is set up, you can customize it per project. VS Code supports workspace-level settings that override your global configuration, which is useful when different projects need different AI behavior.
Create a .vscode/settings.json file in your project root. You might want Copilot to be more aggressive with suggestions in a familiar codebase but more conservative in a new one. You can also configure file-specific behavior.
{
  "github.copilot.enable": {
    "javascript": true,
    "typescript": true,
    "css": false,
    "json": false
  },
  "[typescript]": {
    "editor.defaultFormatter": "esbenp.prettier-vscode"
  }
}
This tells Copilot to suggest code in JavaScript and TypeScript files but stay quiet in CSS and JSON files, where its suggestions are less useful. The formatter setting ensures AI-generated code gets auto-formatted to match your project's style.
For teams, committing this .vscode/settings.json to your repository means everyone gets the same AI configuration.
Installing multiple AI extensions that provide inline completions and leaving them all active simultaneously. When Copilot and Continue both try to show inline suggestions, they fight for control and neither works well. Pick one extension for inline completions and use the other for chat only. You can disable inline suggestions for a specific extension in its settings without uninstalling it entirely.
Verifying Your Setup Works
Before you start building, test your workbench. Create a new file called test.ts and type a function signature like function calculateTax(price: number, rate: number). Pause after the closing parenthesis and opening brace. If your inline AI is configured correctly, you should see a ghosted suggestion for the function body within a second or two.
Next, select that function and open your AI chat. Ask it to "add input validation to this function." If the chat responds with a modified version that includes checks for negative numbers or non-numeric inputs, your chat integration is working.
Finally, if you have Claude Code installed, open your terminal and type claude. Ask it to "look at test.ts and suggest improvements." If it reads the file and provides feedback, your terminal agent layer is operational.
Delete test.ts when you are done. Your workbench is ready.
Your AI coding environment is set up. Now put it to work on a real project.
Explore tutorialsWhat This Means For You
Your workbench evolves as you discover what works for your specific workflow. But starting with a solid foundation saves you from fighting your tools when you should be learning to code.
- If you are switching careers into development: This setup gives you a serious advantage over learning to code the traditional way. AI inline suggestions teach you patterns as you type, and the chat panel acts like a patient tutor who never gets tired of explaining things. Start with Copilot for inline suggestions and use the chat for every concept you do not understand. You will learn faster because you are seeing real code in context instead of reading documentation in isolation.
- If you are a student learning to code: Resist the temptation to accept every AI suggestion without understanding it. Use the chat panel to ask "why did it suggest this?" for any suggestion that surprises you. Configure your setup so suggestions only appear when you pause, giving yourself time to think before the AI fills in the blank. The goal is to learn the patterns, not just to generate code quickly.
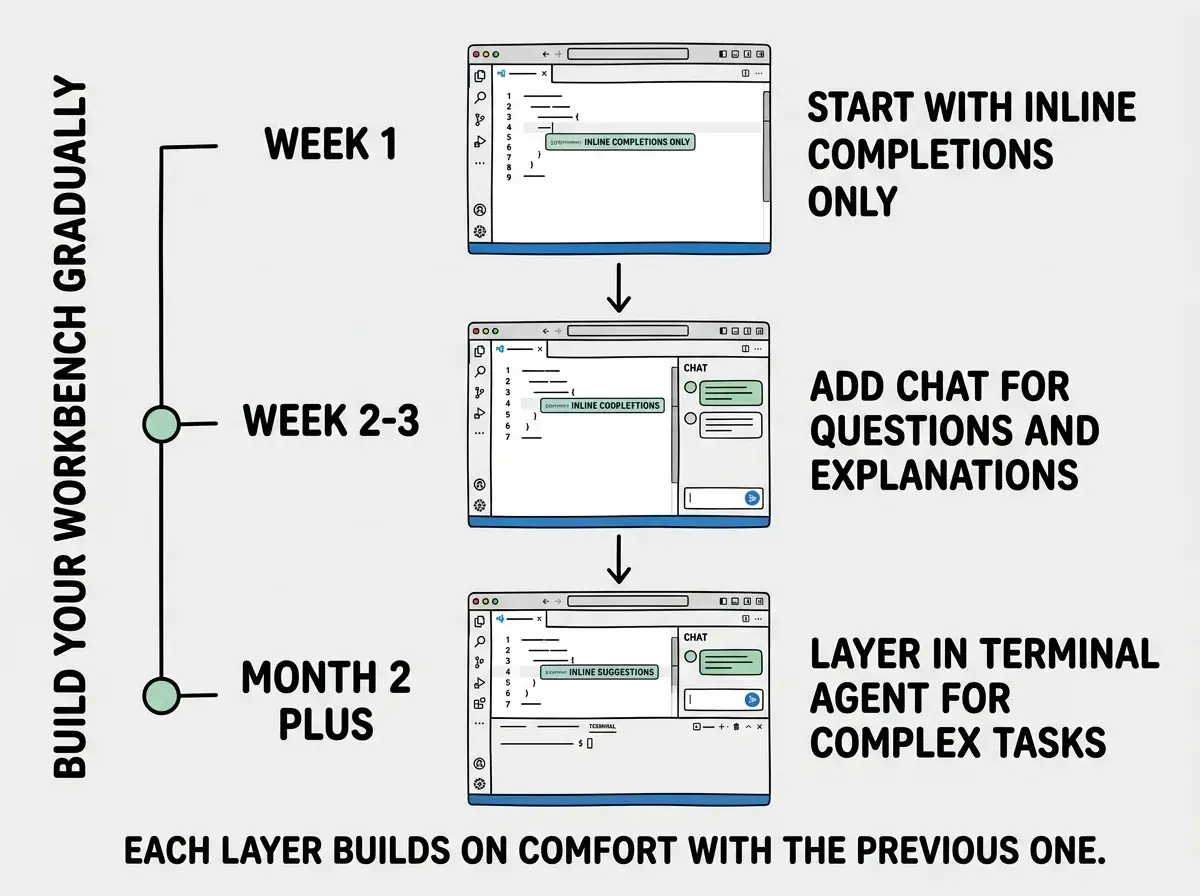
- If you are exploring AI development tools for the first time: Start with just one extension (Copilot is the most beginner-friendly) and use it for a full week before adding anything else. Adding all three layers at once creates cognitive overload. Once inline suggestions feel natural, add the chat panel. Once chat feels natural, try a terminal agent. Building your workbench one tool at a time means each tool gets properly learned instead of half-understood.
Your future self will thank you for building a solid workbench today instead of fighting a messy setup six months from now.
From first install to first deploy, we cover every step of the AI-assisted development workflow.
Browse foundations