Your API is a nightclub. Every request is a person trying to get through the door. Without a bouncer, the club fills past capacity, the music stops, and everyone has a terrible time. Rate limiting is your bouncer. It stands at the door, counts heads, and politely turns people away once you hit the limit per minute. With 92% of devs using AI daily to build apps, more APIs are going live faster than ever, and most of them have zero protection at the door.
This tutorial walks you through building a proper rate limiting system for your API. You will learn the two most popular algorithms, implement them with Upstash Redis and Vercel KV, wire everything through middleware, and handle the HTTP responses that tell clients to slow down. By the end, your API will have a bouncer that actually does its job.
Why Your API Needs a Bouncer Right Now
Every public API gets abused eventually. Sometimes it is a bot scraping your data. Sometimes it is a user who wrote a bad loop that fires 10,000 requests in a second. Sometimes it is you, running a test script that accidentally hammers your own AI endpoint and burns through $200 in API credits before you notice.
Rate limiting API endpoints is not optional. It is the difference between a $5 bill and a $500 bill at the end of the month. If you are calling OpenAI, Anthropic, or any paid AI service from your backend, every unthrottled request costs real money. Your bouncer does not just keep the club safe. It keeps your wallet safe too. Let us start with the algorithms.
The Token Bucket Algorithm
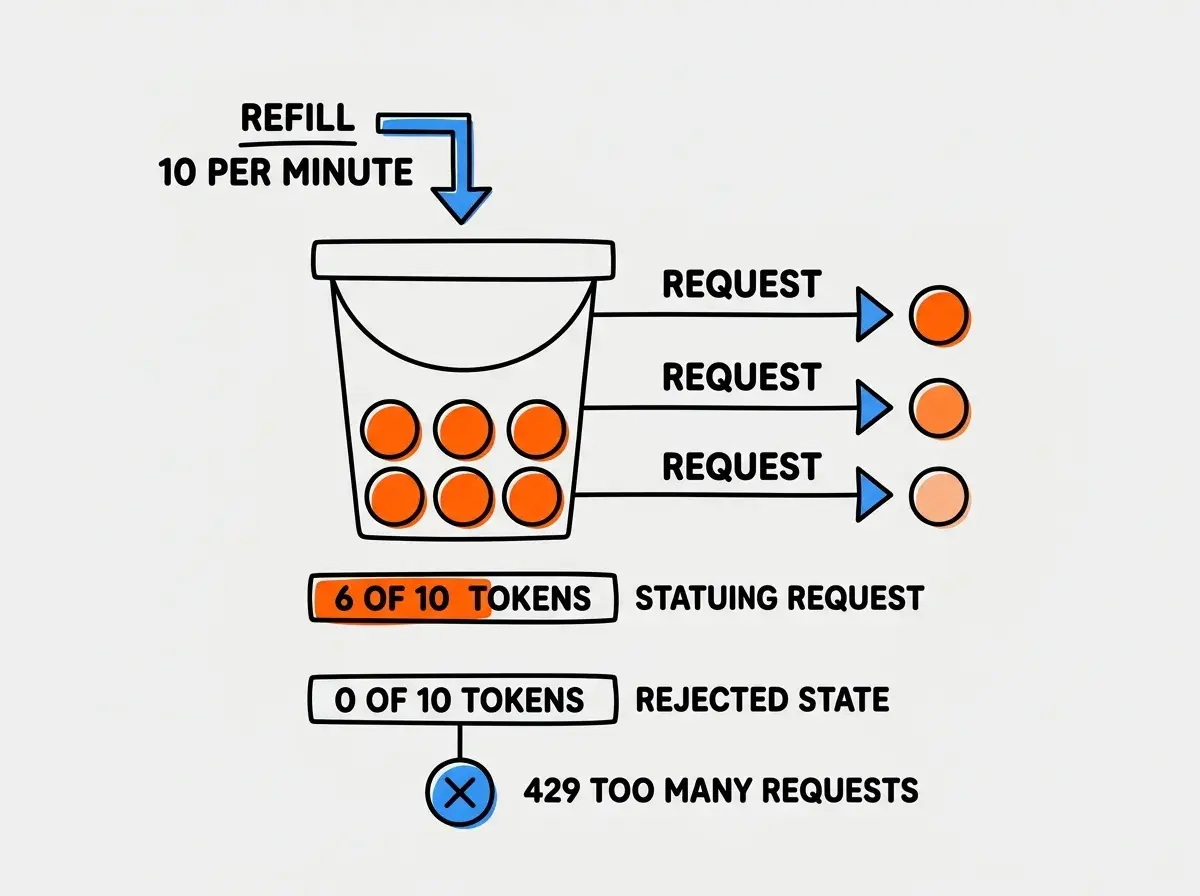
The token bucket is the most intuitive rate limiting pattern, and it maps perfectly to our nightclub analogy. Imagine your bouncer has a bucket of wristbands. Each wristband lets one person in. The bucket refills at a steady rate, say ten wristbands per minute. When someone shows up and there is a wristband available, they get in. When the bucket is empty, they wait outside.
In code, a token bucket works like this. You start with a maximum number of tokens (the bucket capacity). Tokens replenish at a fixed rate. Each request consumes one token. If no tokens are available, the request is rejected.
interface TokenBucket {
  tokens: number;
  lastRefill: number;
  maxTokens: number;
  refillRate: number; // tokens per second
}

function consumeToken(bucket: TokenBucket): boolean {
  const now = Date.now();
  const elapsed = (now - bucket.lastRefill) / 1000;

  // Refill tokens based on elapsed time
  bucket.tokens = Math.min(
    bucket.maxTokens,
    bucket.tokens + elapsed * bucket.refillRate
  );
  bucket.lastRefill = now;

  if (bucket.tokens >= 1) {
    bucket.tokens -= 1;
    return true; // Request allowed
  }
  return false; // Request denied
}
The beauty of the token bucket is that it allows short bursts. If nobody has visited your club for a few minutes, the bucket fills up, and a group of friends can all walk in at once. But sustained traffic gets smoothed out to your configured rate. This makes it forgiving for normal usage while still protecting against abuse.
The Sliding Window Approach
The sliding window algorithm takes a different approach. Instead of tracking tokens, it counts requests within a rolling time window. Think of the bouncer with a clicker counter and a stopwatch. They count everyone who entered in the last sixty seconds. If the count is under the limit, you are in. If not, wait until the window slides forward and older entries drop off.
async function slidingWindowCheck(
  redis: Redis,
  key: string,
  limit: number,
  windowMs: number
): Promise<{ allowed: boolean; remaining: number }> {
  const now = Date.now();
  const windowStart = now - windowMs;

  // Remove expired entries and count current ones
  await redis.zremrangebyscore(key, 0, windowStart);
  const count = await redis.zcard(key);

  if (count < limit) {
    await redis.zadd(key, { score: now, member: `${now}-${Math.random()}` });
    await redis.expire(key, Math.ceil(windowMs / 1000));
    return { allowed: true, remaining: limit - count - 1 };
  }

  return { allowed: false, remaining: 0 };
}
The sliding window is more precise than the token bucket. It guarantees that exactly N requests are allowed in any given time window. There is no burst behavior. The bouncer does not care that the club was empty five minutes ago. They only care about the last sixty seconds.
Which one should you pick? Token bucket for APIs where occasional bursts are fine. Sliding window for APIs where strict limits matter, especially AI inference endpoints where every call costs money.
Choose the token bucket algorithm when your API can tolerate short bursts of traffic and you want a forgiving user experience. Choose the sliding window when you need strict, predictable limits with no burst allowance. For AI-powered endpoints where every request costs money, the sliding window is almost always the safer choice because it prevents any scenario where a burst drains your budget in seconds.
Implementing With Upstash Redis
Upstash Redis is the go-to choice for serverless rate limiting because it works over HTTP. No persistent connections, no cold start issues, and it plays nicely with Vercel, Cloudflare Workers, and any edge runtime. Upstash even provides a dedicated @upstash/ratelimit package that handles the algorithm details for you.
npm install @upstash/ratelimit @upstash/redis
import { Ratelimit } from "@upstash/ratelimit";
import { Redis } from "@upstash/redis";

const redis = new Redis({
  url: process.env.UPSTASH_REDIS_REST_URL!,
  token: process.env.UPSTASH_REDIS_REST_TOKEN!,
});

// 10 requests per 60 seconds using sliding window
const ratelimit = new Ratelimit({
  redis,
  limiter: Ratelimit.slidingWindow(10, "60 s"),
  analytics: true,
  prefix: "api-ratelimit",
});

// Usage in any handler
const identifier = request.headers.get("x-forwarded-for") ?? "anonymous";
const { success, limit, remaining, reset } = await ratelimit.limit(identifier);

if (!success) {
  return new Response("Too Many Requests", {
    status: 429,
    headers: {
      "X-RateLimit-Limit": limit.toString(),
      "X-RateLimit-Remaining": remaining.toString(),
      "Retry-After": Math.ceil((reset - Date.now()) / 1000).toString(),
    },
  });
}
If you are already on Vercel, you can swap in Vercel KV instead. It is Upstash Redis under the hood, so the API is identical. Just import from @vercel/kv and the rate limiting code stays exactly the same.
Wiring It Into Middleware
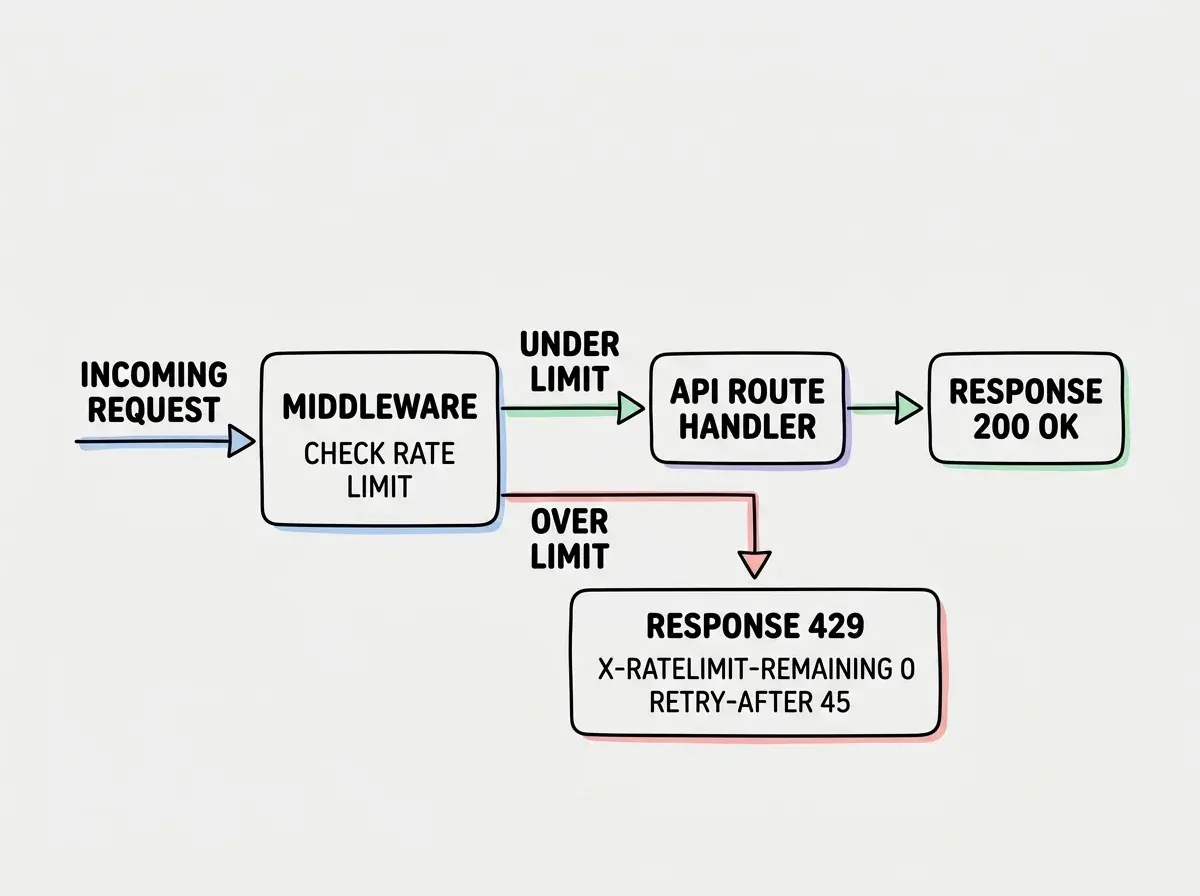
The most effective place for rate limiting is middleware. It runs before your route handlers, so rejected requests never touch your business logic, never call your AI provider, and never cost you a cent.
In Next.js, your middleware file sits at the root of your project and intercepts every request.
// middleware.ts
import { Ratelimit } from "@upstash/ratelimit";
import { Redis } from "@upstash/redis";
import { NextRequest, NextResponse } from "next/server";

const ratelimit = new Ratelimit({
  redis: Redis.fromEnv(),
  limiter: Ratelimit.slidingWindow(20, "60 s"),
  prefix: "middleware-ratelimit",
});

export async function middleware(request: NextRequest) {
  // Only rate limit API routes
  if (!request.nextUrl.pathname.startsWith("/api")) {
    return NextResponse.next();
  }

  const ip = request.headers.get("x-forwarded-for")
    ?? request.ip
    ?? "127.0.0.1";

  const { success, limit, remaining, reset } = await ratelimit.limit(ip);

  if (!success) {
    return NextResponse.json(
      { error: "Rate limit exceeded. Please try again later." },
      {
        status: 429,
        headers: {
          "X-RateLimit-Limit": limit.toString(),
          "X-RateLimit-Remaining": remaining.toString(),
          "Retry-After": Math.ceil((reset - Date.now()) / 1000).toString(),
        },
      }
    );
  }

  const response = NextResponse.next();
  response.headers.set("X-RateLimit-Limit", limit.toString());
  response.headers.set("X-RateLimit-Remaining", remaining.toString());
  return response;
}

export const config = {
  matcher: "/api/:path*",
};
This middleware approach means you set up rate limiting once and every API route is protected automatically. The bouncer stands at the front door, not at each individual room inside the club.
Handling 429 Responses and Retry-After Headers
When your bouncer turns someone away, how they communicate matters. A good bouncer does not just say "no." They say "come back in five minutes." That is what the Retry-After header does.
Always include three headers in your 429 response. X-RateLimit-Limit tells the client their total allowance. X-RateLimit-Remaining tells them how many requests they have left. Retry-After tells them how many seconds to wait before trying again. These headers are not just polite. They let well-behaved clients implement automatic backoff instead of hammering your API in a retry loop.
On the client side, handle 429 responses with backoff. Read the Retry-After value and wait that many seconds before retrying. If the client ignores these headers and retries immediately, your bouncer will just keep turning them away.
Using the client IP address as the sole rate limit identifier behind a reverse proxy or CDN. When your app sits behind Cloudflare, Vercel, or AWS, all requests may appear to come from the same IP. Always use the x-forwarded-for header or, better yet, use authenticated user IDs as your rate limit key for logged-in users. IP-based limiting is fine for anonymous traffic, but it will accidentally throttle your entire user base if you are behind a proxy that masks individual IPs.
Choosing Your Limits
For a typical AI-powered SaaS app, here is a starting point. General API routes can handle 60 requests per minute per user. AI inference endpoints should be tighter at 10 to 20 per minute because each call costs money. Authentication endpoints like login and signup should be the strictest at 5 per minute to prevent brute force attacks.
Start conservative and loosen the limits once you have real usage data. It is much easier to increase limits than to recover from a $500 surprise bill.
What This Means For You
Rate limiting is one of those features that feels invisible when it works and catastrophic when it is missing. You just learned how to build it properly, from algorithm selection through production middleware.
- If you are a senior dev shipping a side project: You now have a copy-paste middleware setup that protects every endpoint in your app. The Upstash integration takes about ten minutes to wire up, costs almost nothing at low traffic, and saves you from the nightmare scenario of a bot or a bad script draining your AI budget overnight. Add it before you launch, not after you get the bill.
- If you are an indie hacker building a SaaS product: Rate limiting is a trust signal. Enterprise customers check for it. Your API consumers expect those
X-RateLimitheaders. Beyond the cost protection, proper throttling makes your product look professional and production-ready. It is one of the cheapest ways to signal that your API is built by someone who knows what they are doing.
Get your rate limiting in place early, set it once in middleware, and move on to the features your users actually care about.
See how other developers protect their endpoints and manage costs.
Explore more guidesYour rate limiting setup will pay for itself the first time a misbehaving client tries to hammer your endpoints. And when that happens, your bouncer will handle it quietly while you sleep.
Start with the fundamentals before diving into advanced patterns.
Start from the beginning