Netlify is one of the best options for deploying AI-built apps, especially if your project is not a Next.js app or if you want more control over your serverless functions. I have deployed dozens of projects to Netlify, and the pattern is always the same: it feels almost too easy when everything works, and deeply confusing when one small thing is wrong. This guide covers both scenarios.
If your AI tool generated a React app, a static site, a Vite project, or an Astro site, Netlify handles all of them well. It also supports Next.js, though Vercel has deeper integration there. Where Netlify really shines is with static sites and projects that use serverless functions for backend logic. The free tier is generous, and you can deploy unlimited sites on a single account.
What You Need Before Starting
You need the same three things as any deployment. Your code needs to be on GitHub (or GitLab or Bitbucket, but GitHub is most common). You need a Netlify account, which you can create at netlify.com using your GitHub login. And you need your .env file open in a separate window because you are going to reference it throughout this process.
One thing that is specific to Netlify: check whether your project has a netlify.toml file in the root directory. Some AI tools generate this file automatically. If it exists, Netlify will use it for configuration instead of the dashboard settings. This is actually convenient because it means your deployment configuration lives in your code repository, but it can cause confusion if the file has incorrect settings and you are trying to fix them in the dashboard instead.
Connect Your Repository
Log into Netlify and click "Add new site," then "Import an existing project." Choose GitHub as your Git provider. Netlify will ask for permission to access your repositories. Grant it access, then select the repository you want to deploy.
If you do not see your repository, you may need to configure the Netlify GitHub app. Click "Configure the Netlify app on GitHub" and ensure it has access to the repository in question. This permission issue catches people on their first deployment because GitHub's default app permissions are conservative.
Netlify's build settings depend heavily on your framework. A React app created with Vite uses npm run build as the build command and dist as the publish directory. A Create React App project uses npm run build and build. Next.js uses npm run build and .next. Getting these two values wrong is the single most common Netlify deployment failure, and the error message will not tell you directly that this is the problem.
After selecting your repository, Netlify shows you a configuration screen. The three critical fields are "Branch to deploy" (usually main), "Build command" (usually npm run build), and "Publish directory" (depends on your framework). Here are the correct publish directories for common frameworks:
- Vite (React, Vue, Svelte):
dist - Create React App:
build - Next.js:
.next(but use the Netlify Next.js plugin) - Astro:
dist - Static HTML:
.(the root directory)
If your AI tool used a framework you are not sure about, look at your package.json file. Find the build script and run it locally. Whatever folder it creates is your publish directory.
Configure Environment Variables
Before clicking deploy, expand the "Advanced build settings" section. This is where you add your environment variables, and this is where most people skip ahead because they are excited to see their site live. Do not skip this.
Go through your .env file line by line and add each variable. The interface is straightforward: enter the variable name in the "Key" field and its value in the "Value" field. Some important notes about environment variables on Netlify.
Variables are available during the build process and in serverless functions. They are not available in client-side JavaScript unless your framework has a specific prefix convention. For Vite projects, client-side variables must start with VITE_. For Next.js, they must start with NEXT_PUBLIC_. For Create React App, they must start with REACT_APP_. If your client-side code references a variable and it is not showing up, the prefix is almost certainly the problem.

After adding your environment variables, you can click "Deploy site." Netlify will start building your project immediately.
Understanding the Build Output
Netlify's build logs are detailed and scroll in real time. Watch them. When things fail, the answer is almost always in these logs if you read them carefully.
The build process follows a predictable sequence: clone the repository, detect the framework, install dependencies, run the build command, deploy the output. Each of these steps can fail, and each has different solutions.
Dependency installation fails. If you see errors during npm install, your package.json or package-lock.json may be corrupted or out of sync. Delete your local node_modules folder and package-lock.json, run npm install again locally, commit the new package-lock.json, and push. This fixes the issue about 80% of the time.
Build command fails. Read the error carefully. The most common causes are TypeScript errors, missing environment variables that are needed at build time, and imports that reference files that do not exist. Fix the issue locally, verify the build works by running npm run build on your own machine, then push the fix.
Deploy fails with "Page not found." This almost always means your publish directory is wrong. The build succeeded, but Netlify is looking for files in the wrong folder. Go to "Site settings," then "Build & deploy," then "Build settings," and verify the publish directory matches your framework's output.
Serverless Functions
If your app has backend logic (API endpoints, form handlers, database queries), you need serverless functions. Netlify supports these through a netlify/functions directory in your project root.
Each file in this directory becomes an API endpoint. A file at netlify/functions/hello.js becomes available at /.netlify/functions/hello. Your AI tool may have generated these already, or you may need to ask it to create them.
Serverless functions on Netlify have access to your environment variables automatically. This is where you put code that needs secret API keys, database connections, or any logic that should not run in the browser. The function format is simple: export a handler that receives a request and returns a response.
If you are using Next.js on Netlify, API routes in the app/api directory work as serverless functions automatically through the Netlify Next.js adapter. You do not need to move them to the netlify/functions directory.
Putting sensitive logic in client-side code because serverless functions seem complicated. Your API keys, database queries, and authentication logic must run on the server. On Netlify, that means serverless functions. If your AI tool put an API key in a file that runs in the browser, anyone can see it by opening the browser's developer tools. Move that logic to a serverless function immediately, even if the setup takes extra time.
Custom Domains and HTTPS
After deployment, Netlify gives you a URL like random-name-12345.netlify.app. To use your own domain, go to "Domain settings" and click "Add custom domain."
You have two options. Netlify DNS is simpler: point your domain's nameservers to Netlify and they manage everything. Or add DNS records at your existing registrar by creating a CNAME record pointing to your Netlify site URL.
Netlify automatically provisions SSL certificates through Let's Encrypt. Once DNS has propagated (usually within an hour, sometimes up to 48 hours), HTTPS works without additional configuration.
Now that your app is live, make sure it is secure.
Read the security guideContinuous Deployment and Branch Deploys
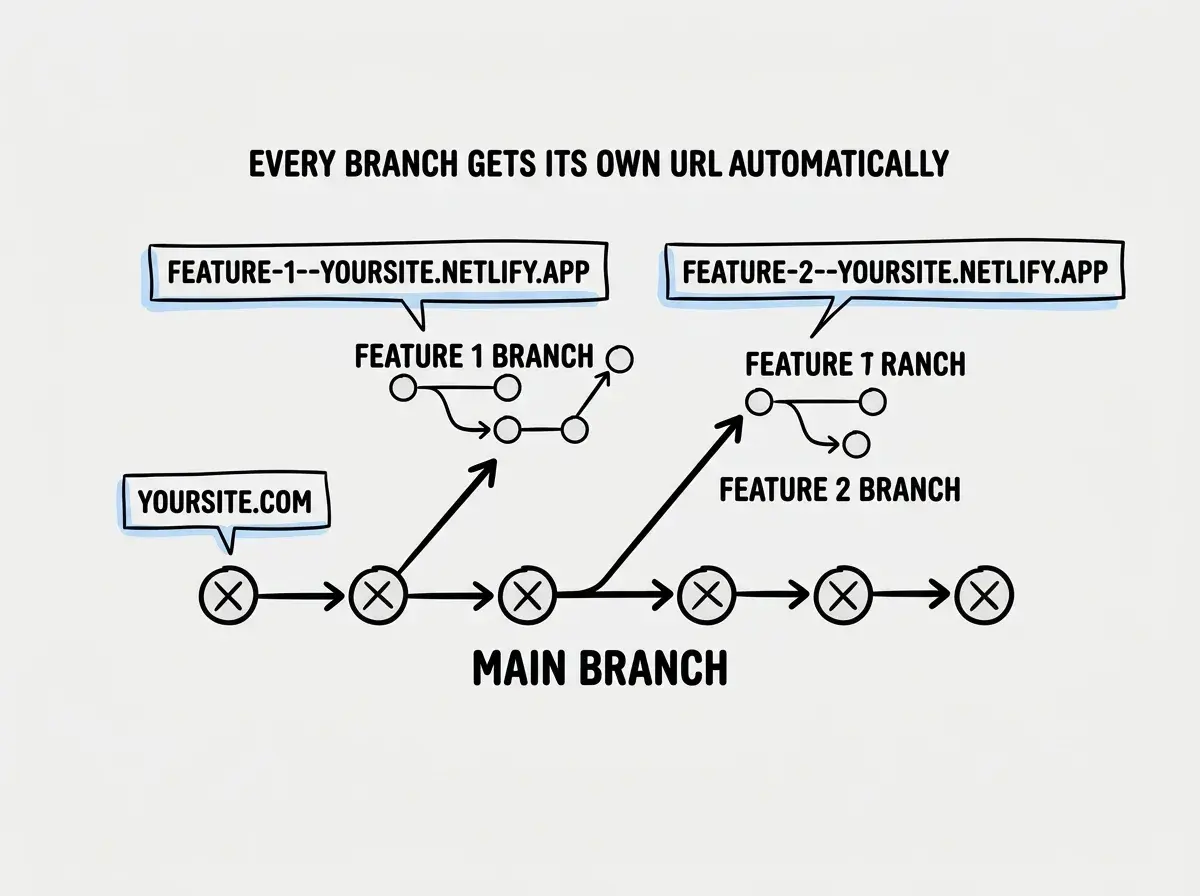
Like Vercel, Netlify deploys automatically when you push to your main branch. Every git push triggers a new build and deployment.
Netlify also supports deploy previews that automatically build pull requests and add a preview link as a comment on the PR. Enable this in "Site settings" then "Build & deploy" then "Continuous deployment." This lets you verify changes work before merging them into production.
Debugging a Failed Deployment
When your deployment fails and you cannot figure out why, here is the systematic approach I use every time.
First, try building locally. Run npm run build on your own machine. If it fails locally, fix it there before pushing. If it succeeds locally but fails on Netlify, the difference is almost always an environment variable or a Node.js version mismatch.
Second, check the Node.js version. Netlify defaults to an older Node.js version that may not support syntax your project uses. Set the Node.js version by adding a NODE_VERSION environment variable in Netlify's dashboard (for example, NODE_VERSION=18). You can also create a .nvmrc file in your project root containing just the version number.
Third, check for case sensitivity. Your Mac treats Image.png and image.png as the same file. Netlify's build servers (running Linux) do not. If your code imports ./components/Header but the file is named header.tsx, it will work locally and fail on Netlify.
What This Means For You
Netlify gives you a professional deployment workflow with zero infrastructure knowledge. The platform handles building, hosting, SSL, CDN distribution, and serverless functions. Your responsibility is getting the configuration right, specifically the build command, publish directory, and environment variables.
- If you are a founder: Netlify's form handling and serverless functions mean you can collect user feedback and process data without building a separate backend. For landing pages and MVPs, this means faster validation with fewer moving parts. Start with a static site and add serverless functions only when you need backend logic.
- If you are a career changer: Netlify's generous free tier and unlimited sites make it ideal for building a portfolio of deployed projects. Each deployment teaches you something new about how web infrastructure works, and having live URLs proves to employers that you can ship, not just code. The deploy preview feature also lets you iterate safely without breaking what you have already built.
- If you are a student: Practice deploying different types of projects to Netlify. Deploy a static HTML page, a Vite React app, and a project with serverless functions. Each teaches you something different about how web applications work. Having a variety of live projects on your portfolio demonstrates breadth, and every deployment will make the next one faster.
Understand the fundamentals before choosing a platform.
Read deployment 101