Migrating between services is like renovating a house while you are still living in it. You cannot tear out the kitchen and the bathroom at the same time, because you need at least one of them functional while the other is being rebuilt. You move room by room, keeping the old system running until the new one is proven, then you switch over and tear out the old pipes.
Most migration horror stories come from developers who tried to renovate everything at once. They switched the database, the auth provider, and the hosting platform in a single weekend, and spent the next week fielding support tickets from users who could not log in, lost their data, or hit 500 errors on every page. The house analogy keeps you safe. One room at a time. Always keep the old plumbing connected until the new plumbing is tested and flowing.
Before You Migrate Anything
Every migration starts with the same three steps, regardless of what you are moving.
Never migrate more than one critical service at a time. Database, auth, hosting, and payments are all load-bearing walls. Move one, verify everything still works, then move the next. Developers who bundle migrations "to save time" end up spending three times as long debugging cascading failures where it is impossible to tell which change broke what.
Document your current setup. Before you change anything, write down exactly how your current system works. What environment variables does it use? What API endpoints does it call? What data does it store and in what format? This documentation becomes your rollback guide if the migration fails. You cannot go back to a house you do not remember the layout of.
Set up monitoring before you migrate. You need to know immediately when something breaks. At minimum, set up uptime monitoring (Betterstack or UptimeRobot, both have free tiers), error tracking (Sentry free tier), and a way to check your database health. If you migrate and something breaks at 2 AM, you want an alert, not a user complaint the next morning.
Create a rollback plan. For every migration step, write down how to undo it. "If the new database fails, point the DATABASE_URL back to the old connection string." "If the new auth provider rejects tokens, re-enable the old provider's middleware." A rollback plan you never use is a success. A rollback plan you need but did not write is a disaster.
Database Migration
Moving your database is the most dangerous renovation. It is the foundation of the house. Everything else sits on top of it.
Export a complete dump of your current database. For PostgreSQL, use pg_dump. For MySQL, use mysqldump. For MongoDB, use mongodump. Store this backup somewhere safe and separate from both the old and new systems. Then analyze the schema. How many tables? How many rows in the largest table? Are there any stored procedures, triggers, or custom types? These determine how complex the migration will be.
Create the new database instance and replicate the schema. Most ORMs (Prisma, Drizzle, TypeORM) can generate the schema from your existing code. Run the migration against the new database and verify the schema matches. Do not import data yet. First confirm the structure is correct.
Import a subset of your data (the first 1,000 rows of each table) into the new database. Run your app against it in a staging environment. Test every major feature: user login, data creation, data retrieval, search, and reporting. This catches schema incompatibilities, character encoding issues, and data type mismatches before you move production data.
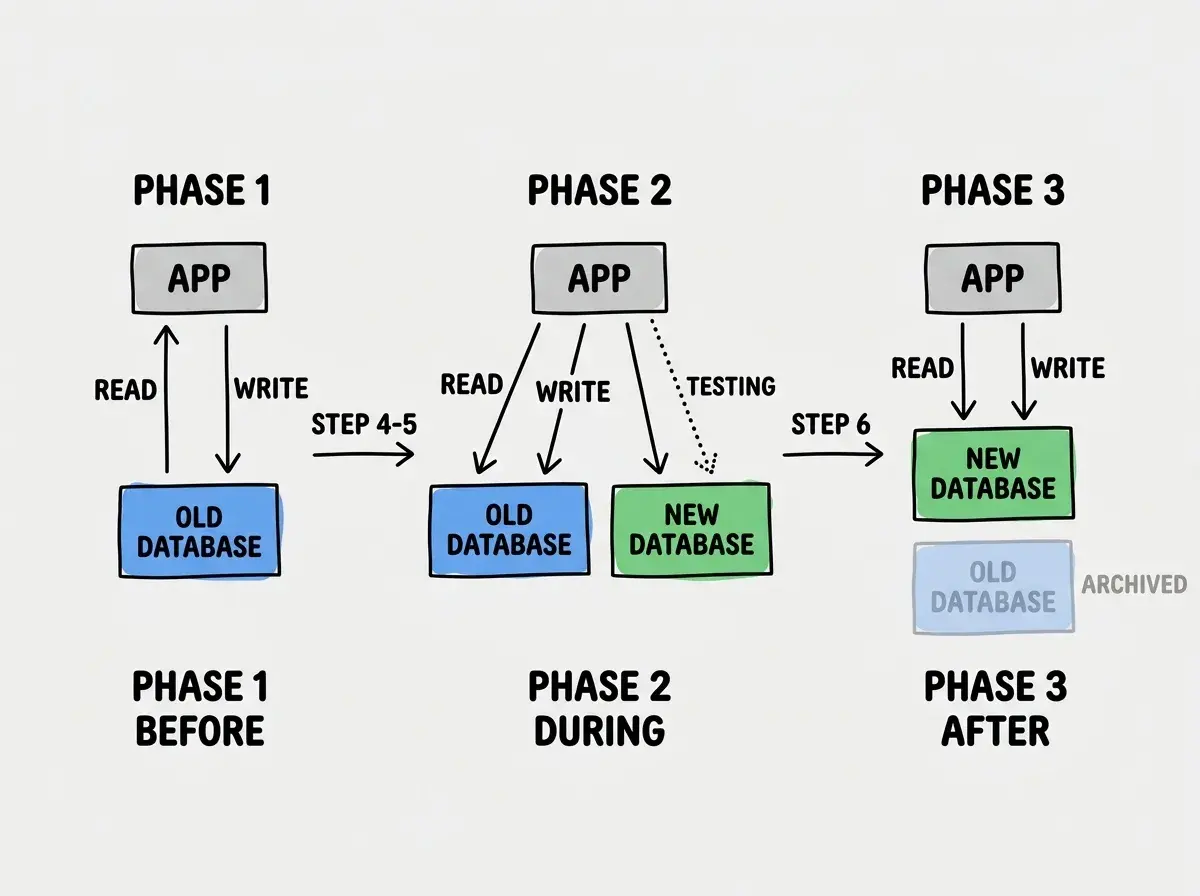
For zero-downtime migrations, configure your app to write to both databases simultaneously. Every INSERT, UPDATE, and DELETE goes to both the old and new database. Read from the old database. This builds up the new database with real production data while keeping the old one as the source of truth. Run dual writes for at least 48 hours to catch edge cases.
Flip your app to read from the new database while still writing to both. Monitor closely for data inconsistencies, slow queries, and missing records. If anything looks wrong, flip reads back to the old database immediately. Your rollback is instant because the old database is still receiving all writes.
Once reads from the new database have been stable for 48-72 hours, stop writing to the old database. Keep the old database running (read-only) for at least two weeks as a safety net. After two weeks with no issues, decommission it. Do not delete it. Archive the final snapshot first.
The dual-write approach is the safest path. Here is how the data flow changes at each phase.
Auth Provider Migration
Auth migrations are uniquely tricky because they affect every single user session. Get it wrong and nobody can log in.
The golden rule: never invalidate existing sessions during migration. Your old auth system issued tokens or cookies that your users' browsers currently hold. The new auth system needs to accept those tokens during a transition period, or you need to map old sessions to new ones transparently. Forcing every user to log in again is technically simple but practically terrible. Users who get logged out unexpectedly often assume they have been hacked and stop using your app.
For JWT-based auth, configure your app to verify tokens from either issuer during the transition. New logins go through the new provider. Existing sessions continue working until their tokens expire naturally. Over 1-2 weeks, all users transition as they log in again.
For session-based auth, export your session store and import it into the new provider. Map user IDs if they changed, then update your session middleware to point at the new store.
Always migrate a test group first. Route 5-10% of users through the new auth provider using feature flags while everyone else stays on the old one. This catches incorrect claim mappings, missing scopes, and redirect URL misconfigurations before they affect your entire user base.
Hosting Migration
Hosting migrations are the least risky when done correctly, because you can run old and new in parallel without data concerns.
The approach is simple: deploy to the new host, test, then switch DNS. Deploy your app to the new hosting provider. Give it a temporary URL. Test every feature manually and with automated tests against the temporary URL. Once everything works, update your DNS records to point your domain at the new host. DNS propagation takes up to 48 hours, during which some users hit the old host and some hit the new one. Both should work.
Keep the old host running for one week after DNS switch. DNS caches at various levels (ISP, browser, operating system) mean some users will continue hitting your old host for days after you update the records. Keep it running and up to date until traffic drops to zero.
Watch for environment variable differences. The most common hosting migration bug is a missing environment variable. Your old host had 15 env vars configured. Your new host has 14 because you forgot one. The app starts but breaks when it tries to use the missing variable. Copy your env vars systematically and verify each one.
Compare hosting platforms for AI-built apps.
See the comparisonPayment Provider Migration
Payment migrations are the highest-stakes renovation. You are dealing with real money, legal compliance, and user trust.
Never migrate active subscriptions in bulk. Instead, let existing subscriptions continue on the old provider. New subscriptions go through the new provider. As existing subscriptions renew, cancel them on the old provider and create corresponding subscriptions on the new one. This gradual approach can take months but eliminates the risk of double-charging users or losing subscription data.
Handle webhook endpoints carefully. Your old payment provider sends webhooks to your app when subscriptions renew, cancel, or fail. Your new provider does the same, but to different endpoints with different payload formats. During the transition, both webhook endpoints must be active. Your app needs to handle events from both providers and apply them to the correct user accounts.
Compliance matters more than speed. PCI DSS compliance, tax calculation, receipt generation, and refund handling all differ between providers. If you are moving from Stripe to Paddle, for example, the tax handling model changes completely (merchant of record vs. platform). Understand these differences before you start migrating, not after.
Turning off the old service before confirming the new one handles every edge case. The most common migration failure is decommissioning the old system too early. A webhook from the old payment provider fires, but you already disabled that endpoint. A user with a cached auth token hits the old provider, but it is gone. Keep old systems running in read-only or receive-only mode for at least two weeks after switching. The cost of running two systems briefly is nothing compared to the cost of lost transactions or locked-out users.
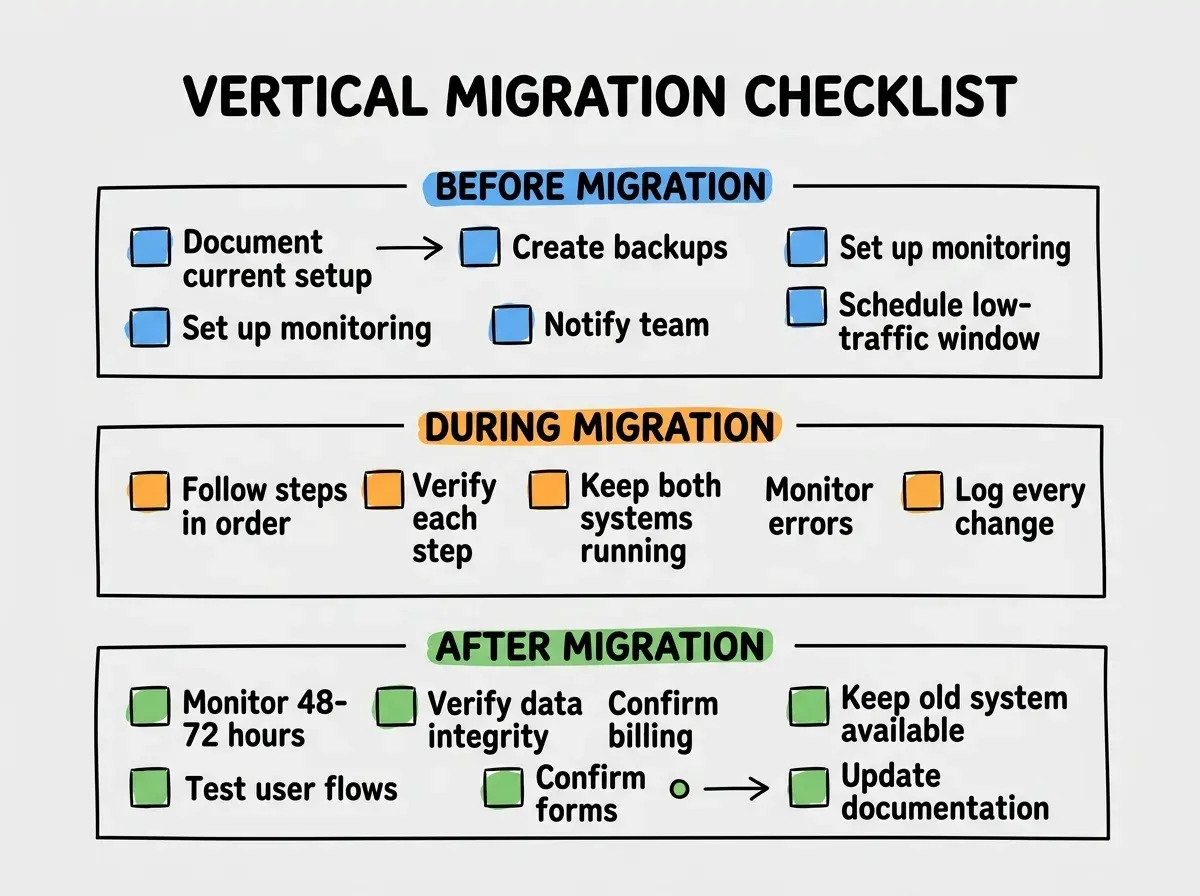
The Universal Migration Checklist
Regardless of what you are migrating, run through this checklist for every move.
Before the migration: document the current setup, create backups, set up monitoring, write the rollback plan, notify your team, and schedule the migration during low-traffic hours.
During the migration: follow your steps in order, verify each step before proceeding, keep both systems running, monitor error rates and response times, and keep a log of every change you make.
After the migration: monitor for 48-72 hours, verify data integrity, confirm billing is correct, test every major user flow, keep the old system available for rollback, and update your internal documentation to reflect the new setup.
How to Decide What to Migrate First
If you need to move multiple services, sequence them by risk level. Start with the lowest-risk migration to build confidence and establish your process. Then work up to the highest-risk moves.
Low risk: hosting. You can run two hosts in parallel easily. Rollback is just a DNS change. No data to synchronize. Start here.
Medium risk: auth. Session and token handling are tricky, but the dual-provider approach limits blast radius. Test with a small user group first.
High risk: database. Data is irreplaceable. Dual writes and gradual cutover are essential. Take your time.
Highest risk: payments. Real money, legal implications, user trust. Gradual migration over weeks or months. Never rush this.
Get the fundamentals of building reliable, portable applications.
Read the guideWhat This Means For You
Renovate one room at a time. Keep the old plumbing connected until the new plumbing is tested. Never tear out the kitchen and the bathroom on the same weekend.
The developers who migrate safely are not the ones who move fastest. They are the ones who keep both systems running until the new one has proven itself under real traffic, with real data, for real users. Patience during migrations is not slow. It is the fastest path to a stable system on the other side.