There comes a point in every Bolt.new project where you start bumping into walls. Maybe your token budget is bleeding out faster than expected. Maybe you need a real database connection, or custom server logic, or a deployment pipeline that does not depend on a browser tab staying open. Whatever the trigger, you have arrived at the same conclusion thousands of other builders reach: it is time to move this project to your own machine.
Think of it like moving from a hotel to your own apartment. The hotel was convenient. Someone else handled the plumbing, the electricity, the furniture layout. You walked in, and everything just worked. But you could not customize the walls. You could not control the thermostat. And every night you stayed cost you more than you planned. Your own apartment takes more setup, but once you are in, you decide how everything works and you stop paying per interaction.
With 92% of developers now using AI tools daily, more people than ever are starting projects in browser-based builders like Bolt. But starting there does not mean you have to stay there. This guide walks you through the full migration, from exporting your Bolt project to running it locally with your own backend, your own database, and your own rules.
When It Makes Sense to Leave Bolt
Not every project needs to leave the browser. If you are building a quick prototype for a demo next week, Bolt is still one of the fastest paths from idea to working app. The migration makes sense when specific pain points start compounding.
Token costs are adding up. The rapid-fire prompting that makes Bolt feel fast also drains your allocation quickly. If you have already spent more on tokens than you planned and the project is not finished, moving to a local setup with a tool like Cursor or VS Code plus an AI extension lets you keep iterating without per-prompt costs eating your budget.
You need real backend infrastructure. Bolt handles frontend beautifully and can scaffold basic Express servers, but connecting to a production Postgres database, setting up background job queues, or integrating third-party APIs with proper secret management pushes beyond what the in-browser environment handles well. In the apartment analogy, this is like needing a home office. The hotel room just does not have the space.
Your project needs to scale. Browser-based environments have memory limits, dependency size limits, and session duration limits. Once your app grows past a certain complexity, you will notice slower previews, missing packages, and inconsistent behavior. A local environment gives your project room to breathe.
You want version control and collaboration. Bolt lets you download code, but working locally gives you Git history, branching, pull requests, and the ability to collaborate with other developers or AI tools on your filesystem.
What a Bolt Export Actually Looks Like
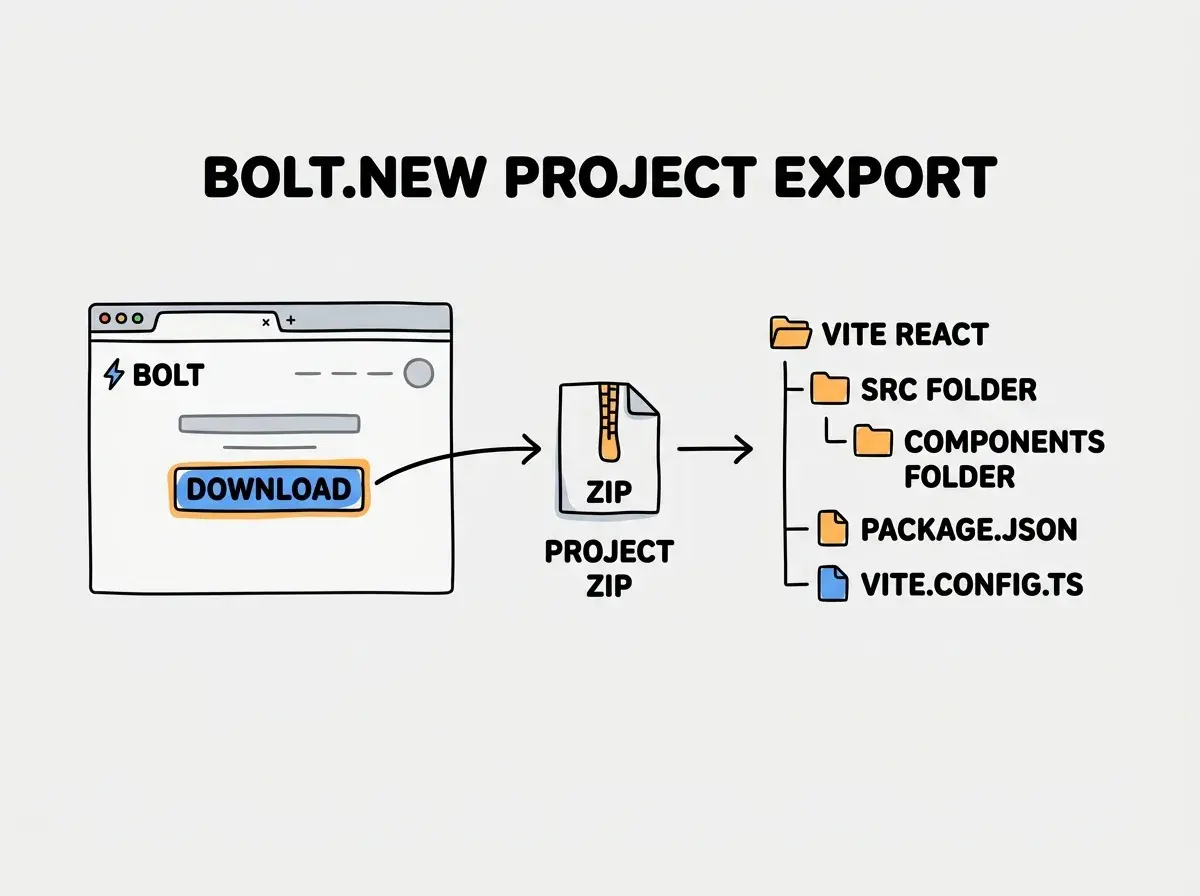
When you hit the download button in Bolt, you get a zip file containing a Vite-based React project. The structure is familiar to anyone who has seen a modern JavaScript app, and completely learnable if you have not.
Here is the typical folder layout:
my-bolt-project/
  src/
    components/      # React components
    App.tsx          # Main app component
    main.tsx         # Entry point
    index.css        # Styles (often Tailwind)
  public/            # Static assets
  package.json       # Dependencies and scripts
  vite.config.ts     # Build configuration
  tsconfig.json      # TypeScript settings
  index.html         # HTML entry point
The package.json lists every dependency your project uses. The src/ folder contains all the React components Bolt generated. If Bolt set up Tailwind CSS for styling, you will see a tailwind.config.js and PostCSS configuration as well.
One important thing to know is that Bolt projects do not include a .git folder, a .env file, or any deployment configuration. Those are all things you will set up yourself, which is actually a good thing. You get a clean starting point without leftover configuration that might conflict with your setup.
Step-by-Step Local Setup
Here is the exact process to go from a downloaded zip to a running local project. You will need Node.js installed on your machine. If you do not have it yet, download it from nodejs.org and install the LTS version.
Step 1: Unzip and open the project. Extract the zip file to wherever you keep your projects. Open the folder in your code editor. If you are using VS Code or Cursor, you can drag the folder directly onto the application icon.
Step 2: Install dependencies. Open a terminal in the project folder and run:
npm install
This reads the package.json and downloads every package your project needs. It will create a node_modules folder and a package-lock.json file. This step is where most first-time issues appear, and I will cover those in the troubleshooting section below.
Step 3: Start the development server. Run:
npm run dev
If everything installed correctly, you will see a message with a local URL, usually http://localhost:5173. Open that in your browser and you should see your app running exactly as it did in Bolt, except now it is on your machine.
Step 4: Initialize version control. Set up Git so you have a safety net for every change going forward:
git init
git add .
git commit -m "Initial export from Bolt.new"
Now you have a snapshot you can always return to if something breaks during migration.
Step 5: Create your environment file. Create a .env file in the project root for any secrets or configuration values:
VITE_API_URL=http://localhost:3001
VITE_SUPABASE_URL=your-project-url
VITE_SUPABASE_ANON_KEY=your-anon-key
In Vite projects, environment variables must start with VITE_ to be accessible in the browser. This is different from Next.js, which uses NEXT_PUBLIC_ for client-side variables.
The migration itself is straightforward. Export, install, run. The real work starts after, when you connect your own backend, add proper environment variables, and set up the deployment pipeline. Plan for that second phase before you start the migration so you do not end up with a project that runs locally but has nowhere to go.
Connecting Your Own Backend and Database
Most Bolt projects start with everything in the frontend, often using localStorage or mock data. Moving to local development is the perfect time to add a real backend.
Option 1: Add Supabase. If your Bolt app uses any form of data storage, Supabase is one of the fastest paths to a real database. Create a free Supabase project, copy your project URL and anon key into your .env file, and install the client library:
npm install @supabase/supabase-js
Then replace any localStorage calls with Supabase queries. Your data now lives in a real Postgres database with authentication, row-level security, and real-time subscriptions available when you need them.
Option 2: Keep the Express server Bolt generated. If Bolt scaffolded a backend, split it into its own server/ directory and run the frontend and backend as separate processes. This gives you independent control over each layer.
Option 3: Build a new API layer. If your app has outgrown what Bolt generated, build a proper API using Next.js API routes, Express, Fastify, or serverless functions on Vercel or Cloudflare Workers. The frontend Bolt generated will work with any backend that serves the right JSON responses.
Back to the apartment analogy. In the hotel, the kitchen came pre-stocked with whatever the hotel decided. In your apartment, you choose your own appliances. More work upfront, but the meals are exactly what you want.
Troubleshooting Common Migration Issues
After helping several people through this process and doing it myself, here are the issues that come up most often.
Missing or incompatible dependencies. Bolt's in-browser environment has certain packages pre-installed that do not ship with the export. If npm install fails or the app crashes on start, read the error message carefully. It usually names the missing package. Install it with npm install package-name and try again.
Node version mismatches. Bolt runs a specific Node.js version in its WebContainer. If your local Node version is significantly older, some packages might not work. Run node -v to check your version. If it is below 18, upgrade to the latest LTS.
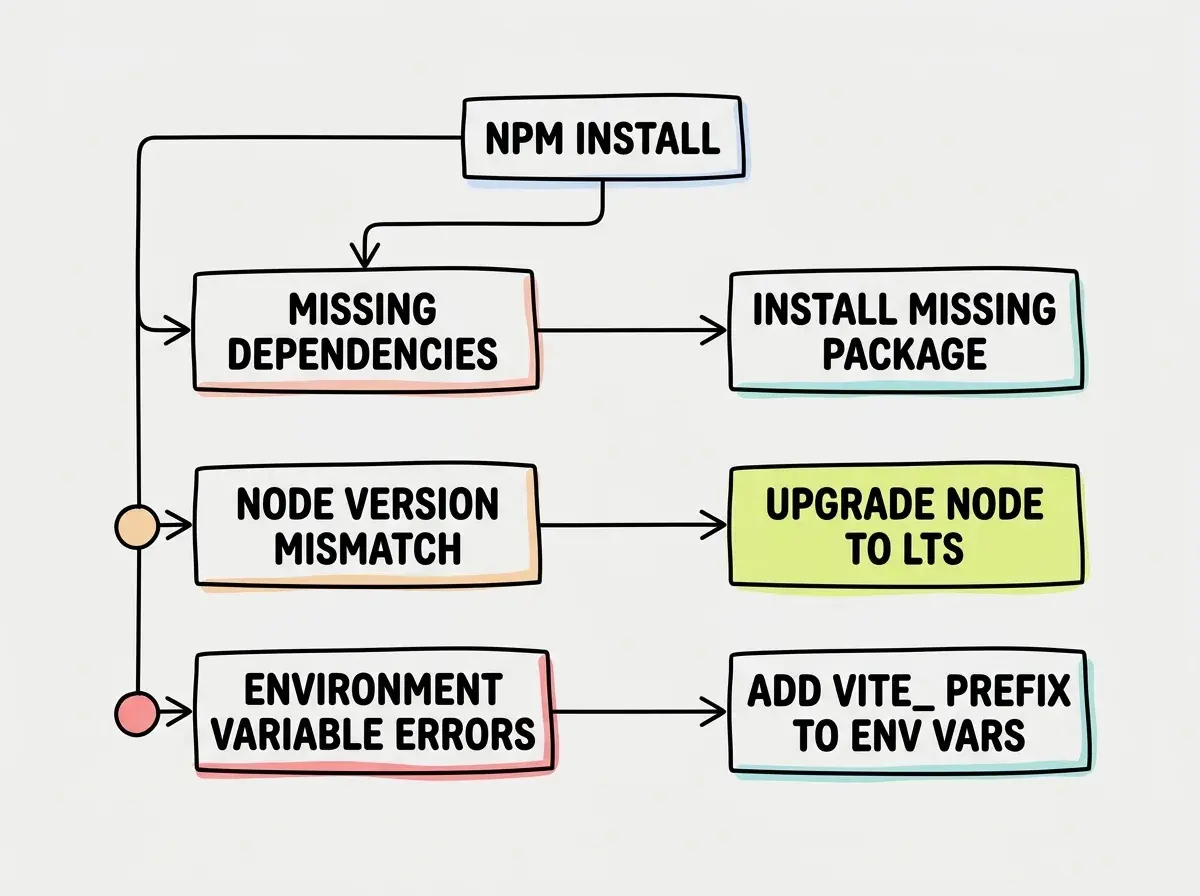
Environment variable errors. If your Bolt project referenced any API keys or URLs through the Bolt interface, those values did not come with the export. You need to recreate them in your .env file. Watch for the VITE_ prefix requirement. A variable named API_KEY in your code needs to be VITE_API_KEY in the .env file, or Vite will not expose it to your application.
Path and import issues. Bolt sometimes generates imports that work in its environment but break locally due to case sensitivity differences between operating systems. If you see "module not found" errors, check that the file name casing in the import statement matches the actual file on disk exactly.
Trying to migrate a project while it is still half-built in Bolt. Finish the core functionality in Bolt first, make sure everything works in the browser preview, and then export. Migrating a broken project means debugging two things at once: the original bugs and the migration issues. Get it working in one place before moving it to another.
What Comes After Migration
Once your project runs locally, you are in a fundamentally different position. You have moved from the hotel to the apartment, and now you can make it yours.
Set up a GitHub repository and push your code. Configure a deployment pipeline on Vercel, Netlify, or Cloudflare Pages so that every push to main automatically deploys your app. Add an AI coding tool like Cursor or Claude Code to your local workflow so you still get AI assistance without per-token costs eating into your budget.
The skills you build during this migration are exactly what separates someone who can only build inside a browser tool from someone who can build anything, anywhere.
Learn the fundamentals of setting up your development environment from scratch.
Start hereWhat This Means For You
Migrating from Bolt.new to local development is not about outgrowing AI tools. It is about graduating from a managed environment to one you control. You still use AI. You still move fast. But you stop paying per prompt and you start making infrastructure decisions that scale.
- If you are a founder who prototyped in Bolt: Your prototype validated the idea. Now set up a proper development environment, connect a real database, and build the version that handles actual users. The code Bolt generated is a solid starting point, not a final product.
- If you are changing careers into tech: This migration is one of the most valuable exercises you can do. It touches package management, environment configuration, version control, and deployment. Every concept you encounter during the process is something you will use in professional development work.
The hotel served its purpose. You got up and running fast, you tested your idea, and you learned what you were building. Now it is time to move into a place where you control the thermostat.
See how Bolt.new compares to other tools in the vibe coding ecosystem.
Browse tools