GitHub Actions deploy your code automatically every time you push to a repository. If you are building with AI tools and pushing to GitHub, you already have the infrastructure for automated builds and deploys sitting right there, unused. This tutorial walks through setting it up with real YAML files and warnings about the mistakes that cost hours.
Here is the honest context. Platforms like Vercel and Netlify already handle build-and-deploy when you push code. They do this well. But they do not run your tests. They do not lint your code. They do not catch the broken import that your AI tool introduced three commits ago. GitHub Actions fills that gap by running whatever checks you want before your code reaches production. With 92% of US developers now using AI tools daily and 46% of code being AI-generated, automated quality gates are not optional anymore. They are the safety net between AI output and your users.
What GitHub Actions Actually Are
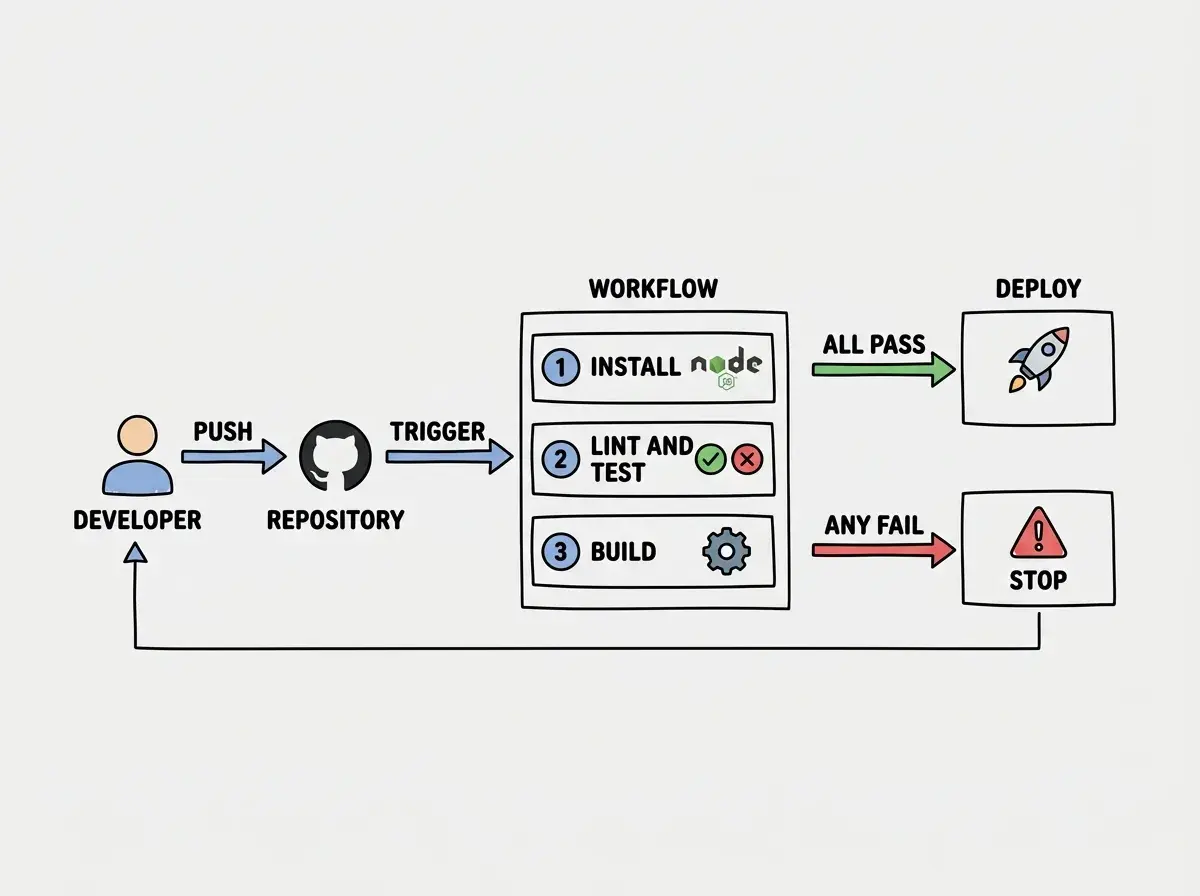
GitHub Actions is a CI/CD system built into GitHub. CI stands for continuous integration (automatically testing code when it changes) and CD stands for continuous deployment (automatically shipping code after tests pass). You define workflows in YAML files, and GitHub runs them on its own servers whenever a trigger event happens.
The key concept is that a workflow is just a series of steps that run on a fresh virtual machine. That machine has nothing installed except a base operating system. Your workflow has to set everything up from scratch: install Node.js, install your dependencies, then run whatever commands you need. This is different from your local machine, where everything is already configured.
This "fresh machine" model is actually a strength. If your workflow passes, you know the build works on a clean environment, not just on your laptop with its unique collection of globally installed packages and cached files.
The Workflows Directory
GitHub Actions looks for workflow files in one specific location: .github/workflows/ at the root of your repository. If this directory does not exist, create it. Every .yml or .yaml file in this directory becomes a workflow that GitHub can run.
mkdir -p .github/workflows
You can have multiple workflow files. A common pattern is one for CI (testing and linting) and one for deployment. Each file is independent and can have different triggers.
A Complete CI Workflow for Next.js
Here is a full ci.yml file that installs dependencies, runs linting, runs tests, and builds your Next.js app. This catches the majority of problems that AI-generated code introduces.
name: CI

on:
  push:
    branches: [main]
  pull_request:
    branches: [main]

jobs:
  ci:
    runs-on: ubuntu-latest

    steps:
      - name: Checkout code
        uses: actions/checkout@v4

      - name: Set up Node.js
        uses: actions/setup-node@v4
        with:
          node-version: 20
          cache: 'npm'

      - name: Install dependencies
        run: npm ci

      - name: Run linter
        run: npm run lint

      - name: Run tests
        run: npm test

      - name: Build
        run: npm run build
Save this as .github/workflows/ci.yml, push it to GitHub, and the workflow will run immediately. Let me walk through what each section does.
The on block defines triggers. This workflow runs on every push to the main branch and on every pull request that targets main. The pull_request trigger is the important one because it runs checks before code gets merged. If the workflow fails on a pull request, GitHub shows a red X next to it, warning you not to merge.
The runs-on field tells GitHub which type of virtual machine to use. ubuntu-latest is the standard choice and is free for public repositories with generous limits for private ones.
The steps array is where the real work happens. Each step runs sequentially, and if any step fails, the entire workflow stops. This means your linter runs before your tests, and your tests run before the build. If linting fails, you do not waste time waiting for a build.
The cache: 'npm' line on the Node.js setup step is critical for speed. Without it, every workflow run downloads all your dependencies from scratch. With caching, npm stores the downloaded packages between runs and only fetches what has changed. On a typical Next.js project, this cuts workflow time from three to four minutes down to one to two minutes.
The npm ci command is not the same as npm install. It does a clean install based on your package-lock.json file, which ensures your CI environment matches exactly what you tested locally. Using npm install in CI can introduce version drift that causes mysterious failures. Always use npm ci in your workflows.
Now that you have the core CI workflow in place, the next step is controlling when it runs. GitHub Actions gives you fine-grained control over workflow triggers.
Learn what happens when you take your app from localhost to the internet.
Start with the basicsUnderstanding Triggers
The on block supports many more triggers than just push and pull request. Here are the ones that matter most for vibe coders.
push runs when code is pushed to matching branches. You can also filter by file paths, so the workflow only runs when specific directories change:
on:
  push:
    branches: [main]
    paths:
      - 'src/**'
      - 'package.json'
pull_request runs when a PR is opened, updated, or reopened against matching branches. This is your pre-merge safety net.
workflow_dispatch lets you trigger a workflow manually from the GitHub UI. Useful for deploy workflows you want to run on demand:
on:
  workflow_dispatch:
schedule runs on a cron schedule. This is useful for nightly builds or periodic dependency checks, but most vibe coders will not need it immediately.
Storing Secrets in GitHub
Your workflows will need environment variables that should not be in your code. API keys, deploy tokens, database URLs. GitHub has a built-in secrets system for this.
Go to your repository on GitHub, click Settings, then Secrets and variables, then Actions. Click "New repository secret" and add each value. In your workflow file, you reference secrets like this:
- name: Build
  run: npm run build
  env:
    DATABASE_URL: ${{ secrets.DATABASE_URL }}
    NEXT_PUBLIC_API_URL: ${{ secrets.NEXT_PUBLIC_API_URL }}
One warning: secrets are not available in pull requests from forks. This is a security feature. For most vibe coding projects where you are the only contributor, it will not affect you.
Hardcoding API keys or tokens directly in your workflow YAML file. Your workflow files are committed to your repository, which means anyone with access to the repo can see them. Always use GitHub Secrets for sensitive values and reference them with the ${{ secrets.SECRET_NAME }} syntax. If you accidentally commit a secret, rotate it immediately because Git history is permanent.
Deploying to Vercel via GitHub Actions
Vercel deploys automatically when you push to a connected repository. So why would you use GitHub Actions for deployment? Because you want the deploy to happen only after your tests pass. Without Actions, a push to main triggers both your CI checks and the Vercel deploy simultaneously. If your tests fail, Vercel has already deployed the broken code.
Here is a deploy workflow that waits for CI to pass first:
name: Deploy

on:
  workflow_run:
    workflows: [CI]
    types: [completed]
    branches: [main]

jobs:
  deploy:
    runs-on: ubuntu-latest
    if: ${{ github.event.workflow_run.conclusion == 'success' }}

    steps:
      - name: Checkout code
        uses: actions/checkout@v4

      - name: Deploy to Vercel
        uses: amondnet/vercel-action@v25
        with:
          vercel-token: ${{ secrets.VERCEL_TOKEN }}
          vercel-org-id: ${{ secrets.VERCEL_ORG_ID }}
          vercel-project-id: ${{ secrets.VERCEL_PROJECT_ID }}
          vercel-args: '--prod'
The difference between deploying with and without GitHub Actions comes down to one thing: whether broken code can reach production.
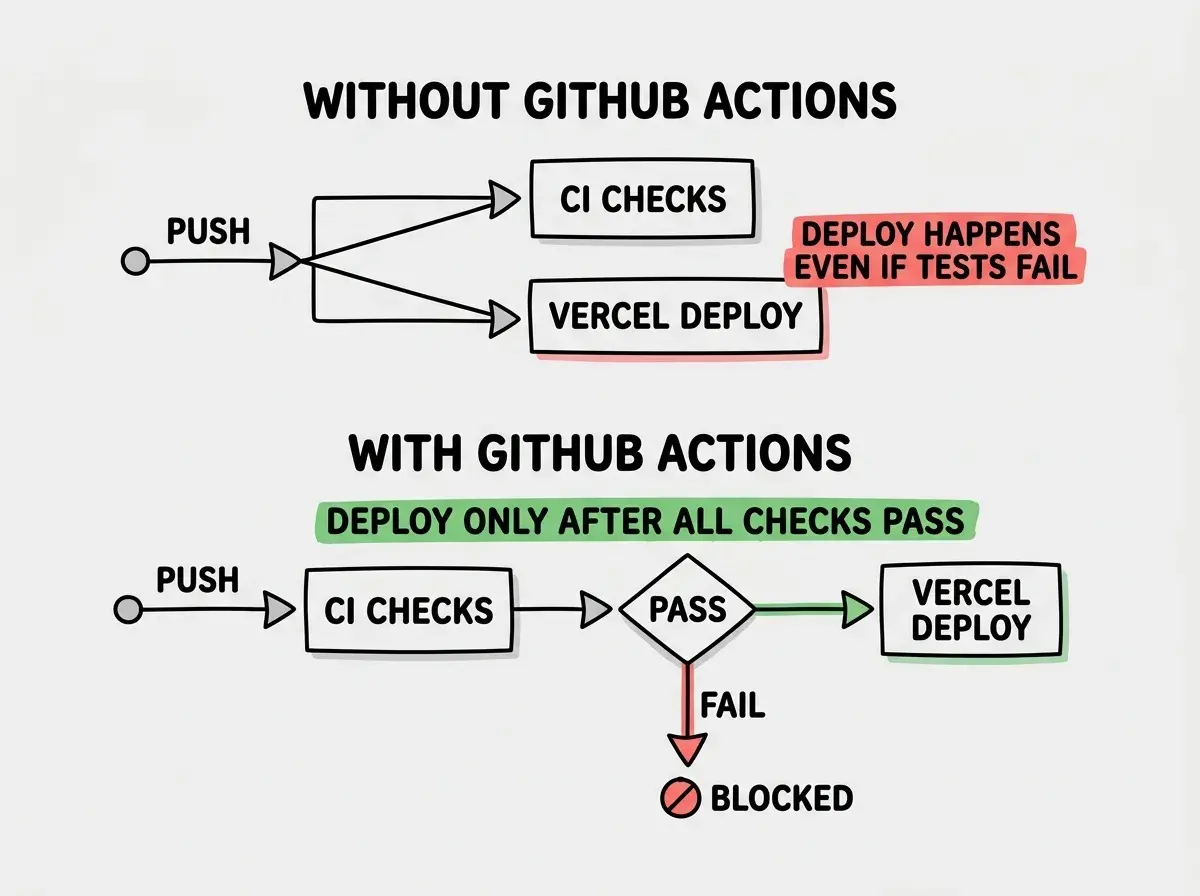
The workflow_run trigger makes this deploy workflow wait for the CI workflow to complete. The if condition ensures it only deploys when CI succeeded. If your tests fail, no deployment happens.
For Netlify, the pattern is similar. Use the netlify/actions/cli@master action with your Netlify auth token and site ID stored as secrets.
The key step for either platform is to disable automatic deploys in the platform's settings. In Vercel, go to your project settings, find the Git section, and turn off "Automatically deploy on push." This way, only your GitHub Actions workflow triggers deploys, and it only does so after tests pass.
Caching Dependencies for Speed
The cache: 'npm' option in the Node.js setup step handles the basics, but you can go further. If your project has a heavy build step that produces the same output for the same inputs, you can cache the build output too:
- name: Cache Next.js build
  uses: actions/cache@v4
  with:
    path: .next/cache
    key: nextjs-${{ runner.os }}-${{ hashFiles('package-lock.json') }}-${{ hashFiles('src/**') }}
    restore-keys: |
      nextjs-${{ runner.os }}-${{ hashFiles('package-lock.json') }}-
      nextjs-${{ runner.os }}-
This caches the .next/cache directory, which Next.js uses to store incremental build results. On subsequent runs, the build step skips work if your source files have not changed much. For large projects, this cuts build times by 40% to 60%. The restore-keys provide fallback matches so partial cache hits still help.
What This Means For You
GitHub Actions is free infrastructure that sits between your AI-generated code and your users. Setting it up takes 15 minutes and pays for itself the first time it catches a broken build before it reaches production.
- If you are an indie hacker: Start with the basic CI workflow. Add linting and a build check. You do not need tests on day one, but having the workflow in place means you can add tests later without changing your deployment process. The discipline of "green checks before merge" will save you from shipping broken features to paying customers.
- If you are a senior developer adopting AI tools: You already know why CI/CD matters, but you might be surprised how often AI-generated code passes local checks and fails in CI. The clean environment of a GitHub Actions runner exposes hidden dependencies on local state that your machine masks. Treat your CI workflow as a trust-but-verify layer for AI output.
- If you are a team lead: Require passing CI checks before merging pull requests. In your GitHub repository settings, go to Branches, add a branch protection rule for
main, and check "Require status checks to pass before merging." This single setting prevents anyone (including AI tools with push access) from shipping code that breaks the build.
Automated builds are step one. Learn what else to check before shipping.
Read the security guide