A CI CD pipeline is the system that takes your code from a git push to a live website without you manually running builds, copying files, or SSHing into a server. If you have ever pushed to GitHub and watched Vercel or Netlify automatically deploy your site, you have already used one. This tutorial explains what is actually happening behind the scenes and how to make it do more.
Most vibe coders think CI/CD is something only DevOps teams at big companies deal with. It is not. The push-to-deploy workflow you already use is a CI/CD pipeline. A simple one, but a real one. Understanding the pieces means you can add tests, linting, and quality checks that catch problems before they reach your users. 92% of US developers now use AI tools daily, and AI-generated code needs these automated checks more than hand-written code ever did.
What CI and CD Actually Mean
Think of a CI CD pipeline like an assembly line in a factory. Raw materials come in one end, quality checks happen at each station along the line, and a finished product rolls off the other end. Your code is the raw material. The finished product is a deployed website.
CI stands for Continuous Integration. This is the first half of the assembly line. Every time you push code, the system automatically pulls your changes, installs dependencies, runs your tests, checks for linting errors, and verifies the build compiles without errors. The word "integration" means it checks that your new code integrates cleanly with everything else in the project.
CD stands for Continuous Deployment (or Continuous Delivery). This is the second half. If every check in the CI stage passes, the system automatically deploys the new version to production. Continuous Delivery means a human still clicks "deploy" at the end. Continuous Deployment means it happens automatically with zero human intervention.
When you push to GitHub and Vercel builds and deploys your site automatically, that is continuous deployment. There is no approval step. Code goes from your machine to production in one push.
git push origin main
  -> GitHub receives code
  -> Vercel detects the push
  -> Installs dependencies (CI)
  -> Runs the build (CI)
  -> Deploys to CDN (CD)
  -> Live at your-site.vercel.app
That is a CI/CD pipeline. You have been using one this whole time.
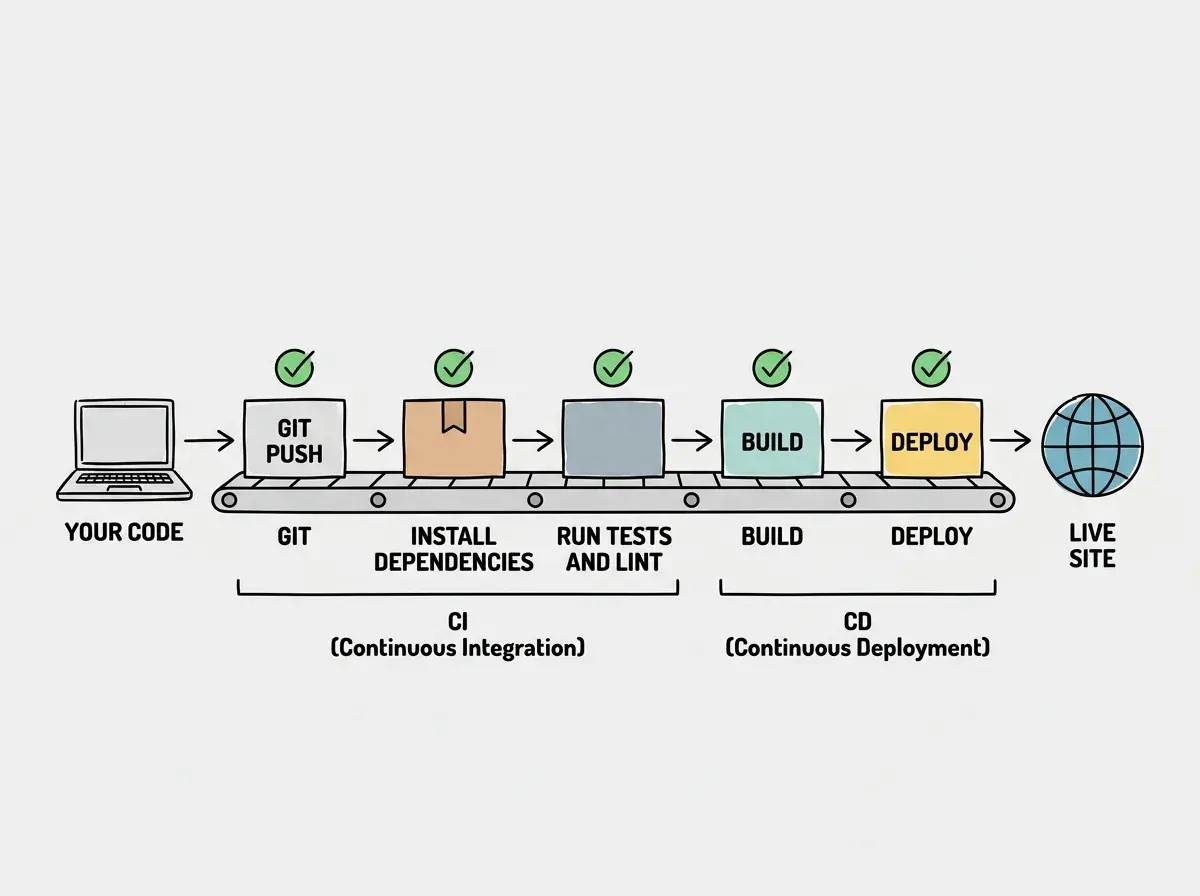
Why Push-to-Deploy Is Already Enough for Many Projects
Here is the honest truth. If you are building a personal project, a portfolio, or an early-stage product, the default push-to-deploy from Vercel or Netlify is a perfectly good CI/CD pipeline. It runs your build, and if the build fails, it does not deploy. That single check catches a surprising number of problems.
You do not need to set up GitHub Actions, write YAML files, or configure test runners to have a working CI/CD pipeline. The hosting platforms do the heavy lifting. Vercel runs npm run build on every push. If TypeScript finds a type error, the build fails and the old version stays live. If a dependency is missing, the build fails. That is CI doing its job.
The question is when to add more. And the answer is straightforward: add more checks when bugs start reaching production. If you keep finding issues after deploy that could have been caught earlier, it is time to expand your pipeline.
Adding GitHub Actions for Tests and Linting
GitHub Actions is a free CI system built into GitHub. You define a workflow in a YAML file, and GitHub runs it on every push or pull request. This runs before Vercel even starts its build, giving you an earlier checkpoint on the assembly line.
Here is a basic workflow that runs your linter and tests on every push:
# .github/workflows/ci.yml
name: CI

on:
  push:
    branches: [main]
  pull_request:
    branches: [main]

jobs:
  lint-and-test:
    runs-on: ubuntu-latest

    steps:
      - name: Checkout code
        uses: actions/checkout@v4

      - name: Setup Node
        uses: actions/setup-node@v4
        with:
          node-version: 20
          cache: 'npm'

      - name: Install dependencies
        run: npm ci

      - name: Run linter
        run: npm run lint

      - name: Run tests
        run: npm test

      - name: Build
        run: npm run build
That is 30 lines. Save it as .github/workflows/ci.yml in your repo, push, and GitHub will run it automatically. The workflow installs your dependencies, runs your linter, runs your tests, and attempts a full build. If any step fails, the whole workflow fails and you see a red X on your commit.
Breaking down what each piece does on the assembly line:
npm ciinstalls exact versions from your lockfile, ensuring the CI environment matches yoursnpm run lintcatches code style issues, unused variables, and potential bugsnpm testruns your test suite (if you have one)npm run buildverifies the production build compiles cleanly
You do not need all four steps to start. Even just linting on every push catches a significant number of issues. Add tests later when your project grows.
You do not need to set up a CI/CD pipeline from scratch. If you use Vercel, Netlify, or Cloudflare Pages, you already have one. GitHub Actions adds earlier checks like linting and tests before the deploy platform even starts. Think of it as adding more quality stations to an assembly line that already exists.
Preview Deployments Are Part of Your Pipeline
One of the most useful CI/CD features that Vercel and Netlify provide is preview deployments. Every time you open a pull request, the platform automatically builds and deploys that branch to a unique preview URL. This is CI/CD working for you in a way that matters more than most people realize.
Preview deployments let you see exactly what your changes will look like in production before they merge into main. You can share the preview URL with someone else for feedback. You can test on your phone. You can click through the whole site and verify nothing looks broken.
This fits neatly into the assembly line model. Your main branch pipeline deploys to production. Your pull request pipeline deploys to a preview. Both run the same build process and the same checks. The only difference is where the finished product goes.
Pull Request opened
  -> GitHub Actions runs lint + tests
  -> Vercel builds preview deployment
  -> Preview URL appears in the PR
  -> You review the preview
  -> Merge the PR
  -> Vercel deploys to production
If you are working alone, you might think pull requests are unnecessary overhead. They are not. A pull request with a preview deployment gives you a checkpoint. It forces a pause between writing code and shipping it. That pause has saved me from deploying broken things more times than I can count.
Learn how deployment works before adding pipeline steps.
Start with the basicsMaking Your Pipeline Smarter Over Time
The beauty of a CI CD pipeline is that it grows with your project. You start with push-to-deploy. Then you add linting. Then tests. Then maybe a step that checks your bundle size, or a step that runs accessibility checks, or a step that verifies your environment variables are set.
Here are practical additions you can make as your project matures:
Type checking as a separate step. If you use TypeScript, add npx tsc --noEmit as its own step. This catches type errors faster than waiting for the full build to fail.
Bundle size monitoring. Tools like @next/bundle-analyzer can track your JavaScript bundle size. Add a step that fails the pipeline if the bundle grows past a threshold you set.
Lighthouse CI. Google's Lighthouse can run in CI and check your performance score, accessibility score, and SEO score on every push. If your performance drops below 90, the pipeline fails and you fix it before deploying.
Dependency vulnerability scanning. Add npm audit --audit-level=high as a pipeline step. This catches known security vulnerabilities in your dependencies before they ship.
Each addition is one more station on the assembly line. One more check that catches problems before your users do. You do not need all of them on day one. Add them when you feel the pain of not having them.
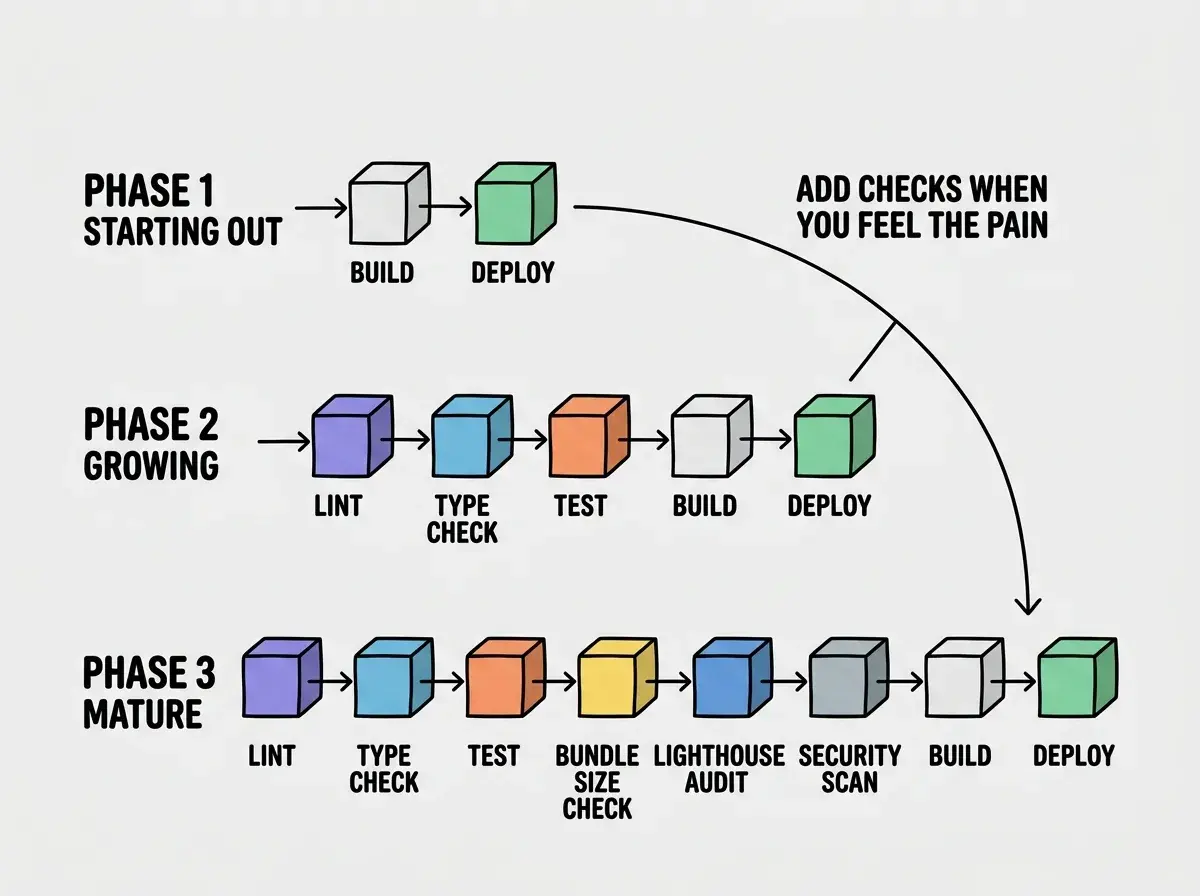
The key is letting real problems guide what you add. If your linter keeps catching issues from AI-generated code, that check is earning its place. If a check never fails, it might just be slowing you down.
Over-engineering your CI/CD pipeline before you need it. Adding 15 checks to a side project with no users will slow down your development without catching real problems. Start with the build step your hosting platform already provides. Add linting when sloppy code starts costing you time. Add tests when bugs start reaching production. Let the pain guide the investment.
The Real Cost of Not Having Checks
Here is what happens without CI checks in a vibe coding workflow. You prompt your AI tool to add a new feature. It generates 200 lines of code across four files. You glance at it, it looks right, you push. The build passes because there are no syntax errors. But the AI introduced a subtle bug: it forgot to handle the empty state, or it broke an existing feature you did not think to check. Without automated linting, that bug ships to production.
AI tools generate code fast, but they do not verify their own work. A CI/CD pipeline is the verification layer. It is the quality inspector standing at each station on the assembly line, catching defects before the product reaches the customer.
Learn the full workflow from building to deploying your project.
See the shipping guideWhat This Means For You
If you are using Vercel, Netlify, or Cloudflare Pages, you already have a CI/CD pipeline. It runs your build and deploys on every push. That is real, and for many projects it is enough.
When you are ready for more, create a .github/workflows/ci.yml file with linting and a build step. That takes five minutes and catches problems before they reach your hosting platform. Add tests when bugs start slipping through. Add bundle size checks when performance starts dropping. Let each addition solve a real problem you have actually experienced.
The assembly line metaphor is the one to hold onto. Every station you add catches something the previous stations missed. You do not need to build the entire factory on day one. Start with what your hosting platform gives you for free, and add stations when the defects tell you it is time.