If you want to Fly.io deploy a full-stack app that runs close to your users worldwide, this is one of the few platforms built for that problem. 92% of US developers use AI tools daily, and vibe-coded apps ship faster than ever. But building speed means nothing if your users in Tokyo wait 400ms for a query routed through Virginia.
Fly.io solves this by running your application on lightweight virtual machines (called Machines) in data centers around the world. Unlike serverless platforms, Fly.io gives you real servers with persistent processes, writable file systems, and direct control over what runs where. That matters when your app needs a database, WebSocket connections, or background jobs.
What Fly.io Actually Is
Fly.io converts Docker containers into micro-VMs running on bare metal servers across 30+ regions globally. When a user in London makes a request, Fly.io routes them to the nearest machine. When a user in Sao Paulo makes the same request, they hit a different machine. Your code is identical. The latency is dramatically different.
This is edge deployment in the real sense. Not "edge functions" that run a thin JavaScript layer near the user while calling back to a central server for data. Full application instances, with databases, running where your users actually are.
The tradeoff is more configuration than Vercel or Railway. You are managing real infrastructure, even if Fly.io abstracts the hard parts. If your app is a simple static site, this is more power than you need. If your app has a backend, a database, and users in multiple countries, keep reading.
Installing flyctl and Your First Deployment
Everything on Fly.io starts with their CLI tool, flyctl. Install it with a single command:
# macOS
brew install flyctl

# Linux
curl -L https://fly.io/install.sh | sh

# Windows
powershell -Command "iwr https://fly.io/install.ps1 -useb | iex"
After installation, authenticate with fly auth login. This opens a browser window to create an account or log in. You will need a credit card on file even for free tier usage.
Navigate to your project directory and run:
fly launch
This detects your application type (Node.js, Python, Go, Rails, etc.), generates a Dockerfile if you do not have one, creates a fly.toml configuration file, and provisions a machine in a region near you. The prompts let you choose your app name, region, and whether to set up a Postgres database immediately.
fly launch is intelligent about detecting frameworks. It recognizes Next.js, Remix, Rails, Django, Laravel, Go, and dozens of other stacks. The auto-generated Dockerfile is usually production-ready, but always review it. AI-generated apps sometimes have unusual dependency patterns that the detection misses, like Sharp for image processing or native modules that need specific system libraries.
For a typical Node.js app, fly launch generates a Dockerfile that installs dependencies, builds your project, and starts it with npm start. The whole process takes about two minutes and gives you a live URL.
Understanding fly.toml
The fly.toml file is your deployment configuration. Understanding it saves you from most deployment issues. Here is a typical config for a full-stack Node.js app:
app = "my-vibe-app"
primary_region = "iad"

[build]

[http_service]
  internal_port = 3000
  force_https = true
  auto_stop_machines = "stop"
  auto_start_machines = true
  min_machines_running = 0

[env]
  NODE_ENV = "production"
  PORT = "3000"
The fields that matter most are primary_region (where your database lives), internal_port (the port your app listens on), and the auto-scaling settings. auto_stop_machines is critical for cost control. Set to "stop", Fly.io pauses idle machines and restarts them on demand, keeping your bill near zero during quiet periods.

You set secrets (environment variables that should not be in your repository) with the CLI:
fly secrets set DATABASE_URL="postgres://..." API_KEY="sk-..."
These are encrypted and injected at runtime. Never put secrets in fly.toml or your Dockerfile. The [env] section in fly.toml is for non-sensitive configuration only.
Built-in Postgres
One of Fly.io's strongest features for full-stack apps is integrated Postgres. When you run fly launch, it offers to create a Postgres cluster for you. If you skipped that step, you can add one later:
fly postgres create --name my-app-db
fly postgres attach my-app-db
The attach command automatically sets a DATABASE_URL secret on your app. No connection strings to copy, no external database providers. The database runs on its own Fly Machine in the same region as your app, giving you single-digit millisecond latency.
For multi-region database access, Fly.io offers read replicas. Your primary database stays in one region, and replicas live in others. Reads are fast everywhere. Writes route back to the primary.
fly postgres create --name my-app-db --region iad
fly postgres create --name my-app-db-replica --region lhr --fork-from my-app-db
This gives you a primary in Virginia and a read replica in London. For most apps, reads outnumber writes by 10:1 or more, so this dramatically improves perceived performance for international users.
Multi-Region Deployment
Deploying to multiple regions is where Fly.io separates itself from nearly every other platform in this price range. After your initial deployment, adding regions is a single command:
fly scale count 2 --region iad,lhr
This runs two machines, one in Virginia and one in London. Fly.io's Anycast network routes each user to the nearest healthy machine automatically. No load balancers, CDNs, or DNS routing to configure.
For a vibe-coded SaaS with users in the US and Europe, this gets you sub-50ms response times for both audiences. On a centralized deployment, one group always pays a latency tax.
Be deliberate about regions. Adding five regions costs five times as much. Start with your primary region, add one or two based on analytics, and expand from there.
Auto-Scaling and Cost Control
Fly.io's pricing starts at roughly $5 per month for the smallest Machine (shared-cpu-1x, 256MB RAM). That gets you a real server, not a cold-starting function. The free allowance covers small apps, but you should plan for $5-15/month for a typical full-stack project with a database.
The auto-scaling configuration in fly.toml is your primary cost lever:
[http_service]
  auto_stop_machines = "stop"
  auto_start_machines = true
  min_machines_running = 0
With min_machines_running = 0, Fly.io stops all machines when no one is using your app. The first request after a quiet period takes 1-3 seconds while the machine restarts (a "cold start"). Setting min_machines_running = 1 eliminates cold starts but means you are paying even when nobody is visiting.
For a side project or MVP, min_machines_running = 0 is the right choice. For a production app with paying users, set it to 1 in your primary region. This is a small cost for a big improvement in user experience.
Running fly scale count without understanding that each machine in each region costs money independently. If you set fly scale count 3 --region iad,lhr,sin, you now have nine machines (three per region), not three. Read the output carefully after every scale command, and run fly scale show to verify what you are actually paying for.
Fly.io charges by the second for running machines and by the GB for persistent storage. You can see real-time usage with fly billing and set spending alerts in the dashboard.
Fly.io vs Railway
Railway is the closest comparison for developers who want managed infrastructure without the complexity of AWS. Here is how they actually compare for full-stack apps.
Railway is simpler to start with. Visual dashboard, one-click databases, GitHub-based deployment without a CLI. If your app runs in one region and you want minimal configuration, Railway is excellent. Pricing starts around $5/month.
Fly.io wins when geography matters. Railway runs your app in a single region. Fly.io runs it wherever your users are. The CLI-first workflow is more effort upfront but gives you reproducible, automatable deployments.
Choose Railway if your app is US-only and you want a dashboard-driven workflow. Choose Fly.io if you have international users, need a real server process, or want multi-region Postgres. Both are dramatically simpler than AWS.
Make sure you understand the fundamentals before picking a platform.
Learn deployment basicsDeploying Updates
After your initial setup, deploying changes is one command:
fly deploy
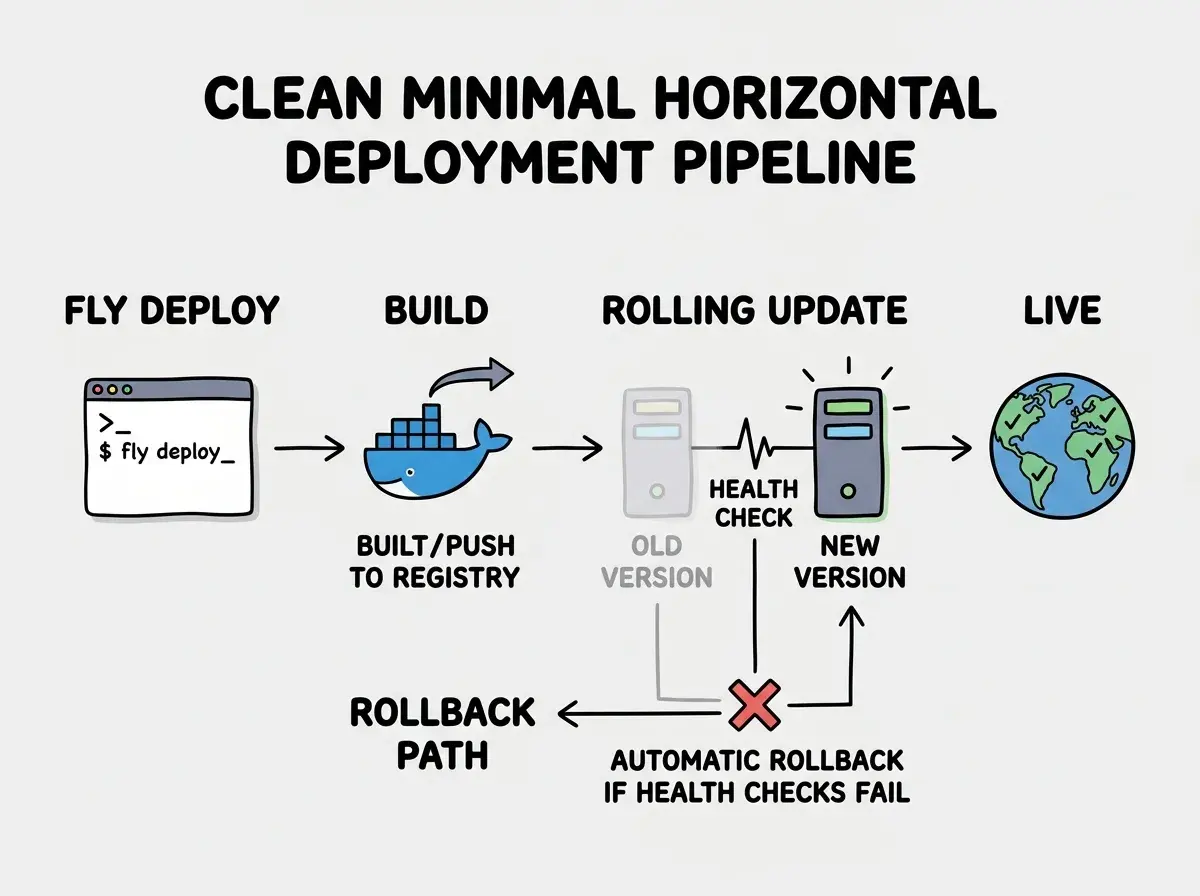
This rebuilds your Docker image, pushes it to Fly.io's registry, and performs a rolling update across all your machines. If the new version fails health checks, Fly.io automatically rolls back. You can also set up GitHub Actions to deploy on every push to main.
For manual rollbacks, run fly releases to see your history and fly deploy --image <previous-image> to revert. Takes under a minute.
One thing to watch for with AI-generated Dockerfiles: the build cache. If your Dockerfile copies package.json before copying the rest of your code (which it should), npm dependencies are cached between deployments and only reinstalled when package.json changes. If the Dockerfile copies everything at once, every deployment reinstalls all dependencies from scratch, which is slow and wasteful. Check this early.
What This Means For You
Fly.io fills a specific gap in the deployment landscape. It gives you the control and flexibility of running real servers without the operational burden of managing them yourself. For full-stack vibe-coded apps that need databases, background processes, and global reach, it is one of the best options available.
- If you are a senior dev exploring AI-assisted development: Fly.io's infrastructure model will feel familiar. You get Docker, Postgres, multi-region networking, and a CLI that does not hide what it is doing. The difference is that provisioning takes minutes instead of hours, and you do not need to write Terraform to get there. Use
fly.tomlas your infrastructure-as-code and version it alongside your application. - If you are an indie hacker shipping a SaaS product: Start with one region and the auto-stop configuration to keep costs minimal. When you get paying customers in other countries, adding a region is one command. Fly.io's built-in Postgres eliminates the need for a separate database provider, which simplifies your stack and reduces your monthly vendor count. The $5/month starting cost is predictable enough to factor into your pricing from day one.
Deploying is only half the job. Make sure your app is locked down before real users arrive.
Read the security guide