File upload and storage is one of those features that looks trivial until you actually build it. A form, an input, a button. How hard can it be? Then you discover CORS policies, file size limits, storage costs, and the joy of someone trying to upload a 2GB executable disguised as a profile picture. 92% of developers now use AI tools daily, and file uploads are one of the features where AI-generated code gets you 80% of the way there but the remaining 20% (security, cost, architecture) separates production apps from demos.
Think of cloud storage like a storage locker facility. Amazon S3 is the giant warehouse on the edge of town, it has been around forever and every moving company knows how to work with it. Cloudflare R2 is the warehouse with free delivery, same storage but you never pay for pickups. Supabase Storage is the locker attached to your apartment, smaller and simpler but already part of your building. Where you store your files matters less than how you get them in and out safely.
How Presigned URLs Work
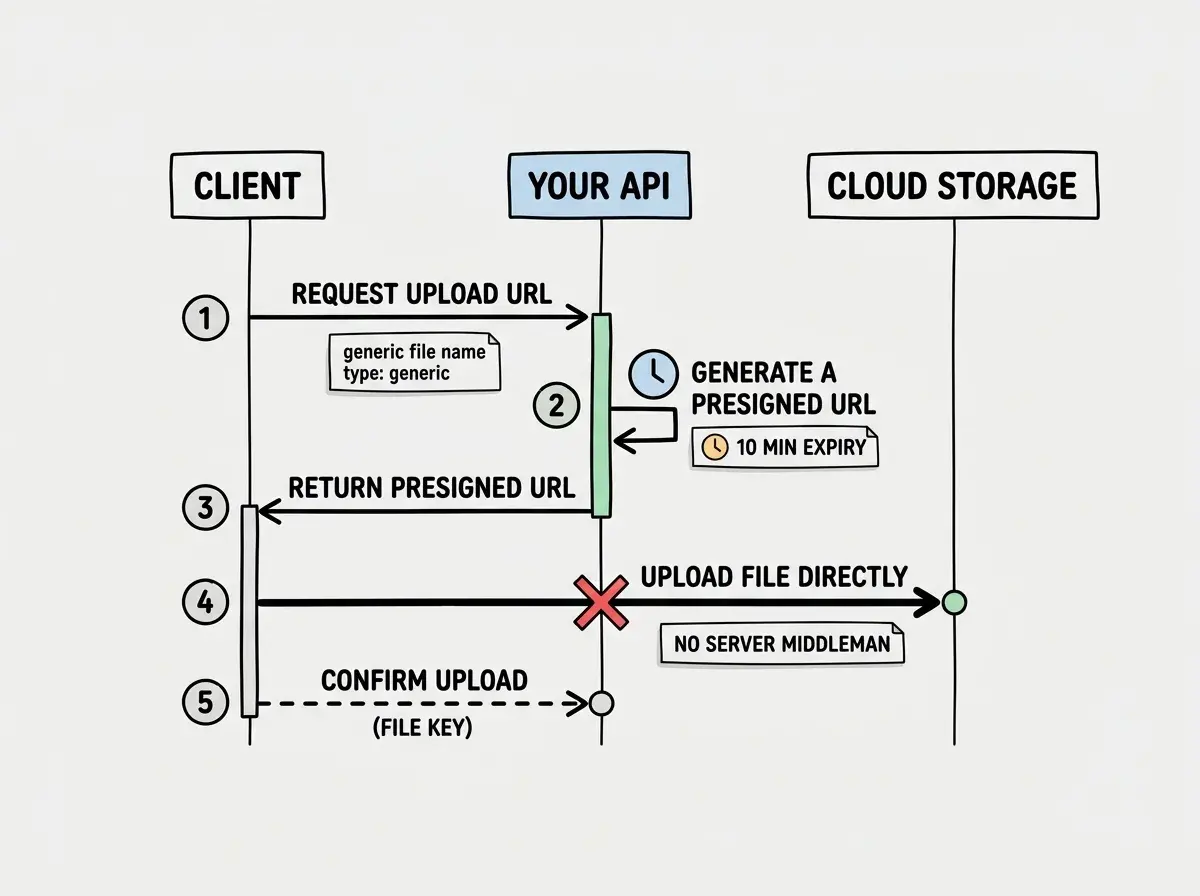
The biggest architectural decision in file upload is whether files pass through your server or go directly to storage. For anything beyond toy projects, direct upload is the answer. Your server generates a short-lived, presigned URL that gives the client temporary permission to upload a file directly to S3, R2, or Supabase Storage. The file never touches your server, which means your API stays fast and your hosting bill stays low.
The flow is simple. Your client requests an upload URL from your API. Your API generates a presigned URL with constraints (file type, max size, expiration) and returns it. The client uploads directly to cloud storage using that URL. Once complete, the client notifies your API with the file's location for database storage.
In S3 terms, you call createPresignedPost or getSignedUrl with a putObject command. R2 uses the exact same S3-compatible API, so the code is identical. Supabase Storage has its own SDK method, createSignedUploadUrl, that achieves the same result with less configuration.
// Works for both S3 and R2 (S3-compatible API)
import { S3Client, PutObjectCommand } from "@aws-sdk/client-s3";
import { getSignedUrl } from "@aws-sdk/s3-request-presigner";

const client = new S3Client({
  region: "auto",
  endpoint: process.env.STORAGE_ENDPOINT,
  credentials: {
    accessKeyId: process.env.ACCESS_KEY_ID!,
    secretAccessKey: process.env.SECRET_ACCESS_KEY!,
  },
});

export async function generateUploadUrl(
  fileName: string,
  contentType: string
) {
  const key = `uploads/${Date.now()}-${fileName}`;
  const command = new PutObjectCommand({
    Bucket: process.env.BUCKET_NAME,
    Key: key,
    ContentType: contentType,
  });

  const url = await getSignedUrl(client, command, {
    expiresIn: 600, // 10 minutes
  });

  return { url, key };
}
The expiresIn value is important. Ten minutes gives users enough time to upload even on slow connections, but limits the window for abuse. If someone intercepts the URL, it becomes useless after the expiration.
Security That Actually Matters
File uploads are one of the most common attack vectors in web applications. The good news is that the critical validations are straightforward. The bad news is that skipping even one of them can be catastrophic.
Validate file types on both sides. Client-side validation improves UX (instant feedback when someone picks a .exe instead of a .png). Server-side validation prevents attacks. When generating the presigned URL, restrict the ContentType to your allowed MIME types. Never trust the file extension alone because renaming malware.exe to malware.png takes two seconds.
Enforce size limits. Set a Content-Length condition on your presigned URL. For S3 and R2, use presigned POST policies with conditions like ["content-length-range", 0, 5242880] to cap uploads at 5MB. Supabase Storage lets you set size limits per bucket in the dashboard.
Sanitize file names. Strip special characters, path traversal attempts (../../../etc/passwd), and excessively long names. Generate your own key using a timestamp and random string instead of trusting user-provided names. The code example above already does this with the Date.now() prefix.
Set your buckets to private by default. Use presigned download URLs when you need to serve files, or put a CDN in front of your bucket with proper cache headers. You would not leave your storage locker door open just because it is easier than carrying a key.
// Server-side validation before generating the presigned URL
const ALLOWED_TYPES = ["image/jpeg", "image/png", "image/webp", "application/pdf"];
const MAX_SIZE = 5 * 1024 * 1024; // 5MB

export function validateUpload(contentType: string, fileSize: number) {
  if (!ALLOWED_TYPES.includes(contentType)) {
    throw new Error("File type not allowed");
  }
  if (fileSize > MAX_SIZE) {
    throw new Error("File exceeds maximum size of 5MB");
  }
}
Always validate file uploads on the server, not just the client. Client-side checks improve user experience but provide zero security. Your presigned URL generation endpoint should enforce file type restrictions, size limits, and rate limiting before handing out upload permissions. Treat every upload request as potentially malicious.
Setting Up Each Storage Provider
All three providers follow the same general pattern, but the setup details differ. Here is what you need to know for each one.
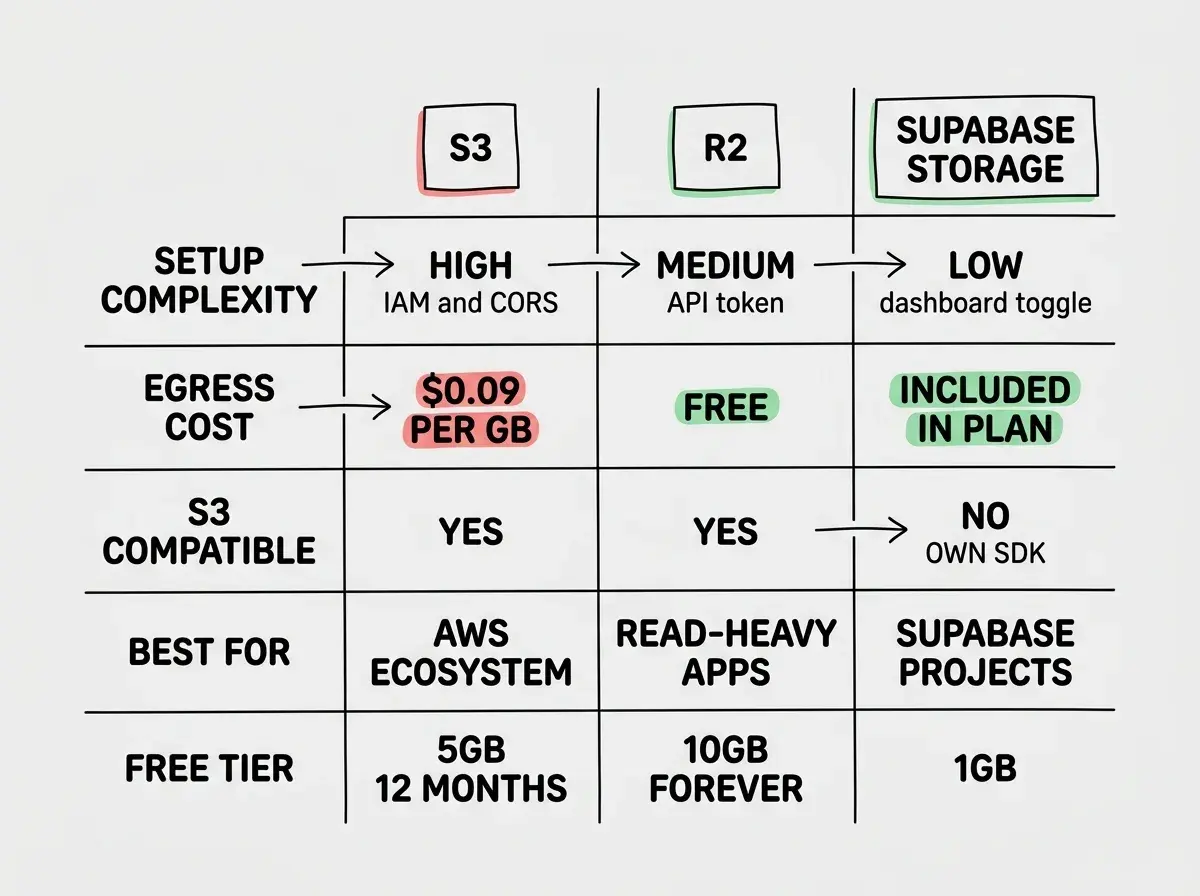
Amazon S3 is the default choice when you have no strong opinion. Create a bucket, set up an IAM user with scoped permissions (never use root credentials), configure CORS to allow uploads from your domain, and point your S3Client at the standard AWS endpoint. S3 charges for storage, requests, and egress (data leaving AWS). That egress cost is the big one.
Cloudflare R2 is S3-compatible with one critical difference: zero egress fees. Same API, same SDK, same presigned URL flow, but you never pay for downloads. Back to the storage locker analogy, R2 is the warehouse with free delivery. You pay for space and for putting stuff in, but taking it out costs nothing. For apps that serve user-uploaded content (profile pictures, documents, media), R2 can cut your storage bill by 50-80% compared to S3. Setup requires creating a bucket in the Cloudflare dashboard, generating an API token, and pointing your S3Client at https://<account-id>.r2.cloudflarestorage.com.
Supabase Storage is the simplest option if you are already on Supabase. It is the locker attached to your apartment. Create a bucket, set access policies using row-level security, and use the Supabase JS client. No separate SDK, no IAM configuration, no CORS headers to debug.
// Supabase Storage upload (client-side)
import { createClient } from "@supabase/supabase-js";

const supabase = createClient(
  process.env.NEXT_PUBLIC_SUPABASE_URL!,
  process.env.NEXT_PUBLIC_SUPABASE_ANON_KEY!
);

const { data, error } = await supabase.storage
  .from("uploads")
  .upload(`public/${fileName}`, file, {
    contentType: file.type,
    upsert: false,
  });
The tradeoff is flexibility. Supabase Storage has fewer configuration options and locks you into the ecosystem. For most indie projects, that is fine. For larger applications that need fine-grained CDN control or multi-region replication, S3 or R2 gives you more room.
Learn the foundational patterns that make features like file upload click.
Start with the basicsCost Comparison for Real Projects
Cost is where these three providers diverge the most, and it is where the wrong choice can quietly drain your budget.
S3 pricing runs about $0.023/GB for storage and $0.09/GB for egress. Store 100GB with 500GB of monthly downloads and you pay $2.30 for storage plus $45 for egress. The egress cost is almost 20x the storage cost.
R2 pricing is $0.015/GB for storage with zero egress fees. That same workload costs $1.50 total, a 97% reduction. R2 also includes 10GB of free storage and 10 million free reads per month, which covers most indie projects entirely.
Supabase Storage includes 1GB free on the free tier and $0.021/GB on Pro. Egress is included in your plan limits. For small projects, it is effectively free.
For most indie hackers, R2 is the best value. S3 compatibility means migration is trivial if you outgrow it. If you are all-in on Supabase, use Supabase Storage to keep your stack simple. Pick S3 only when you need specific AWS integrations like Lambda triggers on upload.
Choosing S3 by default without checking your egress patterns. Many developers pick S3 because it is the industry standard, then get surprised by bandwidth bills when users start downloading files. If your app serves uploaded files back to users, calculate your expected egress before committing. Switching to R2 later is easy because the API is compatible, but switching early saves you from an ugly billing surprise in month three.
Putting It All Together
Here is the implementation pattern that works across all three providers. Build an API route that validates the upload request, generates a presigned URL, and returns it to the client. Build a client-side upload component that requests the URL, uploads directly to storage, and confirms completion.
On the client, show a progress bar during upload, validate file type and size before requesting a URL, and handle errors gracefully. A failed upload with no feedback is worse than no upload feature at all.
For the database, store the file key (not the full URL) alongside a reference to the user who uploaded it. Generate the full URL on read using your CDN domain or a presigned download URL. This lets you migrate between storage providers without updating every database record.
Rate limiting is the final piece. Without it, a bot can generate thousands of presigned URLs and fill your bucket with garbage. Add rate limiting to your upload endpoint through your API framework's middleware, Upstash Redis, or Cloudflare's built-in rate limiting.
Build file uploads this weekend and ship on Monday.
Start buildingWhat This Means For You
File upload and storage is a solved problem with well-documented patterns. The choice between S3, R2, and Supabase Storage comes down to your existing stack and your cost sensitivity.
- If you are a senior developer building a production app: Use presigned URLs with direct upload from day one. It scales better, costs less, and keeps your API free from processing file bytes. Start with R2 unless you have a specific reason to pick S3, and add file validation at both the client and server layers before you ship.
- If you are an indie hacker launching fast: Pick whichever storage is already in your stack. Using Supabase? Use Supabase Storage. Using Cloudflare? Use R2. Do not add a new service just for file uploads when your existing tools handle it. Get the security basics right (type validation, size limits, private buckets) and ship.