Your Figma file is an architectural blueprint. Every pixel, every spacing token, every interaction state represents a deliberate decision you made about how this building should look and function. The problem is that turning blueprints into buildings requires a contractor, and not all contractors read blueprints the same way. Some follow them precisely. Some "interpret" them. Some glance at the first page and wing the rest.
Figma to code tools are those contractors. Each one reads your design file differently, produces different quality output, and requires different levels of involvement from you during construction. The gap between what you designed and what gets built depends entirely on which contractor you hire and how you work with them.
This comparison covers every major approach available in 2026, from Figma's own Dev Mode to AI generators to plugin-based converters, so you can pick the right contractor for each type of project.
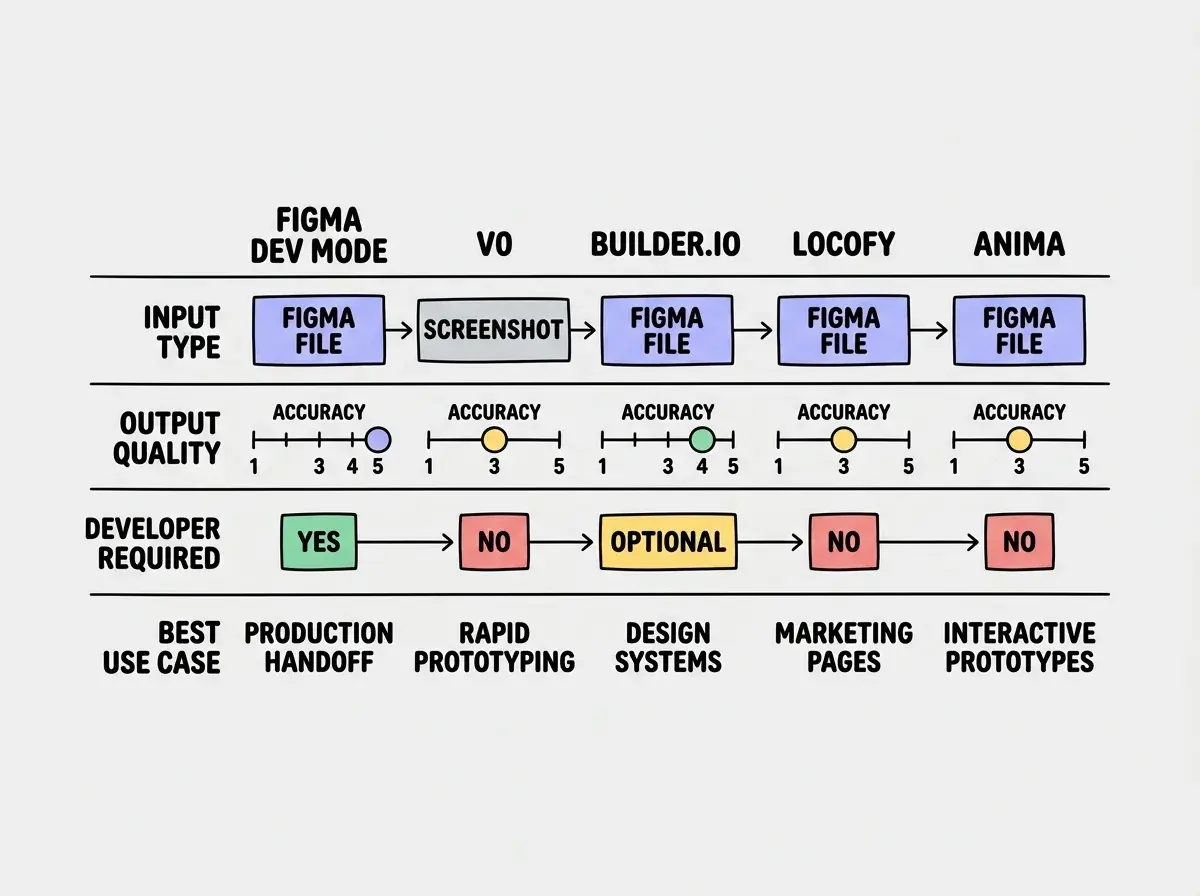
Use Figma Dev Mode if you have a frontend developer; it gives the most accurate handoff but still needs a human implementer. Use v0 for fast prototyping from screenshots. Use Builder.io for the cleanest structured conversion when component fidelity matters. Use Locofy when you need to ship a design without a developer. Speed, accuracy, and autonomy each force a different choice.
Figma Dev Mode and the Official Handoff
Figma Dev Mode is not a code generator. It is a translation layer that helps developers read your blueprints more accurately. Think of it as hiring a bilingual project manager who sits between you and the construction crew, translating your architectural language into their construction language in real time.
Dev Mode gives developers ready-to-copy CSS, iOS, and Android code snippets for any selected element. They can inspect spacing, colors, typography, and component properties without you having to redline anything. When you update the design, the specs update automatically. The handoff friction drops significantly compared to static spec documents or Zeplin-style tools from the previous era.
The limitation is that Dev Mode still requires a developer on the other end. It makes the translation more accurate, but the translation still happens through a human who is juggling your project alongside a dozen other priorities. For teams with strong engineering partners, Dev Mode is the most reliable path to pixel-perfect results. For designers working solo or with limited engineering support, it solves only half the problem.
Best for: Teams with dedicated frontend developers who want accurate specs without manual redlining.
Accuracy: High, but depends entirely on the developer following the specs.
v0 from Screenshots and the AI-First Approach
Vercel's v0 takes a fundamentally different approach. Instead of translating your Figma file into developer specs, v0 looks at a screenshot of your design and generates a working React component from the visual alone. You paste a screenshot, describe what you want, and v0 produces code that looks remarkably close to your original design.
This is like showing a photo of a building to a contractor and saying "build this." A surprisingly effective approach when the building is straightforward, but the contractor is working from visual impression rather than precise measurements. v0 captures the overall feel, the layout structure, and the general aesthetic. It often misses exact spacing values, specific font weights, and subtle interaction details that your blueprint specifies precisely.
92% of developers now use AI daily in their workflows, which means the tools your engineering partners use are already AI-powered. Understanding how Figma to code tools work puts you in a stronger position to collaborate with developers who are increasingly thinking in AI-assisted terms themselves.
Where v0 genuinely shines is speed of prototyping. You can go from a Figma screenshot to a functional, deployed prototype in under ten minutes. For design reviews, stakeholder demos, or testing interaction concepts with real users, that speed is transformative. The code might not be production-ready, but the prototype is real enough to click through, resize, and interact with.
Best for: Rapid prototyping, stakeholder demos, and exploring whether a design concept works in a browser context.
Accuracy: Good for layout and structure, inconsistent on precise spacing and typography details.
Builder.io Figma Plugin and the Structured Conversion
Builder.io reads your actual Figma file structure, not a screenshot. This matters because it means the contractor is working from your actual blueprints rather than a photograph. The plugin analyzes your layers, auto-layout settings, component variants, and design tokens, then generates code that reflects your Figma structure.
The output quality depends heavily on how well-organized your Figma file is. If you use auto-layout consistently, name your layers meaningfully, and structure your components with clear variant properties, Builder.io produces remarkably clean code. If your Figma file is a mess of absolute-positioned frames with layers named "Rectangle 47," the output will reflect that chaos.
This is the "garbage in, garbage out" tool in the comparison. For designers who maintain disciplined Figma files (and you should be maintaining disciplined Figma files regardless), Builder.io delivers the most structurally accurate conversion. The generated code maps to your component hierarchy, which means developers can actually maintain it rather than throwing it away and rebuilding.
Best for: Design systems teams with well-structured Figma files who want maintainable component code.
Accuracy: Excellent for structure and layout when Figma files are well-organized, weaker on complex interactions.
Locofy and the Marketing Page Specialist
Locofy positions itself as the fastest path from Figma to deployed website. The plugin converts your designs into production-ready code for React, Next.js, Gatsby, or plain HTML. It handles responsive behavior automatically and can deploy directly to hosting platforms.
Think of Locofy as the contractor who specializes in residential construction. If you are building a house (marketing page, landing page, portfolio site), they will do an excellent job efficiently. If you are building a hospital (complex web application with state management and API integrations), you need a different contractor.
Landing pages, marketing sites, and content-heavy pages convert cleanly. The tool struggles with complex interactive components and application-level state management. This is not a criticism. It is a scope definition.
Best for: Marketing teams and designers who need to ship landing pages and content sites quickly without engineering involvement.
Accuracy: Strong on visual fidelity for static layouts, limited on interactive components and dynamic behavior.
Anima and the Interactive Prototype Bridge
Anima sits in an interesting middle ground. It converts Figma designs to code (React, Vue, or HTML), but its real strength is adding interactive behavior that your static Figma file cannot express. You can define animations, transitions, hover states, and basic logic within Anima's interface, and the exported code includes those behaviors.
For designers, this is like having a contractor who not only builds from your blueprints but also installs the light fixtures and plumbing based on your verbal descriptions. You can say "this panel slides in from the right when the user clicks this button" and Anima includes that behavior in the generated code. The result is a more complete prototype than what v0 or Locofy typically produce.
The tradeoff is complexity. Anima's interface adds a learning curve on top of Figma, and the generated code can be verbose compared to hand-written equivalents. Developers who inherit Anima-generated code sometimes prefer to rewrite interactive components while keeping the static layout code.
Best for: Designers who need to demonstrate complex interactions in a working prototype without writing any code themselves.
Accuracy: Good overall visual fidelity with the bonus of interactive behavior, though code quality varies.
Designers often pick a Figma to code tool based on which promises the most impressive demo. In practice, the tool that matches your Figma file organization and your team structure matters far more than raw feature lists. A tool that produces perfect code from a perfectly structured Figma file is useless if your files are messy.
Manual Handoff with AI Assistance
There is a sixth approach that does not involve any Figma plugin at all. You export your designs as screenshots, hand them to a developer who uses an AI coding tool like Cursor or Claude Code, and the AI generates code from the visual reference while the developer handles architecture, state management, and integration.
This hybrid approach is becoming the most common workflow in 2026. The developer uses AI to handle the tedious translation of visual elements into CSS and component markup, then focuses their expertise on the parts that actually require engineering judgment. You keep your existing Figma workflow. They keep their existing coding workflow with AI assistance. No new tools or plugins required on either side.
Understand the tools and concepts that make modern design-to-code workflows possible.
Start hereWhen Pixel-Perfect Matters vs When Close Enough Wins
Knowing when to demand precision and when to accept "close enough" is one of the most valuable judgment calls a designer can make.
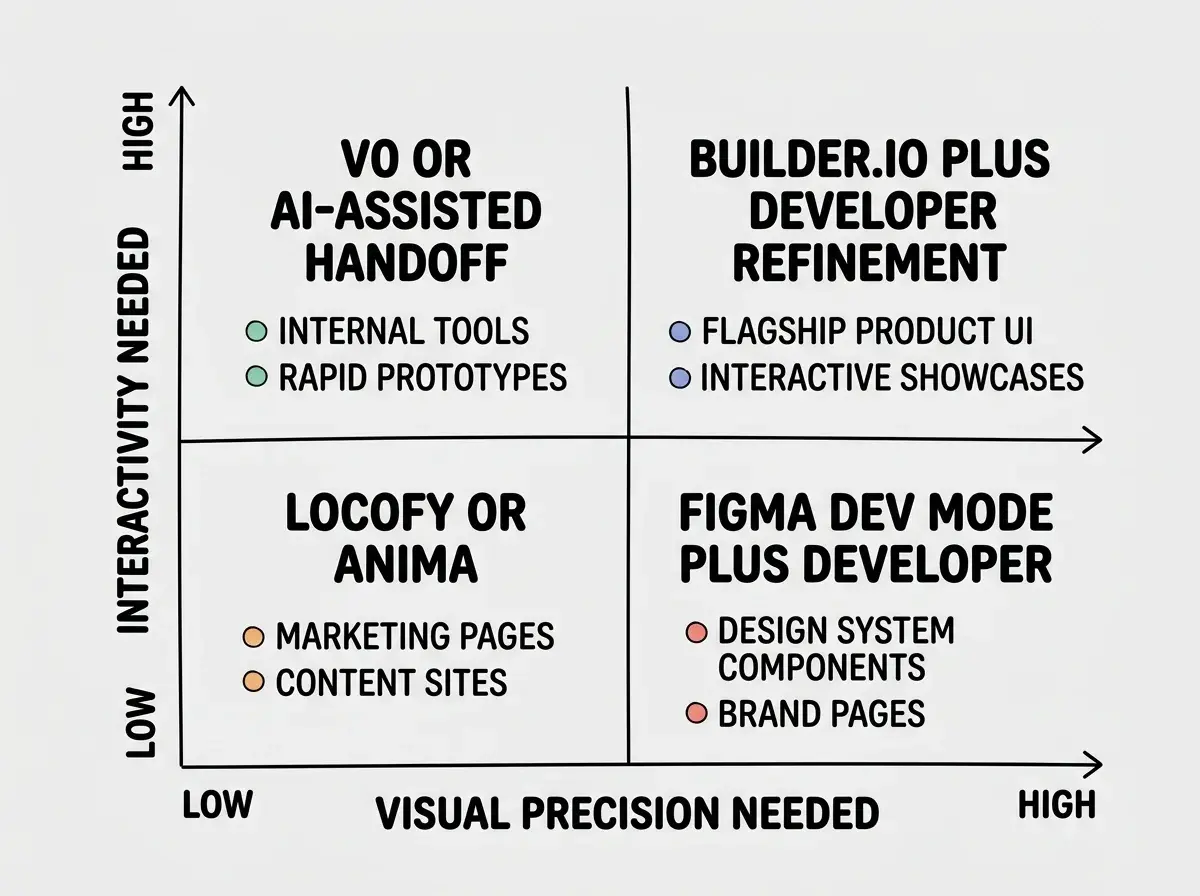
Pixel-perfect matters for: Brand identity pages where the design IS the product. Design system component libraries that other teams build from. Portfolio sites where visual craft is the selling point.
Close enough wins for: Internal tools and admin dashboards. Feature screens deep in an application. Rapid prototypes being tested with users. MVPs where shipping speed outweighs visual polish.
Most applications are 80% "close enough" screens and 20% "pixel-perfect" screens. The smart approach is matching the right contractor to the right part of the building.
Frequently Asked Questions
Picking Your Contractor
The blueprint-to-building analogy holds all the way through. No single contractor is best for every project. The architect who understands construction methods can make smarter decisions about who to hire for what.
If you have a strong engineering team and care about production quality, invest in Figma Dev Mode and clean handoff practices. If you need to ship a prototype by Friday, use v0 and accept the visual approximation. If your Figma files are meticulously organized and you want structural accuracy, Builder.io will reward your discipline. If you need marketing pages shipped without engineering, Locofy gets the job done. If interactive behavior matters more than code quality, Anima fills that gap.
And if you are working with a developer who already uses AI coding tools, the manual handoff with AI assistance might be the most practical path of all. Just a clear design file and a developer who knows how to ask AI the right questions.
Dig deeper
A few hand-picked sources if you want to go further.
Learn how designers are using AI tools to go from concept to working product.
Explore the guideThe best Figma to code workflow is the one that matches your team, your project, and your tolerance for visual deviation. Now you know which contractor to call.