Deployment is where most vibe-coded projects go to die. You have a working app on your laptop, it looks great, it does what you want, and then you try to put it on the internet and everything falls apart. This is not a character flaw. This is the single most common failure point in the entire vibe coding workflow, and it trips up experienced developers too. The difference is that experienced developers have failed at it enough times to know where the landmines are.
I have hit every one of these failures myself. Build errors that make no sense. Environment variables that work locally but vanish in production. Apps that load as a blank white screen after deployment. Each of these has a specific, fixable cause, and once you understand what deployment actually does, you will stop being surprised by them.
What Deployment Actually Means
When you run your app locally, your computer is doing everything. It is the server, the database, the file system, and the network all at once. Your browser talks to your own machine, and everything stays inside that closed loop. Deployment means breaking that loop open and distributing those responsibilities to computers on the internet that strangers can access.
That is the entire concept. Everything else is details.
The reason this is hard is not because the concept is complicated. It is hard because your local machine is forgiving in ways that production servers are not. Your laptop has all your files, all your environment variables, all your dependencies installed, and generous memory limits. A production server has none of those things until you explicitly provide them.
Think of it like cooking at home versus cooking in a restaurant kitchen. At home, you know where everything is. You have your favorite pan, your spices are in familiar places, and nobody cares if your process is messy. A restaurant kitchen requires that every ingredient is inventoried, every recipe is documented, and every step is reproducible by someone who has never seen your kitchen. Deployment is the process of turning your home cooking into a restaurant operation.
Deployment is not one step. It is a series of translations: your code gets built into optimized files, configured for a specific environment, and served by infrastructure that knows nothing about your laptop. Understanding these stages separately is the key to diagnosing every deployment failure you will ever encounter.
Most vibe coders treat deployment as a single button press. Connect to Vercel, click deploy, and pray. When it works, that is fine. When it fails, the error messages reference stages of a process you never learned about, and you have no mental model for what went wrong or where.
The Five Stages of Getting Your App Online
Every deployment, regardless of which hosting platform you use, follows the same five stages. The tools and terminology vary, but the sequence is universal.
Stage 1: Build. Your source code gets transformed into optimized files that a browser can run. If you are using Next.js, this means converting your React components, TypeScript, and CSS into plain HTML, JavaScript, and stylesheets. This is where syntax errors and import problems surface. If your code references a file that does not exist, or uses a library you forgot to install, the build will fail here.
Stage 2: Configure. The hosting platform needs to know how to run your app. What is the build command? What directory contains the output? What Node.js version should it use? What environment variables does the app need? This is where 80% of deployment failures happen, and I am not exaggerating that number.
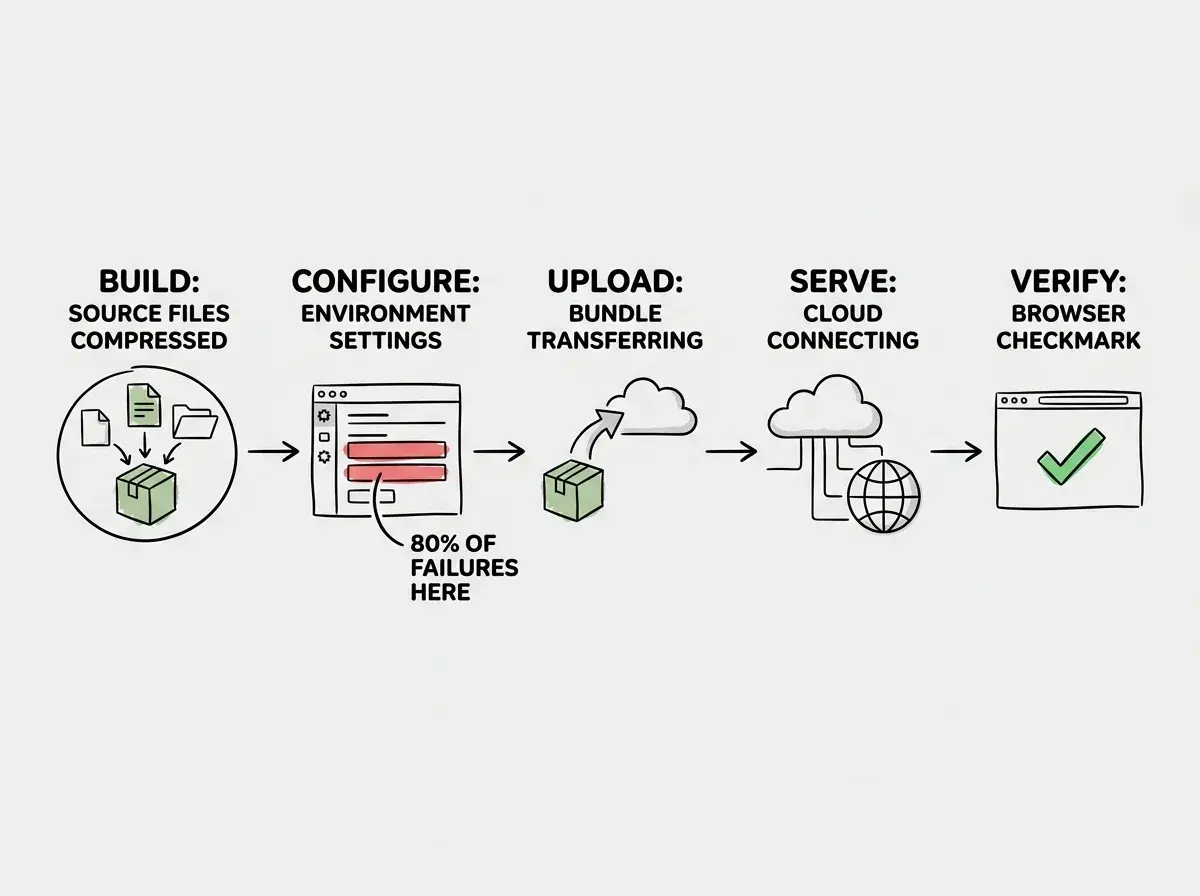
Stage 3: Upload. Your built files get transferred to the hosting platform's servers. This is usually automatic and rarely fails, but it is a distinct step. The platform pulls your code from GitHub (or receives it via a CLI upload), runs the build on their servers, and stores the output.
Stage 4: Serve. The hosting platform makes your built files available at a URL. This involves DNS configuration (pointing a domain name to their servers), SSL certificates (enabling HTTPS), and routing rules (deciding which file to serve for each URL). If you are using a custom domain, this is where you configure it.
Stage 5: Verify. You open the URL in a browser and confirm everything works. This sounds trivial, but it catches issues that the build step cannot: missing images, broken API calls, features that depend on environment variables you forgot to set.
Why Environment Variables Cause 80% of Failures
Environment variables are values that your app needs but that should not be stored in your code. API keys, database URLs, secret tokens. On your laptop, these live in a .env file that you created once and forgot about. When you deploy, that .env file does not come along. It is in your .gitignore (as it should be, because you do not want your secrets on GitHub), which means the hosting platform has never seen it.
This is the number one reason deployments fail for vibe coders. The app builds successfully, deploys successfully, and then crashes at runtime because it tries to use an API key that does not exist in production.
The fix is straightforward but easy to forget. Every hosting platform has a section in its dashboard where you manually add environment variables. You need to go through your .env file, line by line, and add each variable to your hosting platform. Miss one, and the feature that depends on it will break silently.
I have a rule now. Before I click deploy on any project, I open my .env file and my hosting platform's environment variables side by side and check them off one at a time. It takes two minutes and saves hours of debugging.
Assuming your .env file deploys with your code. It does not. The .gitignore file prevents it from reaching GitHub, and your hosting platform never sees it. You must manually add every environment variable to your hosting platform's dashboard before your first deployment. Check them against your local .env file one by one.
The Build Step in Detail
When your AI tool generates code, it creates source files optimized for readability and development speed. These files are not optimized for delivery over the internet. The build step fixes that by compiling TypeScript to JavaScript, minifying CSS, bundling dozens of files into a few larger ones, optimizing images, and removing dead code.
The build step is also where you discover problems your local development server was hiding. Development servers are lenient. They tolerate missing imports and type errors because crashing on every typo would be miserable. The build step is strict. It will fail on errors your development server quietly ignored.
This is why "it works on my machine" is the most common and least helpful thing you can say when a deployment fails. Your machine was being nice to you. The build server is not.
Learn the fundamentals before tackling deployment.
Start hereStatic Sites vs. Server-Rendered Apps
Understanding this distinction will save you from choosing the wrong hosting platform and wondering why nothing works.
A static site is a collection of HTML, CSS, and JavaScript files that do not change. When someone visits your site, they get the same files every time. Blogs, portfolios, marketing pages, and documentation sites are usually static. They are the simplest to deploy because the hosting platform just needs to serve files, like a file cabinet that hands out copies.
A server-rendered app generates pages on demand. When someone visits a page, a server runs code to build that page's HTML, potentially pulling data from a database or API. E-commerce sites, dashboards, and apps with user authentication are usually server-rendered. They require a hosting platform that can run server-side code, not just serve static files.
Many modern frameworks, including Next.js, blur this line. Some pages can be static while others are server-rendered. This is powerful but adds complexity to deployment because you need a hosting platform that supports both modes. Vercel, Netlify, and Cloudflare Pages all handle this, but a basic static hosting service will not.
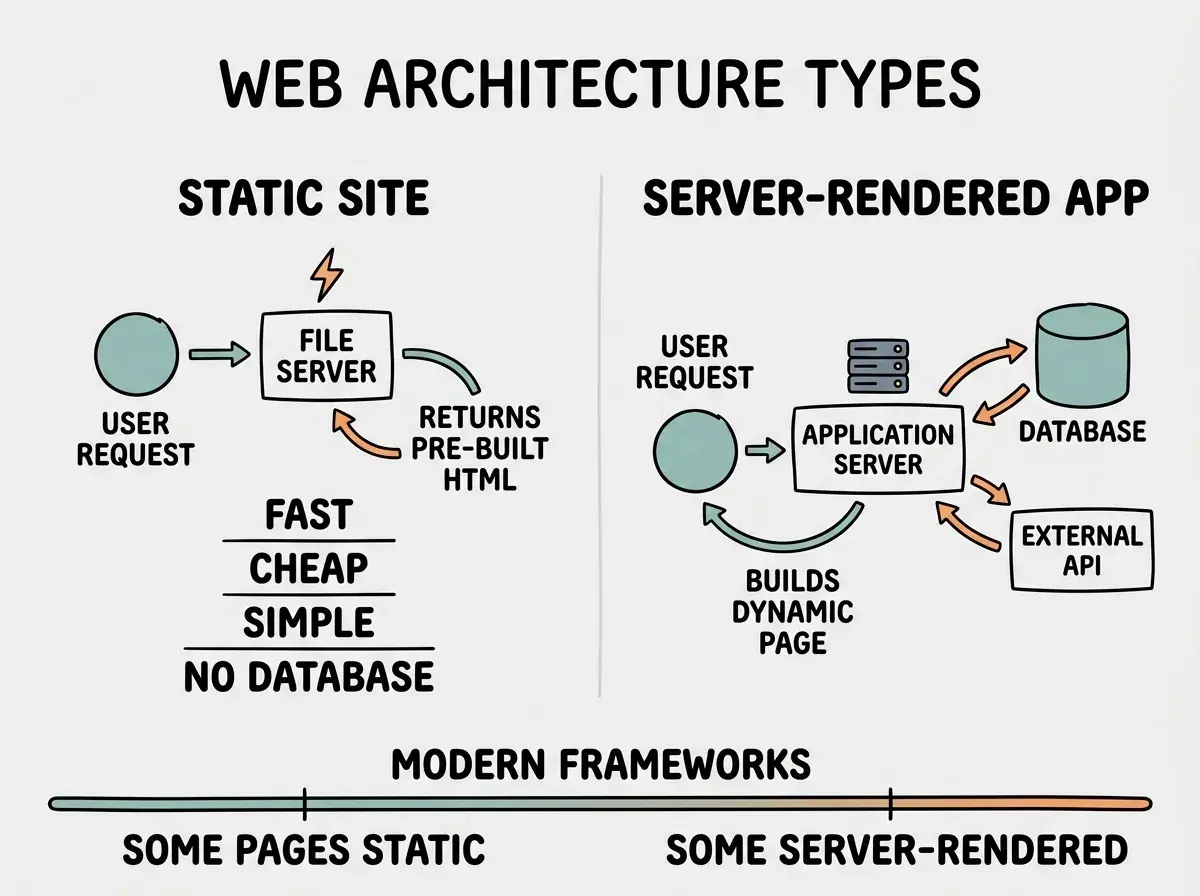
If you are not sure which type your app is, look at your framework's build output. If it produces an out or dist folder full of HTML files, it is static. If it produces a server bundle or mentions serverless functions, it has server-rendered components.
After Deployment, What to Watch
Getting your app live is not the finish line. It is the starting line. Three things to check immediately.
Check your app on a phone. Not by resizing your browser, but on an actual phone. Touch targets that seemed fine with a mouse are too small for thumbs. Layouts collapse in unexpected ways on narrow screens.
Watch for mixed content warnings. If your site uses HTTPS but some images or API calls use HTTP, browsers will block those resources. This happens often with hardcoded URLs from development.
Monitor your error logs. Every hosting platform provides logging. Check it after your first deployment. You will see errors you never saw locally, often from missing environment variables or API endpoints that differ in production.
What This Means For You
Deployment is a skill, not a talent. Every failure teaches you something specific, and the same failures keep appearing across projects until you learn to prevent them. The five-stage mental model gives you a framework for diagnosing any deployment problem you encounter.
- If you are a founder: Deployment anxiety is the biggest reason vibe-coded MVPs never reach users. Understanding these five stages turns deployment from a mysterious, terrifying step into a checklist you can execute methodically. Your first deployment will take an hour. Your fifth will take ten minutes. The key is to not let the first one stop you from trying.
- If you are a career changer: Deployment skills are disproportionately valued by employers because so many developers avoid learning them. Being able to say "I can take a project from code to production" sets you apart from candidates who only know how to build locally. Practice deploying small projects repeatedly until the process feels routine.
- If you are a student: Deploy everything you build, even small experiments. Free tiers on Vercel, Netlify, and Cloudflare Pages mean there is no cost barrier. Every deployment teaches you something, and having live URLs to show in your portfolio is worth more than screenshots of localhost.
Learn the specific steps for the most popular hosting platforms.
See deployment guides