You can build a form builder with AI in a single weekend, and it will collect real submissions from real people into a real database. Not a static mockup. Not a Google Form clone that lives and dies inside someone else's platform. A survey and form builder you own, with drag-and-drop fields, validation, submission storage, and a response dashboard. 92% of developers now use AI tools daily, and the ones building products like this are shipping tools that used to take engineering teams months.
Think of a form builder like a restaurant kitchen. The forms themselves are the dishes on the menu. The drag-and-drop editor is the prep station where you assemble ingredients. The database is the walk-in cooler where everything gets stored. And the analytics dashboard is the manager's clipboard, tracking what got ordered, when, and by whom. You are building the entire kitchen, not just one dish.
Why Build Your Own Instead of Using an Existing Tool
Typeform, Google Forms, and JotForm all work fine until they do not. You hit the free tier limit. You need custom branding. You want to pipe submissions directly into your own database instead of exporting CSVs. You need conditional logic that the platform does not support. Or you simply do not want to pay $50 per month for features you could build yourself.
A custom form builder gives you total control. Your data stays in your database. Your forms match your brand exactly. Your submission logic does whatever you need it to do. And if you are building a SaaS product, a form builder is one of the most universally useful tools you can offer to customers.
The goal of this tutorial is a working form builder that stores real submissions in a database. Not a prototype. Not a frontend demo. By the end, someone can visit your form, fill it out, hit submit, and you can see their response in a dashboard. Every step is designed around getting to that complete loop as fast as possible.
Planning Your Form Builder Before Touching Code
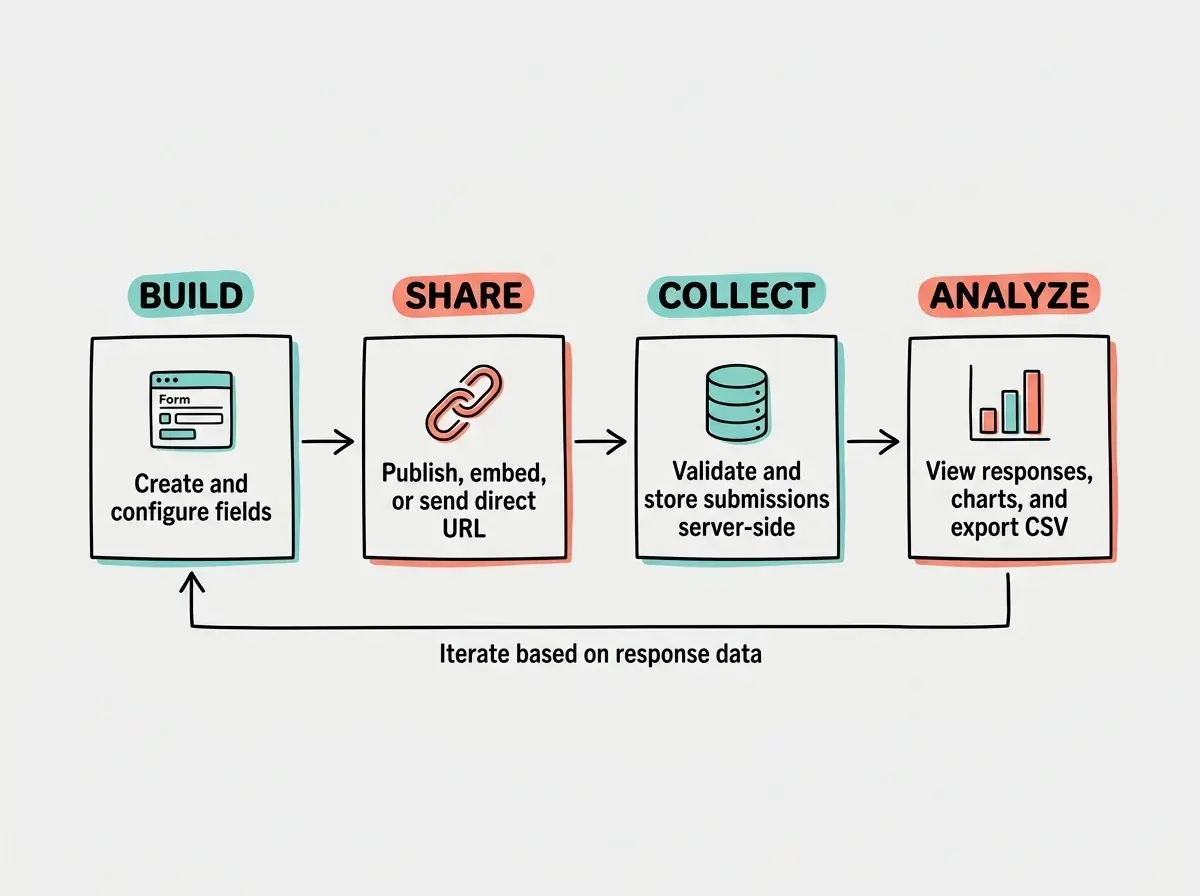
Before you prompt anything, get clear on the four pieces you need. First, a form editor where you add, remove, and reorder fields. Second, a form renderer that displays the form to people filling it out. Third, a submission handler that validates and stores responses. Fourth, a dashboard that shows you what people submitted.
Open your AI coding tool (Cursor, Lovable, Bolt, or whichever you prefer) and start with the data model. This is the foundation everything else sits on. Tell the AI something like this:
"Create a Next.js app with a database schema for a form builder. I need three tables: forms (id, title, description, fields as JSON, created_at, published boolean), submissions (id, form_id, data as JSON, submitted_at), and users (id, email, password_hash). Use Supabase with Prisma as the ORM. Set up the project with Tailwind CSS and shadcn/ui components."
The AI will scaffold your project, generate the schema, and set up the database connection. Review the schema before moving on. The fields column on the forms table is the most important design decision here. Storing field definitions as a JSON column gives you maximum flexibility. Each field object will contain a type (text, email, number, textarea, select, checkbox, radio), a label, a placeholder, validation rules, and options for select/radio/checkbox fields.
Building the Drag-and-Drop Form Editor
This is the centerpiece of your form builder. The editor is where you (or your users) visually construct forms by dragging field types into a canvas and configuring each one.
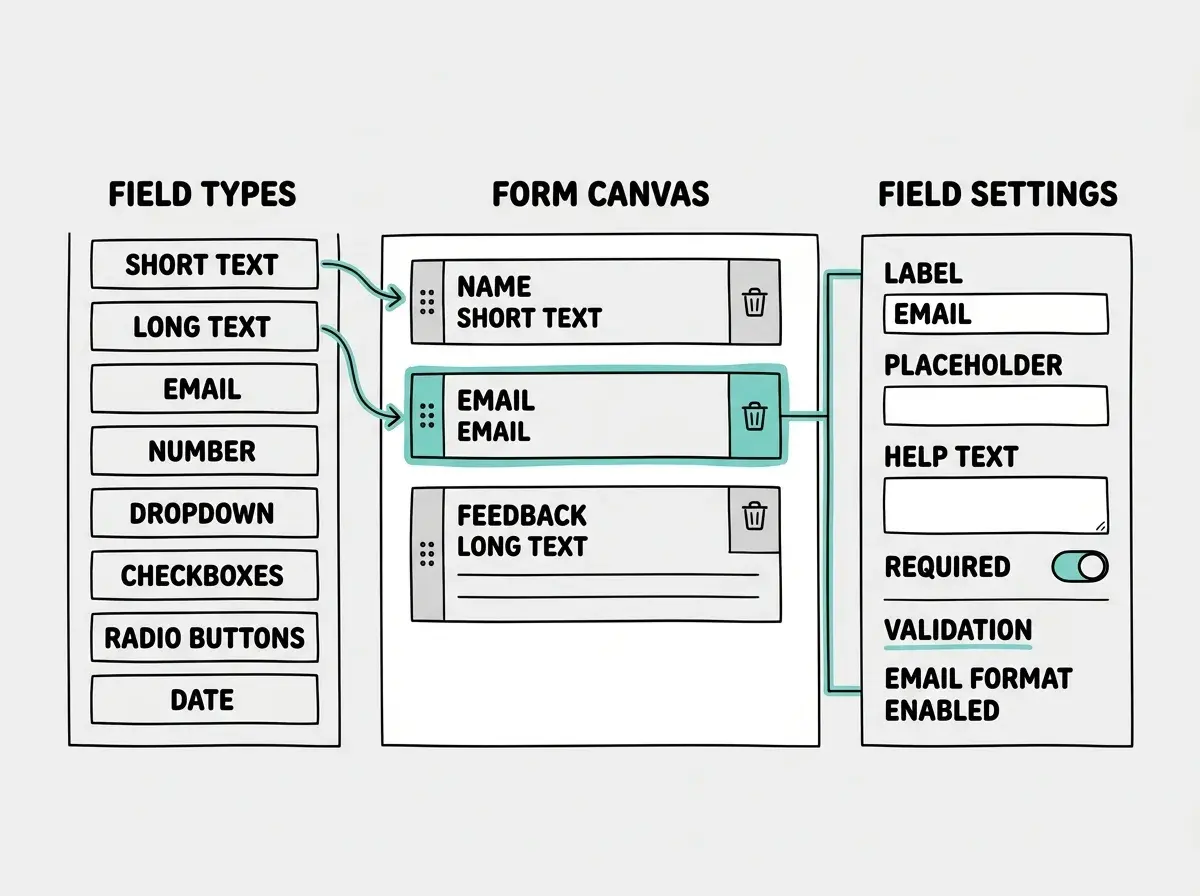
Prompt the AI: "Build a form editor page at /forms/new. On the left side, show a panel with draggable field types: Short Text, Long Text, Email, Number, Dropdown, Checkboxes, Radio Buttons, and Date. On the right side, show a canvas where fields can be dropped and reordered. When a field is clicked in the canvas, show a configuration panel where you can edit the label, placeholder, help text, and whether it is required. Use dnd-kit for drag and drop. Save the form to the database when the user clicks Save."
Let the AI generate this, then test the drag-and-drop behavior. Common issues you will see on the first pass include fields not reordering smoothly, the configuration panel not updating when you click different fields, and the save button not serializing the field array correctly. Fix each issue one at a time with targeted prompts.
Next, add validation rules. Prompt: "For each field in the form editor, add a Validation section in the configuration panel. For text fields, allow setting min length and max length. For number fields, allow min and max values. For email fields, auto-enable email format validation. Add a Required toggle to every field type. Store these validation rules in each field's JSON object."
Rendering Forms and Handling Submissions
The editor builds forms. Now you need the other side: a page where people actually fill them out and submit responses.
Prompt: "Create a public form page at /f/[formId]. Fetch the form data from the database using the formId. Dynamically render each field based on its type and configuration. For select fields, render a dropdown. For radio fields, render radio buttons. For checkbox fields, render checkboxes. Apply the validation rules from each field's config. Show inline error messages when validation fails. On submit, send the form data to an API endpoint that saves the submission to the submissions table."
Test this by creating a form in the editor, publishing it, and opening the public URL. Fill it out with both valid and invalid data. The validation should catch missing required fields, text that is too short or too long, and invalid email formats.
The API endpoint that handles submissions is critical to get right. It should validate the incoming data server-side (never trust client-side validation alone), check that the form exists and is published, and store the response. Prompt: "Add server-side validation to the form submission API. Re-validate every field against the form's field configuration. Return detailed error messages for any validation failures. Only accept submissions for forms where published is true."
Skipping server-side validation because the frontend already validates. This is the single most common security hole in AI-generated form builders. Anyone can bypass your frontend and send raw POST requests directly to your API. If you only validate on the client, you will get garbage data, SQL injection attempts, and submissions that violate your field rules. Always validate on both sides.
Building the Response Dashboard
Collecting submissions is only useful if you can see and analyze them. Build a dashboard that shows responses in a clean, filterable table.
Prompt: "Create a dashboard page at /forms/[formId]/responses. Show a table where each row is a submission and each column is a form field. Add a total submission count at the top. Add date range filtering. Add a CSV export button. For select, radio, and checkbox fields, show a simple bar chart summarizing the distribution of answers."
The bar charts for multiple-choice fields are what turn a basic form into a survey tool. When someone creates a customer satisfaction survey with a rating dropdown, they want to see at a glance how many people picked each rating. The chart summary does this without requiring the user to export data and build charts in a spreadsheet.
Add one more feature that separates your form builder from a basic submission collector. Prompt: "Add a form analytics section above the response table. Show total submissions, submissions in the last 7 days, average completion rate (submissions divided by unique form page views), and a sparkline chart of daily submissions over the last 30 days. Track form page views by incrementing a counter each time the public form page loads."
Start with the foundations that make complex projects possible.
Learn the fundamentalsMaking Forms Embeddable
A form builder that only works on your domain is limited. The real power comes when people can embed your forms anywhere.
Prompt: "Create an embed script at /api/embed/[formId].js. The script should inject an iframe that loads the public form page. Add a share button on each form's dashboard that shows the embed code (an HTML script tag) and a direct link URL. Style the iframe to be responsive and match the parent page width."
Test the embed by pasting the script tag into a plain HTML file and opening it in a browser. The form should render inside the iframe, accept submissions, and redirect or show a thank-you message after submission. This single feature makes your form builder useful for marketers who want to embed surveys on their websites, in email campaigns, or inside existing web apps.
Polishing for Real-World Use
Before you share your form builder with anyone, run through these finishing touches.
Thank-you pages. Add a configurable thank-you message or redirect URL that displays after someone submits a form. Prompt: "Add a thank you message field to the form editor. After successful submission, show the custom message or redirect to the specified URL."
Form duplication. People will want to copy an existing form and modify it. Add a "Duplicate" button on the forms list page.
Rate limiting. Without it, someone can submit thousands of fake responses to your form. Prompt: "Add rate limiting to the form submission API. Limit each IP address to 10 submissions per form per hour. Return a 429 status code when the limit is exceeded."
Email notifications. When someone submits a form, the form owner should know about it. Prompt: "Send an email notification to the form creator when a new submission is received. Use Resend. Include the submission data in the email body."
Each of these features is one or two prompts and a few minutes of testing. They transform your project from a tutorial exercise into something people would actually pay for.
Learn how to deploy your AI-built project to the world.
Explore deployment guidesDig deeper
A few hand-picked sources if you want to go further.
What This Means For You
You just built a full survey and form builder with drag-and-drop editing, validation, submission storage, analytics, and embeddable forms. That is not a weekend project from five years ago. Five years ago, this was a funded startup's MVP.
- If you are a founder testing ideas: A form builder is one of the highest-leverage internal tools you can have. Customer surveys, onboarding questionnaires, feedback forms, beta signup pages. Every one of these used to require either a paid SaaS tool or an engineering sprint. Now you can build exactly what you need, styled to your brand, storing data in your own database, in a weekend.
- If you are a marketer collecting data: You no longer depend on Typeform's free tier limits or Google Forms' bland styling. Build forms that match your brand, embed them anywhere, and own every submission. When you need a new survey for a campaign, you are twenty minutes away from having it live instead of waiting on a developer or paying for another subscription.
- If you are building a SaaS product: Form and survey functionality is one of the most requested features across every category of business software. CRMs need forms. Project management tools need intake forms. Customer support tools need feedback surveys. You just learned the architecture for adding this capability to any product you build next.