You can build a newsletter platform with AI coding tools in a single weekend, and 92% of developers using AI daily are doing exactly this kind of project. Forget paying $50 per month for Mailchimp or ConvertKit. With Resend for delivery, Supabase for subscriber data, and an AI coding assistant to write the glue code, you own every piece of the stack.
This is not a "clone Substack in 10 minutes" fantasy. Building your own newsletter platform means you control your subscriber list, your email templates, your sending schedule, and your analytics. No vendor lock-in, no surprise pricing tiers when you hit 1,000 subscribers, no throttled features behind a paywall. The tradeoff is real work, but AI tools compress what used to be weeks of backend development into hours of guided building.
Think of it like cooking versus ordering takeout. Takeout (Mailchimp) is fast and reliable, but you eat whatever they serve at whatever price they set. Cooking (your own platform) takes more effort upfront, but you control every ingredient, every portion, and every cost. Once the kitchen is set up, every meal after that is cheaper and exactly what you want.
Why Resend and Supabase
Before writing a single line of code, you need two services that handle the hard infrastructure problems you do not want to solve yourself.
Resend handles email delivery. Sending email at scale is genuinely difficult. Spam filters, IP reputation, DKIM signing, bounce handling, and deliverability monitoring are problems that companies spend years solving. Resend abstracts all of that into a single API call. You send JSON, they deliver the email. Their free tier covers 3,000 emails per month, which is enough for a newsletter with several hundred subscribers.
Supabase handles your data. You need a database to store subscribers, track which emails have been sent, and record analytics events like opens and clicks. Supabase gives you a PostgreSQL database with a REST API, authentication, and Row Level Security out of the box. The free tier supports up to 500MB of data and 50,000 monthly active users.
These two services replace what would otherwise require a mail server, a database server, authentication logic, and analytics infrastructure. Your AI tool writes the application code that connects them.
Setting Up Subscriber Management
Every newsletter platform starts with a subscriber table. Open your Supabase dashboard, navigate to the SQL Editor, and run this:
CREATE TABLE subscribers (
  id UUID DEFAULT gen_random_uuid() PRIMARY KEY,
  email TEXT UNIQUE NOT NULL,
  name TEXT,
  status TEXT DEFAULT 'active' CHECK (status IN ('active', 'unsubscribed', 'bounced')),
  subscribed_at TIMESTAMPTZ DEFAULT now(),
  unsubscribed_at TIMESTAMPTZ,
  metadata JSONB DEFAULT '{}'
);

CREATE INDEX idx_subscribers_status ON subscribers (status);
CREATE INDEX idx_subscribers_email ON subscribers (email);
This gives you a subscribers table with status tracking, timestamps, and a flexible metadata field for tags or custom attributes you might add later. The indexes make lookups fast even as your list grows.
Now build the signup API route. Tell your AI tool to create a Next.js API route at /api/newsletter/subscribe that accepts a POST request with an email address, validates the email format, inserts it into the subscribers table via Supabase, and returns a success response. The AI will generate roughly 30 lines of TypeScript that handle validation, duplicate checking, and error responses.
Add a matching unsubscribe endpoint at /api/newsletter/unsubscribe that takes an email and a token, verifies the token, and updates the subscriber's status to "unsubscribed." Every email you send must include an unsubscribe link. This is not optional. CAN-SPAM and GDPR both require it, and Resend will suspend your account if you send emails without one.
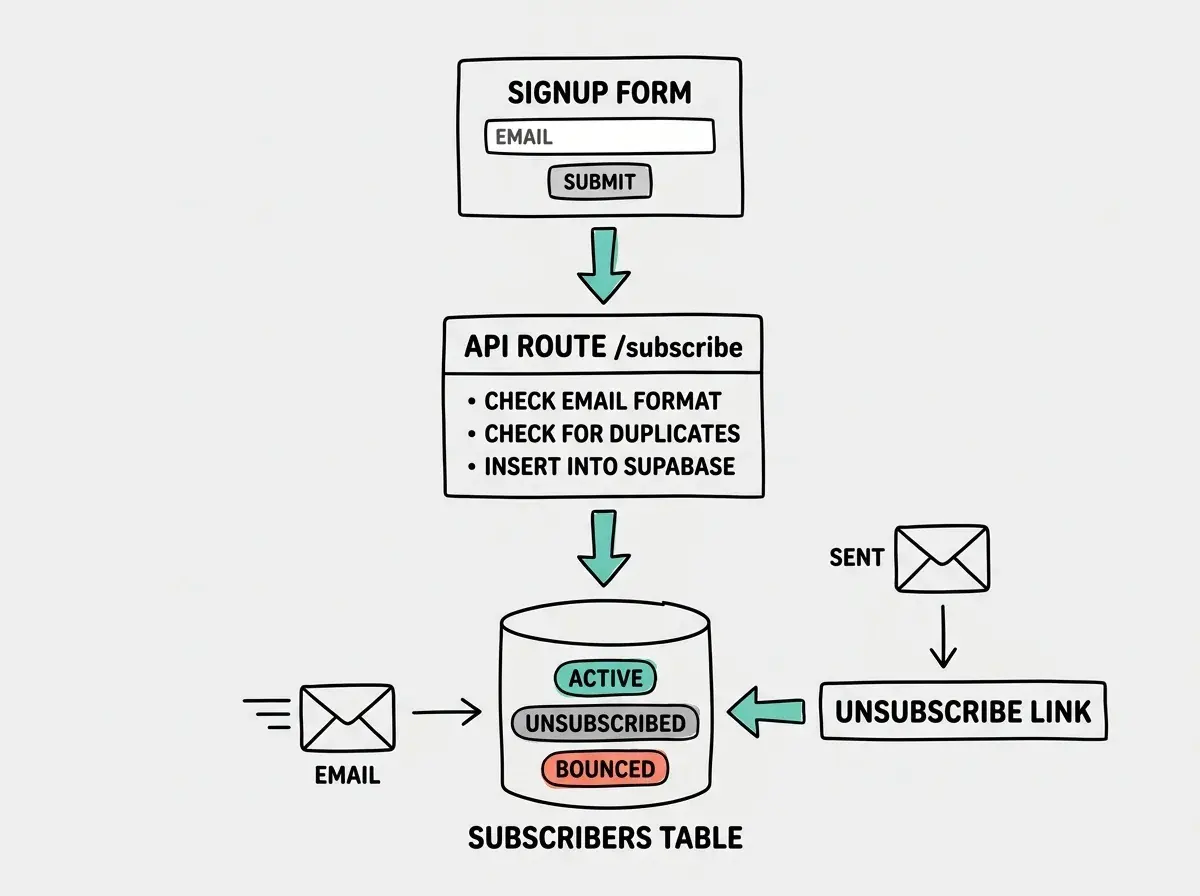
Own your subscriber list from day one. If you build on Mailchimp and later want to leave, exporting contacts means losing engagement history, tags, and open rates. With your own Supabase table, every data point belongs to you. You can switch email providers by changing a single API call without losing a single subscriber record or metric.
Start with the fundamentals before diving into advanced projects.
Start from the basicsBuilding Email Templates
Resend accepts both plain HTML and React components as email templates. The React approach is dramatically better for maintainability. Install the @react-email/components package and build your newsletter template as a React component.
import { Html, Head, Body, Container, Text, Link, Img } from '@react-email/components';

interface NewsletterProps {
  title: string;
  content: string;
  unsubscribeUrl: string;
}

export function NewsletterEmail({ title, content, unsubscribeUrl }: NewsletterProps) {
  return (
    <Html>
      <Head />
      <Body style={{ fontFamily: 'sans-serif', backgroundColor: '#f9fafb' }}>
        <Container style={{ maxWidth: '600px', margin: '0 auto', padding: '20px' }}>
          <Text style={{ fontSize: '24px', fontWeight: 'bold' }}>{title}</Text>
          <div dangerouslySetInnerHTML={{ __html: content }} />
          <Text style={{ fontSize: '12px', color: '#6b7280', marginTop: '40px' }}>
            <Link href={unsubscribeUrl}>Unsubscribe</Link>
          </Text>
        </Container>
      </Body>
    </Html>
  );
}
This template is a starting point. Ask your AI tool to expand it with a header logo, a styled content section, social links in the footer, and responsive design that works on mobile email clients. React Email components compile to HTML that renders correctly across Gmail, Outlook, Apple Mail, and every other major client. That cross-client compatibility is the main reason to use this approach instead of writing raw HTML.
Sending Emails With Resend
The send function is surprisingly simple. Create a utility that pulls active subscribers from Supabase and sends to each one:
import { Resend } from 'resend';
import { createClient } from '@supabase/supabase-js';
import { NewsletterEmail } from './templates/newsletter';

const resend = new Resend(process.env.RESEND_API_KEY);
const supabase = createClient(
  process.env.NEXT_PUBLIC_SUPABASE_URL!,
  process.env.SUPABASE_SERVICE_ROLE_KEY!
);

export async function sendNewsletter(title: string, content: string) {
  const { data: subscribers } = await supabase
    .from('subscribers')
    .select('email')
    .eq('status', 'active');

  if (!subscribers?.length) return { sent: 0 };

  const results = await resend.batch.send(
    subscribers.map((sub) => ({
      from: 'Your Newsletter <newsletter@yourdomain.com>',
      to: sub.email,
      subject: title,
      react: NewsletterEmail({
        title,
        content,
        unsubscribeUrl: `https://yourdomain.com/api/newsletter/unsubscribe?email=${sub.email}`,
      }),
    }))
  );

  return { sent: subscribers.length, results };
}
Resend's batch.send method handles up to 100 emails per call. If you have more than 100 subscribers, chunk your array into groups of 100 and send sequentially with a short delay between batches. Resend's free tier rate-limits to 100 emails per day, so plan your early sends accordingly. The paid tier ($20/month) bumps this to 50,000 per month.
Sending all emails from a single API call without batching or error handling. If one email in the batch fails (invalid address, temporary bounce), it should not kill the entire send. Always wrap individual sends in try/catch blocks, log failures separately, and update the subscriber's status to "bounced" after repeated failures. Your AI tool can generate this error handling, but you need to ask for it explicitly.
Adding Open Tracking and Analytics
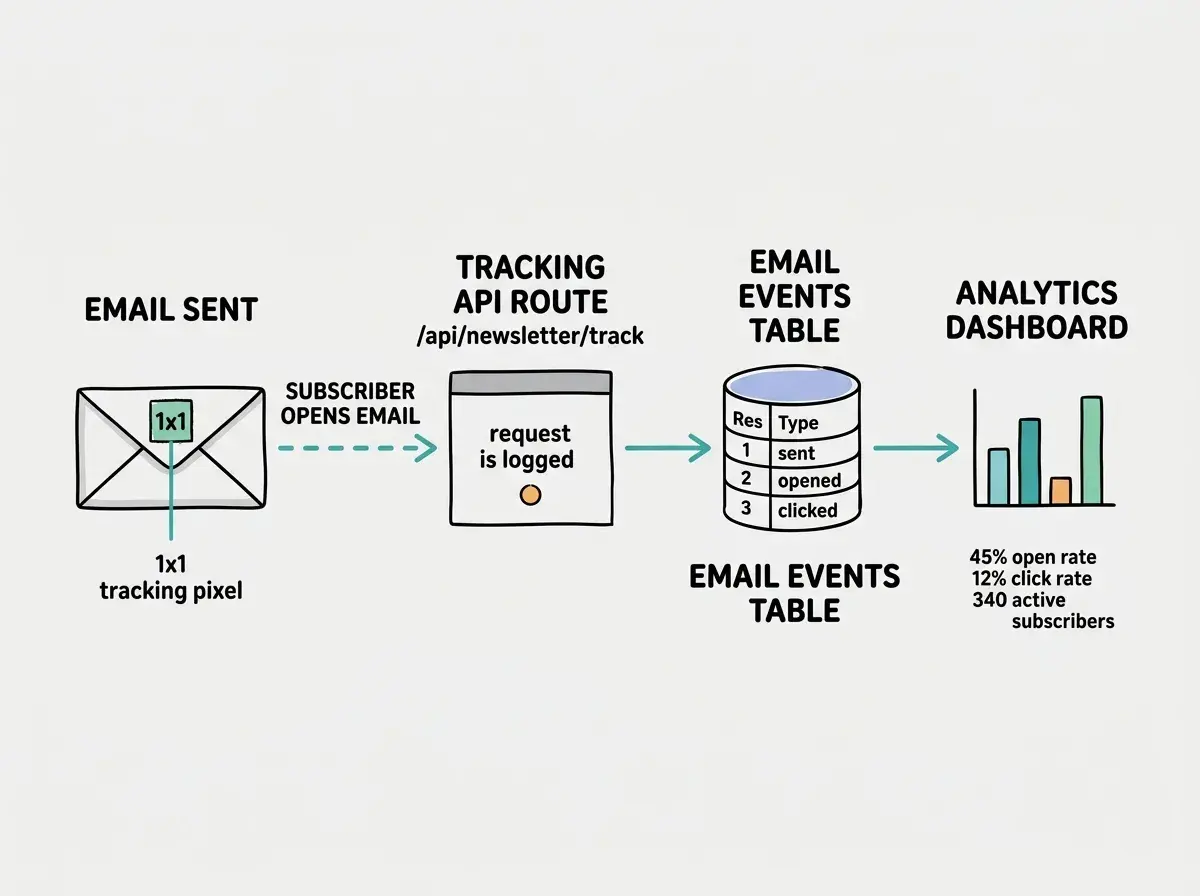
Knowing whether people actually read your emails turns a newsletter from a broadcast into a feedback loop. The standard approach uses a tracking pixel, a tiny invisible image whose URL includes the subscriber's ID.
Create a tracking table in Supabase:
CREATE TABLE email_events (
  id UUID DEFAULT gen_random_uuid() PRIMARY KEY,
  subscriber_id UUID REFERENCES subscribers(id),
  email_subject TEXT,
  event_type TEXT CHECK (event_type IN ('sent', 'opened', 'clicked', 'bounced')),
  created_at TIMESTAMPTZ DEFAULT now(),
  metadata JSONB DEFAULT '{}'
);
Build an API route at /api/newsletter/track that accepts a subscriber ID and event type as query parameters, logs the event to the email_events table, and returns a 1x1 transparent PNG. In your email template, add an image tag pointing to this endpoint:
<img src="https://yourdomain.com/api/newsletter/track?sid=SUBSCRIBER_ID&type=opened" width="1" height="1" />
When a subscriber opens the email, their email client loads the image, your API logs the open, and you now have open-rate data. This same pattern works for click tracking: wrap links in a redirect URL that logs the click before forwarding to the destination.
Build a simple dashboard page that queries the email_events table and displays open rates, click rates, and subscriber growth over time. Ask your AI tool to generate a Next.js page with charts using a lightweight library like Recharts. You will have a functional analytics dashboard in under an hour.
Get tutorials on building real tools with AI, delivered to your inbox.
Browse all tutorialsScheduling and Automation
A newsletter platform without scheduling is just a manual email sender. Add a newsletters table to track drafts, scheduled sends, and completed sends:
CREATE TABLE newsletters (
  id UUID DEFAULT gen_random_uuid() PRIMARY KEY,
  title TEXT NOT NULL,
  content TEXT NOT NULL,
  status TEXT DEFAULT 'draft' CHECK (status IN ('draft', 'scheduled', 'sending', 'sent')),
  scheduled_for TIMESTAMPTZ,
  sent_at TIMESTAMPTZ,
  created_at TIMESTAMPTZ DEFAULT now()
);
For scheduling, you have two practical options. The simpler approach uses a cron job (Vercel Cron or Supabase Edge Functions with pg_cron) that runs every five minutes, checks for newsletters where status = 'scheduled' and scheduled_for <= now(), and triggers the send function. The more robust approach uses a queue service, but for a platform serving hundreds of subscribers, the cron approach works perfectly.
Ask your AI tool to generate the cron handler, and be specific: "Write a Vercel cron function that runs every 5 minutes, queries the newsletters table for rows with status 'scheduled' and scheduled_for in the past, sends each one using the sendNewsletter function, and updates the status to 'sent' with the current timestamp."
What This Means For You
You now have the blueprint for a newsletter platform that costs you nothing at the free tier and under $30 per month at scale. No vendor lock-in, no surprise price increases, no feature gates.
- If you are a creative building an audience: Your newsletter is your most valuable asset, more durable than any social media following. Owning the infrastructure means you will never wake up to an email from ConvertKit saying they tripled their prices. Start with the free tiers of Resend and Supabase, and you will not pay a dollar until you have thousands of subscribers.
- If you are an indie hacker building a SaaS: Newsletter functionality is one of the most requested features in modern apps. The subscriber management, template, and sending code you just built can be embedded directly into your product as a transactional email or notification system. You are not just building a newsletter; you are building reusable email infrastructure.
The entire project fits into a weekend with AI tools handling the boilerplate. Prompt your AI assistant with the schemas, the Resend docs, and the React Email examples from this tutorial, and let it generate the implementation. Your job is the architecture decisions, the error handling requirements, and the testing. The AI writes the code. You own the platform.