You can build a membership site with AI tools that handles subscription billing, content gating, and member dashboards in a single weekend. 92% of developers now use AI tools daily, and membership sites generate recurring revenue from day one. This tutorial covers every layer, from Stripe subscriptions to Supabase access control.
Think of a membership site like a private club. The lobby is open to everyone. Visitors can look around, read the menu, see what is on offer. But the rooms behind the velvet rope are for members only. Your free content is the lobby. Your gated content is the private rooms. Stripe checks the membership card at the door. Supabase makes sure nobody sneaks in through a side entrance.
Why Membership Sites Are the Perfect Intermediate Build
If you have shipped a basic website or landing page with AI, a membership site is the natural next step. It introduces recurring payments, role-based access, protected routes, and database-driven content, which are the building blocks of every serious SaaS application.
The project also solves a real business problem. Creators, educators, and founders all need a way to monetize content. Instead of building for a hypothetical user, you can build this for yourself and start earning from it immediately.
Build your membership site in layers. Start with authentication and free content. Then add Stripe subscriptions. Then gate the premium content. Testing each layer before moving to the next prevents the cascading bugs that happen when payment logic and access control get tangled together. If your content gate breaks, you want to know whether the problem is in Stripe, Supabase, or your frontend, not all three at once.
Setting Up Authentication and the Database
Every membership site starts with knowing who is visiting. Open your AI coding tool and set up the foundation.
Prompt: "Create a Next.js application with Supabase authentication. Set up email/password sign-up and sign-in pages. Create a profiles table in Supabase with columns for id (UUID referencing auth.users), email, display_name, subscription_tier (text, default 'free'), and stripe_customer_id (text, nullable). Enable Row Level Security on the profiles table so users can only read and update their own row."
The AI will generate your auth flow and database schema. Test it by creating two accounts. Verify that each user can only see their own profile. If User A can read User B's profile data, your RLS policies need fixing before you go any further.
Now create your content table. Prompt: "Create a content table with columns for id, title, slug, body (text), tier_required (text, either 'free' or 'premium'), published_at (timestamp), and created_at. Enable RLS. Create a policy that allows anyone to SELECT rows where tier_required is 'free', and only users whose profiles.subscription_tier is 'premium' can SELECT rows where tier_required is 'premium'."
This is where the velvet rope lives in your database. The RLS policy itself decides what content each user can see. No amount of clever frontend code can bypass it.
Creating Subscription Tiers With Stripe
Stripe Billing handles the recurring payment logic so you never have to build subscription management from scratch. You need two things from Stripe: a Product and a Price.
Go to your Stripe dashboard and create a product called "Premium Membership." Add a recurring price, for example $9/month. Copy the Price ID (it starts with price_). You will use this in your checkout flow.
Prompt: "Create an API route at /api/checkout/subscribe that accepts a priceId parameter. It should look up the current user's Supabase session, check if they already have a stripe_customer_id in the profiles table, and either use the existing customer or create a new Stripe customer. Then create a Stripe Checkout Session in subscription mode with the given priceId, setting the success_url to /dashboard?session_id={CHECKOUT_SESSION_ID} and cancel_url to /pricing. Return the checkout session URL."
Test this by clicking through the subscription flow with Stripe's test card (4242 4242 4242 4242). After checkout, check your Stripe dashboard to confirm the subscription was created. You should see a new customer with an active subscription.
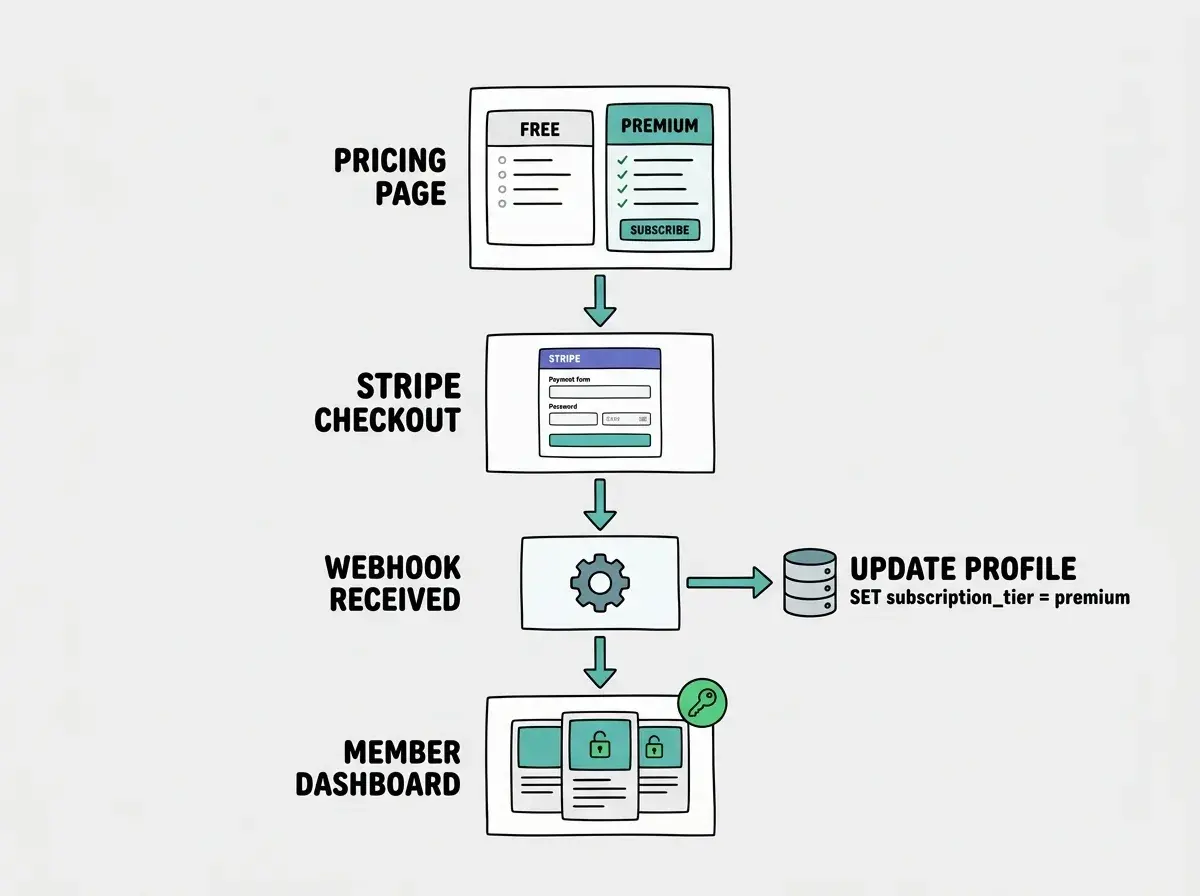
Syncing Stripe With Your Database Using Webhooks
Here is the critical piece that most AI-generated membership sites miss. When a user pays through Stripe, your database does not magically know about it. You need a webhook to bridge the gap.
Prompt: "Create a webhook endpoint at /api/webhooks/stripe that verifies the Stripe signature header. Handle these events: checkout.session.completed should update the user's profiles row to set subscription_tier to 'premium' and save the stripe_customer_id. customer.subscription.deleted should set the user's subscription_tier back to 'free'. Use the Supabase service role client for these database updates since webhooks run without a user session."
The webhook is the bridge between Stripe's world and your database. Without it, a user could pay and still see locked content because your database never learned about the payment.
Test the webhook locally using Stripe CLI: stripe listen --forward-to localhost:3000/api/webhooks/stripe. Then complete a test checkout and watch the terminal. You should see the checkout.session.completed event fire and your database update.
Skipping webhook signature verification. Without it, anyone can send a fake POST request to your webhook URL and grant themselves premium access for free. Stripe signs every webhook with a secret. Your endpoint must verify that signature before processing any event. AI tools sometimes generate webhook handlers that skip verification because it adds complexity. Always include it.
Building the Content Gate
With authentication, subscriptions, and webhooks working, you can now gate content on the frontend. The database already enforces access through RLS, but you also need your UI to communicate what is free and what is locked.
Prompt: "Create a content listing page that fetches all content from the content table. For free-tier content, display the full card with a Read button. For premium content, check the user's subscription_tier. If they are a premium member, show the full card with a Read button. If they are on the free tier, show the card with a blurred preview, a lock icon overlay, and an Upgrade to Premium button that links to the pricing page."
This gives free users a taste of what they are missing without exposing the actual content. The blurred preview creates desire without giving away value.
For individual content pages, add a server-side check. Prompt: "On the content detail page at /content/[slug], fetch the content from Supabase. If the content's tier_required is 'premium' and the user's subscription_tier is 'free', redirect them to the pricing page instead of showing the content. If they are not logged in at all, redirect to the sign-in page with a return URL parameter."
The key principle is defense in depth. The database enforces access through RLS. The API route checks the tier. The frontend hides locked content visually. All three layers work together. If any single layer fails, the others still protect your premium content.
Row Level Security is what keeps your gated content actually gated. Learn how it works.
Explore the guidesBuilding the Member Dashboard
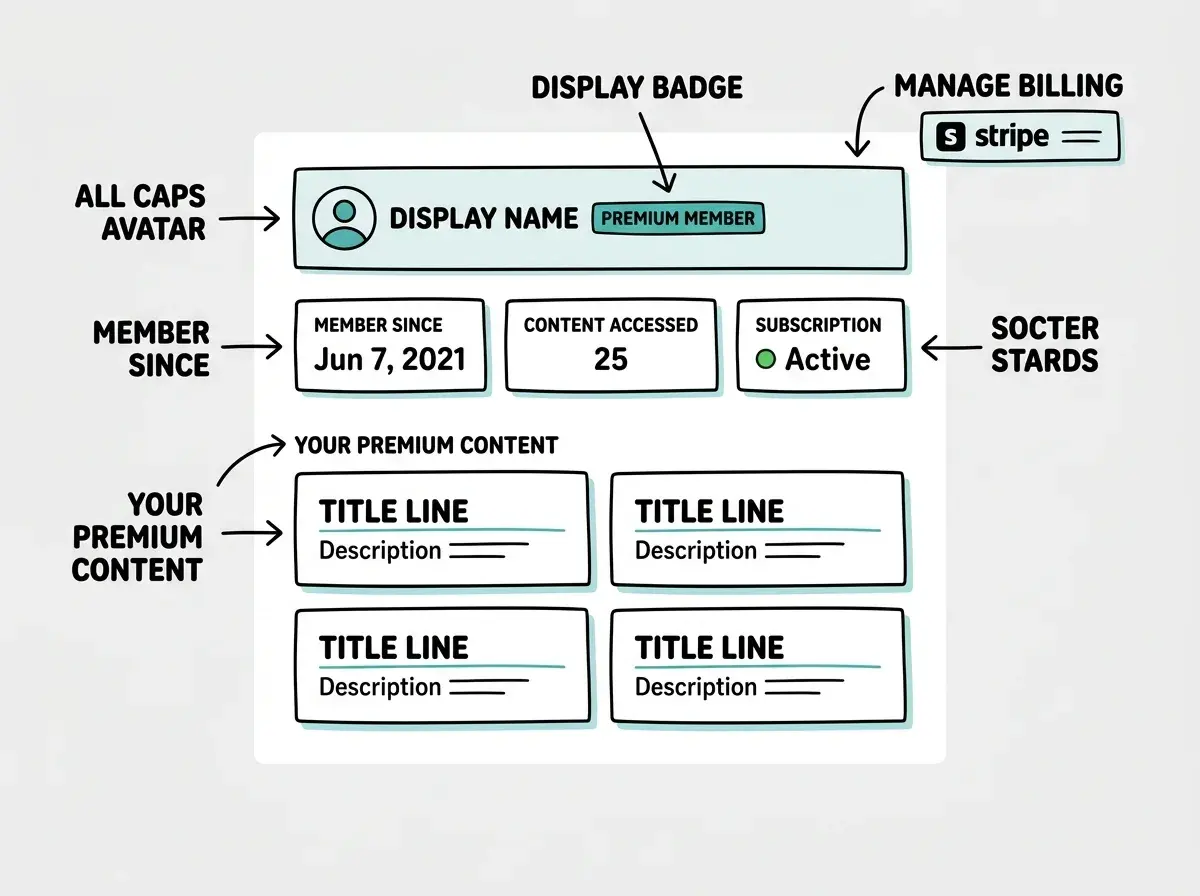
Premium members need a home base where they can see their subscription status, access all premium content, and manage their billing.
Prompt: "Create a dashboard page at /dashboard that shows the current user's display name, subscription tier, and member-since date. If they are a premium subscriber, show a grid of all premium content they can access. Add a Manage Billing button that creates a Stripe Customer Portal session and redirects the user to it, so they can update their payment method, view invoices, or cancel their subscription."
The Stripe Customer Portal is an enormous time saver. Instead of building cancellation flows, invoice pages, and payment update forms from scratch, Stripe gives you a hosted portal that handles all of it. Enable it in your Stripe dashboard under Settings, then Billing, then Customer Portal.
Add a quick API route for the portal. Prompt: "Create an API route at /api/billing/portal that looks up the current user's stripe_customer_id, creates a Stripe Customer Portal session with the return_url set to /dashboard, and returns the portal URL."
Handling Edge Cases and Upgrades
A production membership site needs to handle the transitions between tiers gracefully.
Expired payments. When a credit card fails, Stripe retries the charge according to your retry schedule. During this period, the subscription is "past due." Prompt: "Add a webhook handler for invoice.payment_failed that updates the user's profile with a payment_status of 'past_due'. On the dashboard, if payment_status is 'past_due', show a warning banner with a link to update their payment method through the Stripe Customer Portal."
Cancellation grace period. When a member cancels, Stripe lets them keep access until the end of their billing period. Prompt: "Handle the customer.subscription.updated webhook event. If the subscription's cancel_at_period_end is true, update the profile to show subscription_status as 'canceling' with the period_end date. Show a banner on the dashboard telling them when their access expires."
Free trial. If you want to offer a trial, add trial_period_days: 7 to your Stripe Checkout Session configuration. Stripe handles the trial-to-paid conversion automatically. Your webhook picks up the transition just like any other subscription event.
Start with authentication, add Stripe, then gate your content. Ship it this weekend.
Start buildingWhat This Means For You
You now have a complete blueprint for a membership site with gated content, recurring billing, and proper access control. Every piece was built with AI assistance, but the architecture and business decisions were yours.
- If you are a creator or educator with premium content: You do not need a Patreon, Substack, or Teachable account taking a cut of your revenue. Build your membership site this weekend, set your own price, and own the entire customer relationship. No platform fees. No algorithmic feed deciding who sees your work.
- If you are a founder testing a subscription business: This is the fastest way to validate whether people will pay monthly for what you are building. Launch with three pieces of premium content, share it with your audience, and let real subscription numbers tell you whether to keep going. Revenue is the only validation metric that matters.
The tools to build a membership site with AI are ready and waiting. The only thing between you and recurring revenue is a weekend of building.