You can build an e-commerce store with AI coding tools and have it accepting real payments within a single weekend. 92% of developers now use AI tools daily, and the ones building storefronts are shipping in days what used to take months. This tutorial walks you through every layer of a real storefront, from product catalog to order confirmation email, using AI to handle the heavy lifting while you make the decisions that matter.
Think of building a storefront like opening a physical shop. You need shelves to display products, a register to take payments, and receipts to confirm the sale. Product pages are your shelves. The cart is the customer's basket. Checkout is the register. Confirmation emails are the receipt. AI helps you build all of it, but you still decide what goes on the shelves and how the shop feels when someone walks in.
Why E-Commerce Is the Ideal Intermediate Project
If you have built a basic website or landing page with AI, an e-commerce storefront is the natural next step. It introduces real complexity without being overwhelming. You get to work with state management (the shopping cart), third-party integrations (Stripe), dynamic content (product pages), and transactional flows (checkout and confirmation). These are the building blocks of nearly every serious web application.
The project also has a clear finish line. When a customer can browse products, add them to a cart, pay with a real credit card, and receive an email confirmation, you have built something genuinely useful. Not a demo. Not a prototype. A working store.
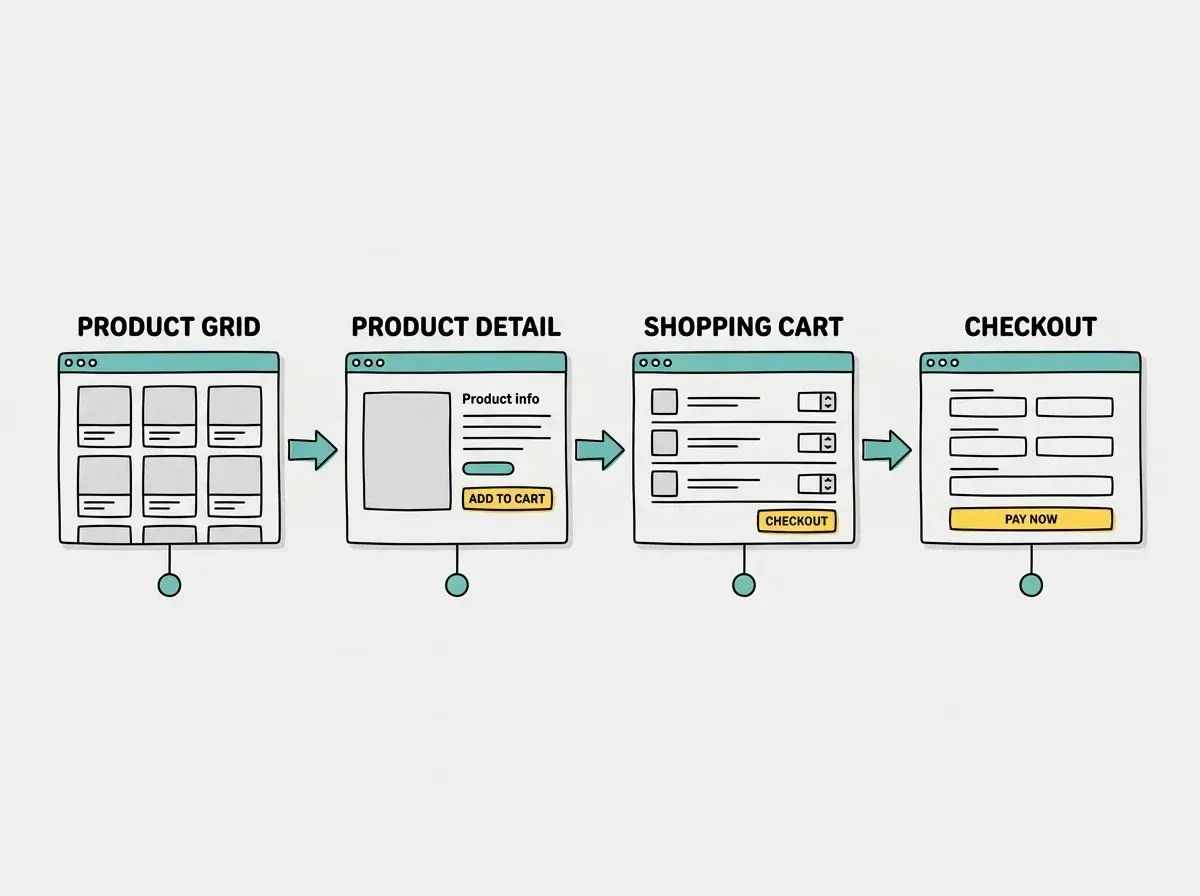
Start with the product catalog and work forward through the customer journey. Every e-commerce storefront follows the same flow: browse, select, cart, checkout, confirm. Build each step in order, and test it before moving to the next. Skipping ahead to payments before your product pages work will create debugging nightmares that even AI cannot untangle quickly.
Setting Up the Project Foundation
Open your AI coding tool and start with a prompt that establishes the full scope. Do not ask the AI to build everything at once. Instead, start with the skeleton.
Try this prompt: "Create a Next.js e-commerce storefront with these pages: a homepage showing a grid of product cards, a product detail page for each item, a shopping cart page, and a checkout page. Use Tailwind CSS for styling. Set up a clean folder structure with separate components for ProductCard, CartItem, and CheckoutForm. Do not add payment processing yet. Use placeholder product data with five sample products, each having a name, price, description, and image URL."
The AI will generate your project structure in about a minute. You should see a homepage with product cards, clickable product pages, and placeholder cart and checkout pages. Everything from here is layering on real functionality.
Project structure check: Make sure your AI created separate component files, not one massive page. You should see files like ProductCard.tsx and CartItem.tsx. If the AI jammed everything into a single file, ask it to refactor: "Break this into separate components with one component per file."
Building the Product Catalog
Your product data needs a home. For a storefront with under fifty products, a local JSON file or TypeScript array works perfectly. For larger catalogs, you would eventually move to a database, but start simple.
Ask the AI: "Create a products data file with ten products. Each product should have an id, name, slug, price in cents (not dollars), description, category, an array of image URLs, and an inStock boolean. Include products across three categories: electronics, clothing, and home goods."
Storing prices in cents matters. Floating-point math in JavaScript is unreliable for currency ($19.99 becomes 19.990000000000002 in some calculations). Stripe also expects amounts in cents. Getting this right from the start saves you from subtle bugs later.
Now build the product detail page. Prompt: "Create a dynamic product page at /products/[slug] that displays the product image, name, price formatted as dollars, full description, an Add to Cart button, and a quantity selector. Include breadcrumb navigation showing Home then Products then the product name."
Implementing the Shopping Cart
The shopping cart is where state management enters the picture. Your cart needs to persist as users navigate between pages, update when they add or remove items, and calculate totals accurately.
Prompt the AI: "Implement a shopping cart using React Context and localStorage. The cart should support adding items with a quantity, removing items, updating quantities, and calculating subtotals and a grand total. Prices are stored in cents, so format them as dollars only for display. The cart state should persist across page refreshes using localStorage."
Test the cart thoroughly before moving on. Add items from different product pages. Change quantities. Remove items. Refresh the page and confirm the cart survives. If any of these break, fix them now. Cart bugs during checkout are the fastest way to lose a customer.
Cart icon in the header: "Add a cart icon to the site header that shows the number of items currently in the cart. Clicking it should navigate to the cart page. Use a small teal badge on the icon to display the count."
Connecting Stripe for Payments
This is the step that separates a demo from a real store. Stripe handles the hard parts: credit card processing, fraud detection, PCI compliance, tax calculation. You provide a checkout experience and Stripe does the rest.
Create a free Stripe account at stripe.com. Grab your test API keys from the dashboard (they start with pk_test_ and sk_test_). Add them to your environment variables.
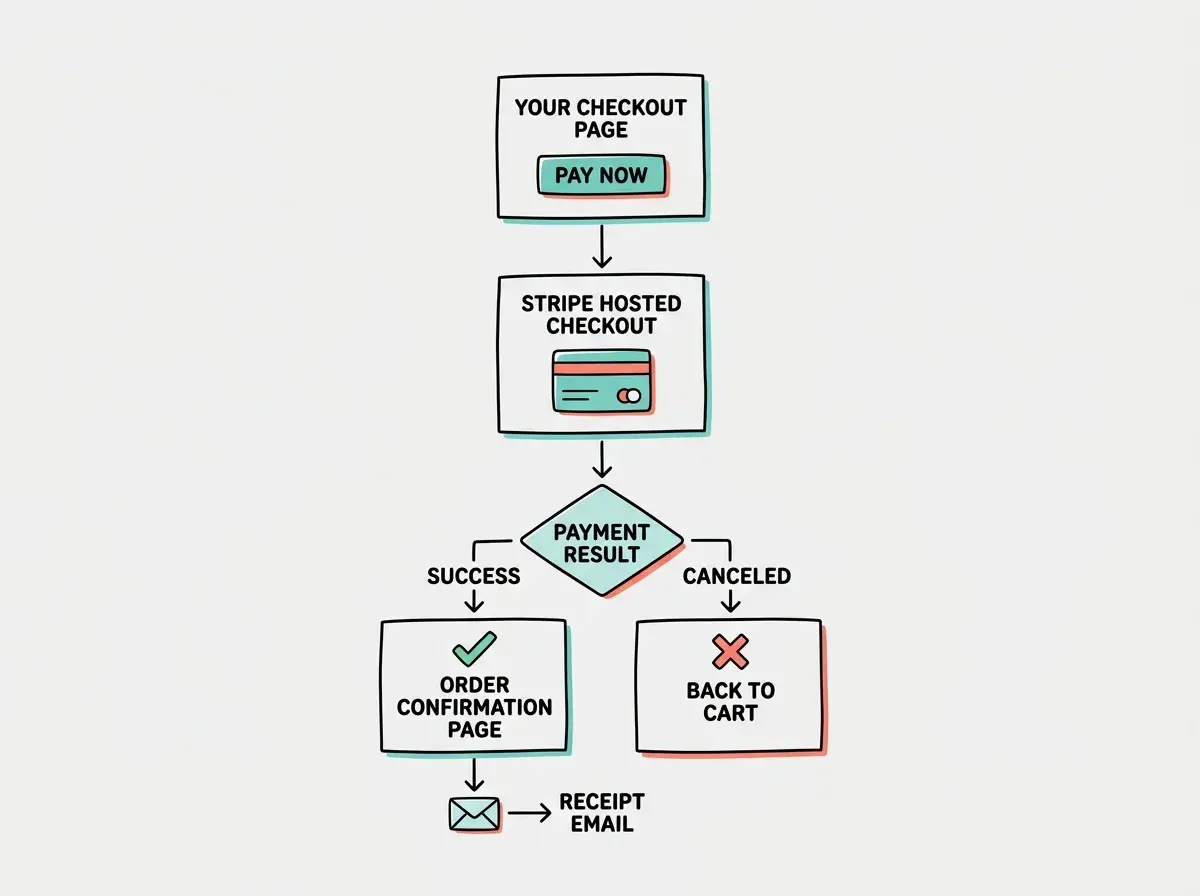
Prompt: "Set up Stripe Checkout integration. Create an API route at /api/checkout that accepts an array of cart items, creates a Stripe Checkout Session with line items for each product (using price_data with the product name, amount in cents, and currency USD), and returns the session URL. On the frontend checkout page, when the user clicks Pay Now, call this API route and redirect to the Stripe-hosted checkout page. Set the success URL to /order-confirmation and the cancel URL to /cart."
Never put your Stripe secret key (sk_test_ or sk_live_) in frontend code. It belongs in environment variables on the server side only. AI tools sometimes place API keys directly in client components because the AI does not distinguish between public and private keys. If your checkout component imports the secret key directly, move it to an API route immediately. Exposed secret keys let anyone charge your Stripe account.
Test the full flow with Stripe's test card number: 4242 4242 4242 4242, any future expiration date, any three-digit CVC. Complete a test purchase. Check your Stripe dashboard to confirm the test payment appears. If it does, your payment pipeline is working.
Building the Order Confirmation
After a successful Stripe checkout, Stripe redirects the customer to your success URL with a session_id parameter. Use this to display order details.
Prompt: "Create an order confirmation page at /order-confirmation that reads the Stripe session_id from the URL query parameters. Create an API route that fetches the session details from Stripe using the session ID and returns the customer email, line items, and total amount. Display a confirmation message with the order details, a summary of items purchased, and the total paid."
For confirmation emails, Stripe can send automatic receipts (enable this in your Stripe dashboard under Settings, then Emails). For your first store, Stripe's built-in receipts are the simplest path. You can add custom emails via Resend later.
Learn the fundamentals of how apps handle money, authentication, and third-party integrations.
Explore the guidesHandling Inventory and Edge Cases
A working storefront needs guardrails. What happens when someone buys an out-of-stock item? What if they add 999 of something to their cart?
Prompt: "Add inventory checks to the Add to Cart function. If a product's inStock field is false, disable the Add to Cart button and show 'Out of Stock' in red. Limit the maximum quantity per item to 10. On the cart page, show a warning if any item's quantity exceeds available stock."
For a first version, client-side inventory checks are fine. As your store grows, you will want server-side validation in your checkout API route. But start simple and upgrade when you need to.
Other edge cases to prompt for:
"Add empty cart handling. If the cart is empty, show a friendly message and a Continue Shopping button instead of the checkout form."
"Add loading states to the checkout button. When the user clicks Pay Now, disable the button and show Processing... until the redirect happens. This prevents double-clicks and duplicate charges."
Going Live
Switching from test mode to live is straightforward. Replace your Stripe test keys with live keys (they start with pk_live_ and sk_live_). Update your environment variables on your hosting platform. Deploy.
Before you share the store, run through the entire flow with a real (small) purchase. Buy the cheapest item in your store. Confirm the charge appears in Stripe and you receive the confirmation email. Then refund yourself from the Stripe dashboard.
You should also set up Stripe webhooks. Prompt: "Create a webhook endpoint at /api/webhooks/stripe that verifies the Stripe signature and handles checkout.session.completed events." Webhooks ensure your app knows about payments even if the customer closes their browser before reaching the confirmation page.
Start with the e-commerce fundamentals and ship your first product.
Start buildingWhat This Means For You
You now have a blueprint for a complete e-commerce storefront. Every piece was built with AI assistance, but the architecture and decisions were yours.
- If you are a founder with a product to sell: You do not need a Shopify subscription or a developer on retainer. Build your storefront this weekend, list your first five products, and start taking real orders by Monday. You control the code, the design, and the customer experience. No monthly platform fees eating into your margins.
- If you are an indie hacker testing a product idea: This is the fastest path from concept to revenue. Build the storefront, list your product, share the link in the communities where your customers hang out, and see if people actually pay. Real purchases tell you more than any survey or landing page signup ever could.
The gap between "I have a product idea" and "I am accepting payments" has never been smaller. The tools are ready. The only thing left is to build it.