If you want to build a kanban board with AI, this is the tutorial that gets you there. 92% of AI-tool users now use them daily, and project management apps are one of the most practical things you can build. A Trello-style board with draggable columns, task cards, labels, and real-time sync is a genuinely useful product that teaches you patterns you will reuse in everything you build next.
This is not a toy project. By the end of this tutorial, you will have a working kanban board with drag-and-drop columns, color-coded labels, user assignments, and a Supabase backend that syncs changes in real time. The kind of tool a small team could actually use.
Why a Kanban Board Is Worth Building
A kanban board hits a sweet spot for intermediate builders. It is complex enough to teach you real patterns (drag-and-drop, state management, real-time data) but focused enough to finish in a few sessions. It is also something you will actually use. Every team needs task management, and building your own means you control the features, the design, and the cost.
The architecture you will learn here applies far beyond kanban boards. Drag-and-drop works the same way in page builders, playlist managers, and form editors. Real-time sync is the foundation of collaborative tools, chat apps, and live dashboards. You are not just building a Trello clone. You are learning the building blocks of modern interactive software.
A kanban board combines four intermediate patterns in one project: drag-and-drop interaction, complex state management, real-time database sync, and multi-user collaboration. Building one teaches you more than three simpler projects combined because you have to make these systems work together. This is the kind of project that separates "I can prompt an AI" from "I can build real software with AI."
Setting Up the Project Foundation
Start by opening your AI coding tool (Cursor, Lovable, Bolt, or whichever you prefer) and giving it a detailed prompt for the project structure. The more specific you are upfront, the less back-and-forth you will need later.
Use this as your opening prompt: "Create a kanban board app using Next.js, Tailwind CSS, and Supabase. The board should have three default columns: To Do, In Progress, and Done. Each column should hold task cards that can be dragged between columns. Use @dnd-kit/core and @dnd-kit/sortable for drag-and-drop. Set up a clean project structure with separate components for Board, Column, and Card."
The AI will scaffold your project with a component structure that looks something like this: a Board component that holds everything, Column components that represent each vertical list, and Card components for individual tasks. It will also install the drag-and-drop library and configure Tailwind.
Review what the AI generated before moving on. Check that the Board component renders three columns, that each column has a title and an area for cards, and that at least one column has sample cards. If anything is missing, tell the AI specifically what to add.
Building Drag-and-Drop That Actually Works
Drag-and-drop is the heart of a kanban board, and it is also where most AI-generated code needs the most refinement. The AI will give you a working starting point, but you will need to prompt it carefully to handle edge cases.
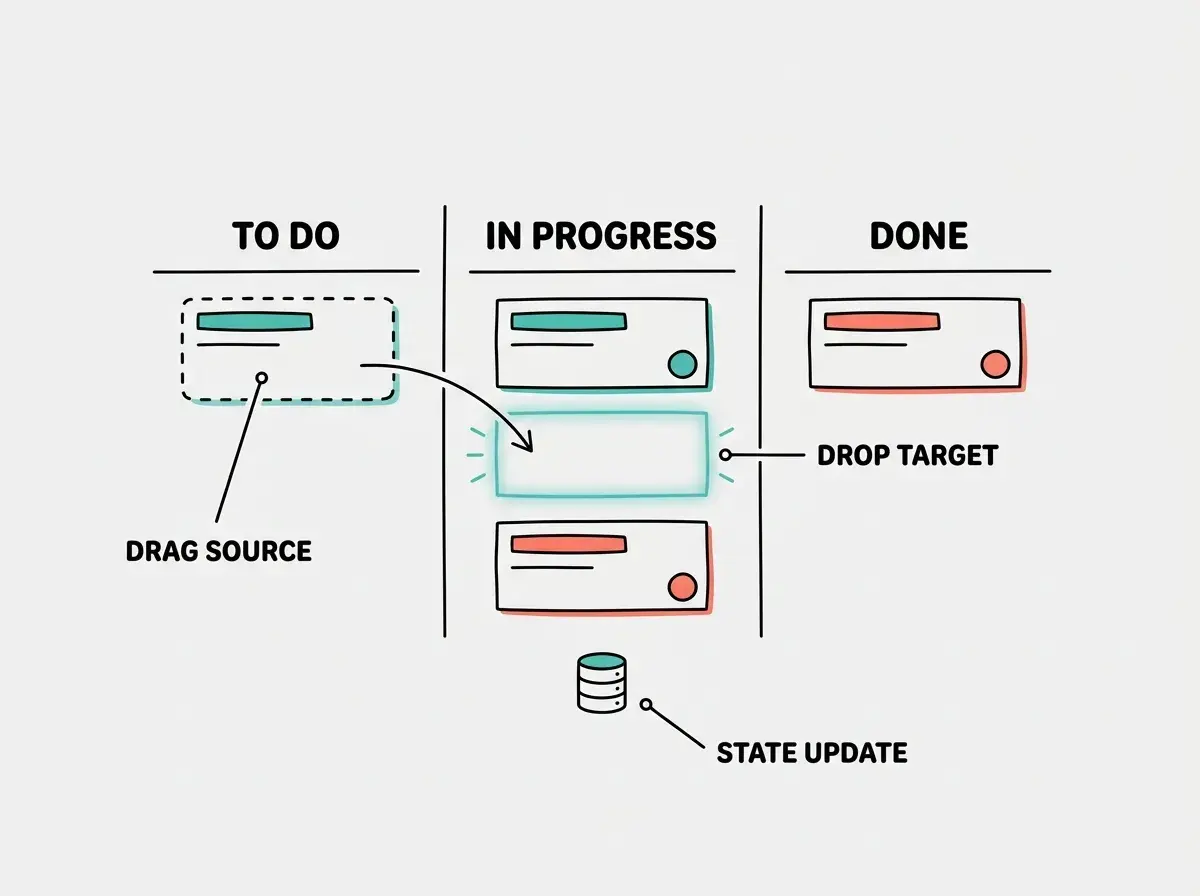
Send this prompt: "Implement full drag-and-drop for the kanban board. Cards should be draggable between columns and reorderable within the same column. When I drag a card, show a visual placeholder where it will land. The card being dragged should have reduced opacity. When I drop a card in a new column, update the state immediately so there is no visual delay."
The key concepts the AI is implementing here are drag sensors (detecting when you click and move a card), drop zones (detecting which column and position you are hovering over), and state updates (moving the card data from one column's array to another). The @dnd-kit library handles the hard parts, but your AI tool needs to wire them together correctly.
Test the drag-and-drop thoroughly at this point. Try dragging a card from the first column to the last. Try reordering cards within the same column. Try dragging when a column is empty. Each of these is a distinct interaction that needs to work.
Adding Task Cards With Labels and Assignments
A blank card with just a title is not very useful. Real kanban boards have labels, assignees, due dates, and descriptions. Build these features one at a time.
Start with the card creation flow: "Add a plus button at the bottom of each column. When clicked, show an inline form with fields for: task title (required), description (optional), label color (dropdown with options: red, yellow, green, blue, purple), and assigned to (text input for a name). When submitted, add the card to the bottom of that column."
Then add visual richness to the cards: "Display each card with its title in bold, description in smaller gray text below, a colored label dot in the top right corner matching the selected label color, and the assignee's name with a small avatar circle showing their first initial at the bottom of the card. Add a subtle shadow and rounded corners to each card."
The label system is more important than it looks. Color-coded labels let users create their own categorization: red for bugs, green for features, blue for design work. This is the kind of small feature that makes the difference between a demo and a tool someone actually opens every day.
For editing, add this: "When I click on a card, open a modal with all the card's fields editable. Include a delete button at the bottom of the modal in red. Changes should save when I close the modal."
Connecting Supabase for Real-Time Sync
Everything so far lives in local state, meaning it disappears when you refresh the page. Supabase fixes that and adds real-time sync so multiple people can use the board simultaneously.
First, set up the database. Go to supabase.com, create a new project, and open the SQL editor. Ask your AI tool: "Generate Supabase SQL to create tables for a kanban board. I need a boards table, a columns table with a position field and a foreign key to boards, and a cards table with title, description, label_color, assigned_to, position, and a foreign key to columns. Add row-level security policies that allow authenticated users to read and write all data."
Skipping row-level security because it seems complicated. Every Supabase table is publicly accessible by default through the API. If you do not add RLS policies, anyone who finds your Supabase URL can read, modify, or delete every task on your board. The AI can generate these policies for you in seconds. Always ask for them, even for personal projects, because the habit protects you when the stakes are higher.
Next, connect your app to Supabase: "Install @supabase/supabase-js. Create a Supabase client using environment variables for the URL and anon key. Replace all local state with Supabase queries. When the board loads, fetch all columns and cards from Supabase. When a card is created, moved, or deleted, update Supabase immediately."
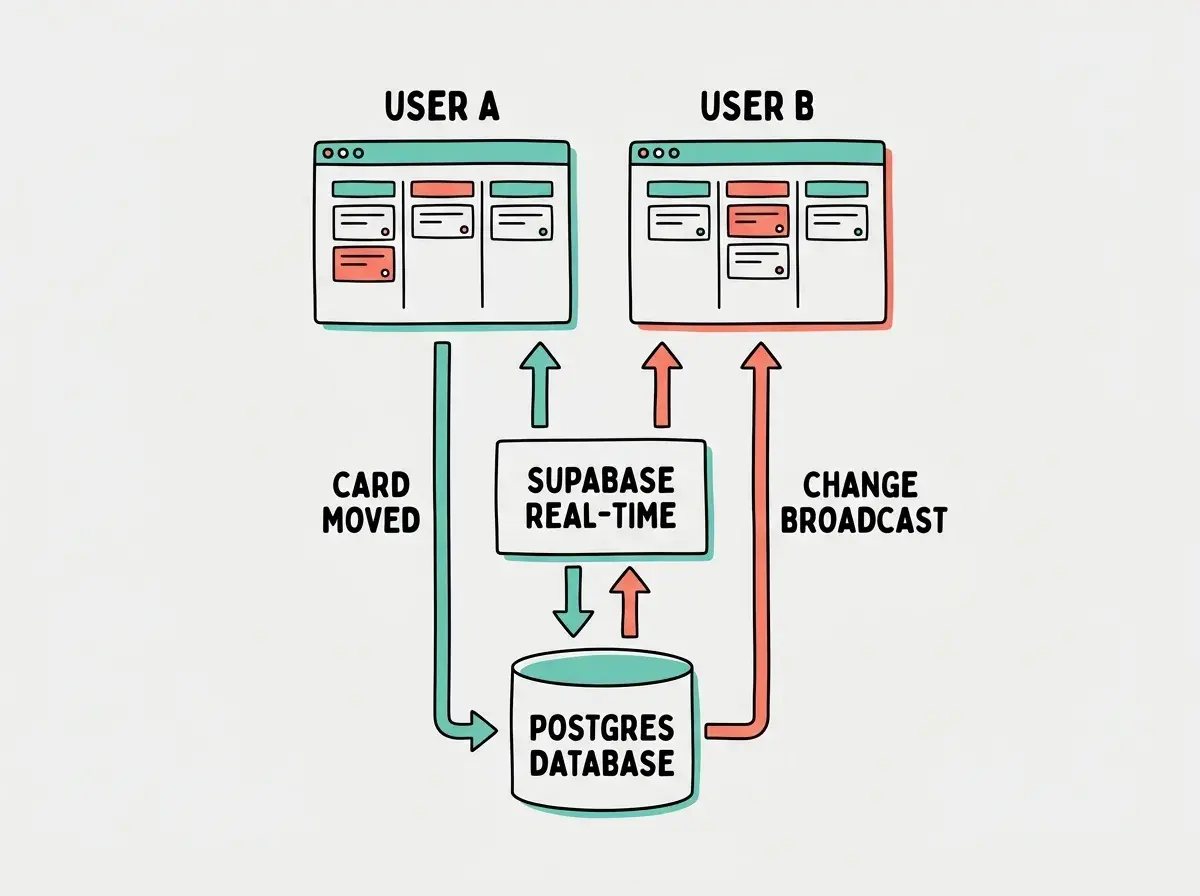
Finally, add real-time subscriptions: "Subscribe to Supabase real-time changes on the cards and columns tables. When another user adds, moves, or deletes a card, update the local board state automatically without needing a page refresh."
Test this by opening your board in two browser windows side by side. Create a card in one window and watch it appear in the other. Drag a card to a new column and confirm the change shows up in both windows. This is the moment your project goes from a local prototype to a collaborative tool.
Polishing the Experience
The functional pieces are done. Now spend time on the details that make it feel like a real product.
Column management: "Let users add new columns by clicking a plus button to the right of the last column. Let users rename columns by double-clicking the column title. Let users delete empty columns with a trash icon that only appears on hover."
Card count and visual feedback: "Show a card count badge next to each column title. When dragging a card over a column, highlight that column's border in teal. Add smooth transitions when cards are added, removed, or reordered."
Keyboard accessibility: "Let users press Escape to cancel a drag operation. Let users press Enter to submit the new card form. Add proper aria labels to all interactive elements for screen reader support."
These polish steps take your board from something that works to something that feels good to use. The AI can handle all of them with single prompts, and each one takes under a minute to generate.
Start with the fundamentals that make AI-built apps actually work.
Explore the basicsDeploying Your Kanban Board
Deploy to Vercel by connecting your GitHub repository. Make sure to add your Supabase environment variables (NEXT_PUBLIC_SUPABASE_URL and NEXT_PUBLIC_SUPABASE_ANON_KEY) in the Vercel project settings before deploying.
Once deployed, share the URL with your team. Every person who opens it will see the same board, and changes sync in real time. You now have a production kanban board that cost you nothing except a few hours and an AI subscription you were already paying for.
For next steps, consider adding user authentication so each person gets their own avatar and you can track who moved what. Add board-level permissions so you can create multiple boards for different projects. Add due date reminders using a simple cron job or Supabase edge function. Each of these is one session of work with your AI tool.
What This Means For You
You just built a collaborative project management tool from scratch. That is not a minor accomplishment. Companies pay thousands per month for tools like this, and you built one in a few sessions.
- If you are a founder building a product: You now know how to build real-time collaborative features, which is the foundation of SaaS products that teams pay for monthly. The drag-and-drop, state management, and real-time sync patterns you learned here apply directly to building your actual product. Take this kanban board, swap the task cards for whatever your product manages (leads, orders, support tickets), and you have the core of a real business tool.
- If you are a student learning to build: You just completed a project that covers more ground than most semester-long courses. Drag-and-drop interaction, database design, real-time subscriptions, and deployment. Put this on your portfolio. When an interviewer asks what you have built, a collaborative kanban board with real-time sync is a much more compelling answer than another to-do list.
Keep building with the tutorials and guides that vibe coders trust.
See more tutorials