Building a job board with AI coding tools is one of the fastest ways to launch a marketplace product that generates real revenue. 92% of builders now use AI tools daily, and a job board is the perfect project to test that workflow because it combines multiple systems (listings, search, applications, dashboards) into one cohesive product. This tutorial walks you through building every piece.
Job boards are deceptively simple on the surface. Someone posts a job, someone else applies. But underneath that simplicity lives a set of interconnected features that make or break the product. Search and filtering, employer management, application tracking, email notifications, and admin controls all need to work together. The good news is that AI coding tools handle this kind of structured, well-understood application extremely well.
Why a Job Board Is the Ideal AI Build Project
Job boards follow established patterns that AI models have seen thousands of times. Database schemas for listings, CRUD operations for job management, search interfaces with filters, form submissions for applications. These are not novel problems. They are well-documented patterns, which means the AI will generate high-quality code on the first attempt for most features.
The business model is also straightforward. Charge employers to post jobs, offer premium listing placements, or take a percentage of successful hires. Niche job boards (remote-only, AI jobs, climate tech) are especially profitable because they serve a focused audience that general platforms like LinkedIn and Indeed cannot prioritize.
Niche job boards consistently outperform general ones for monetization. A board focused on a specific industry, technology, or work style (like remote-only or AI engineering) builds a concentrated audience that employers will pay premium prices to reach. Pick your niche before you write your first prompt. The niche determines your database schema, your filtering options, and your entire feature set.
The tech stack for this build is Next.js with a PostgreSQL database (via Supabase), Tailwind CSS for styling, and Resend for email notifications. You can substitute your preferred tools, but this stack gives you authentication, a database, and real-time capabilities out of the box.
Step 1, Set Up the Project and Database Schema
Start by telling your AI coding tool to scaffold the project. Here is the kind of prompt that produces clean results on the first pass.
"Create a Next.js app with Supabase for the database. Set up three main tables: jobs (id, title, company, location, salary_min, salary_max, type, description, requirements, apply_url, employer_id, status, featured, created_at, expires_at), employers (id, name, email, company_name, company_logo, plan, created_at), and applications (id, job_id, applicant_name, applicant_email, resume_url, cover_letter, status, created_at). Add proper indexes on jobs for location, type, and status. Set up row-level security so employers can only edit their own jobs."
Notice how specific that prompt is. You are not saying "make a job board database." You are specifying every column, every relationship, and even the security model. This level of detail eliminates two or three rounds of back-and-forth and produces a schema you can actually use in production.
After the schema is generated, review it carefully. Check that foreign keys link jobs to employers and applications to jobs. Verify that the row-level security policies actually restrict access correctly. This takes five minutes and prevents hours of debugging later.
Step 2, Build the Job Listing Pages
The public-facing job board needs three views: a listing page with search and filters, individual job detail pages, and a simple homepage that highlights featured and recent listings.
"Build a job listings page at /jobs with the following features: a search bar that searches job titles and descriptions, filter dropdowns for location (remote, on-site, hybrid), job type (full-time, part-time, contract, freelance), and salary range. Show results as cards with the job title, company name, location, salary range, and posting date. Add pagination showing 20 jobs per page. Featured jobs should appear at the top with a subtle highlight."
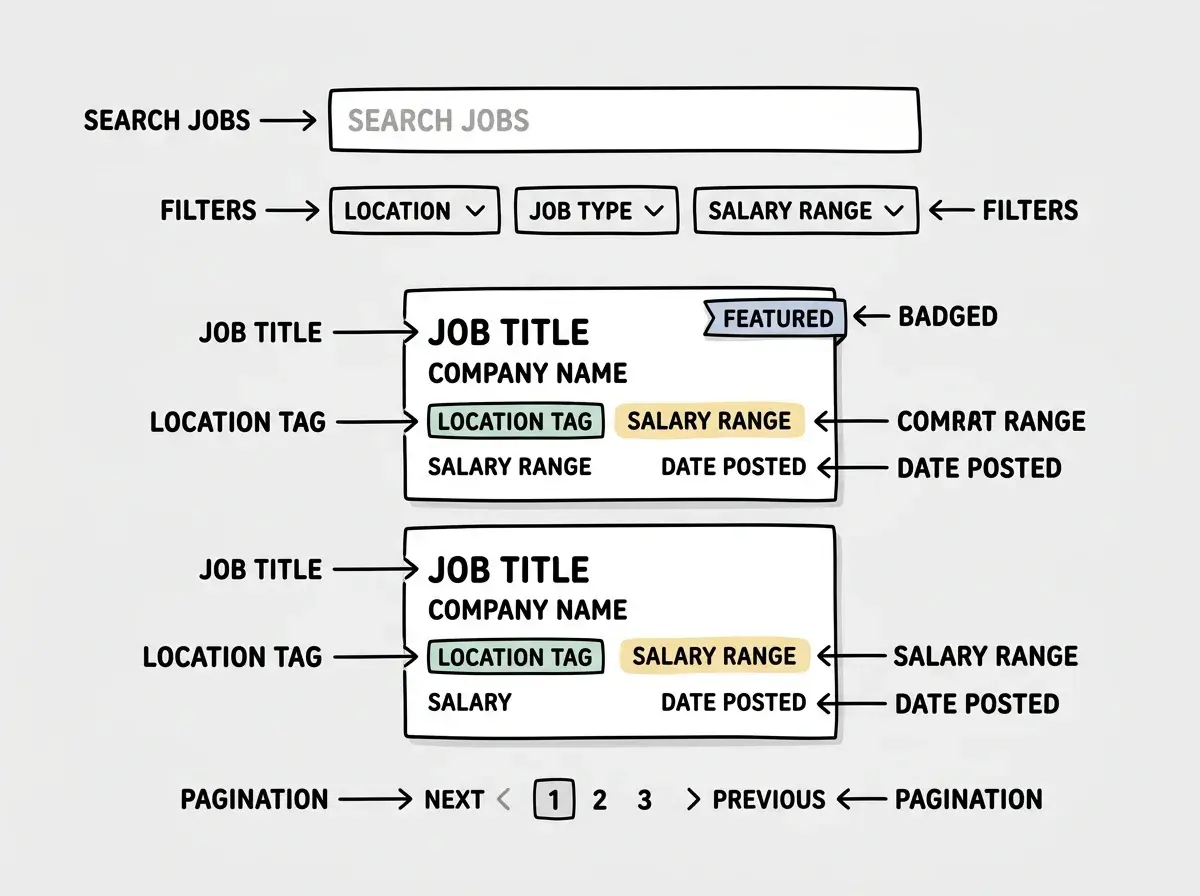
The search implementation matters here. For a v1, full-text search on the title and description columns works fine. Tell the AI to use Supabase's built-in text search rather than pulling all jobs to the client and filtering with JavaScript. Server-side search keeps the page fast even with thousands of listings.
For the individual job page, ask the AI to create a clean layout with the full job description, requirements list, company information, and a prominent "Apply" button. This page should also show related jobs from the same company or in the same category.
Step 3, Build the Employer Dashboard
Employers need a private area where they can post jobs, edit listings, and track applications. This is where the product gets sticky and where you start building real value.
"Create an employer dashboard at /dashboard with these pages: an overview showing total active jobs, total applications received, and applications this week; a job management page where employers can create, edit, pause, and delete their listings; and an applicants page showing all applications grouped by job, with the ability to mark applications as reviewed, shortlisted, or rejected. Add Supabase Auth with email magic links for employer login."
The dashboard should feel responsive and professional. Employers are your paying customers, so this is the part of your product that needs the most polish. Ask the AI to add loading states, confirmation dialogs for destructive actions (like deleting a job), and clear success messages when jobs are posted or applications are updated.
Learn the fundamentals that make tutorials like this one click.
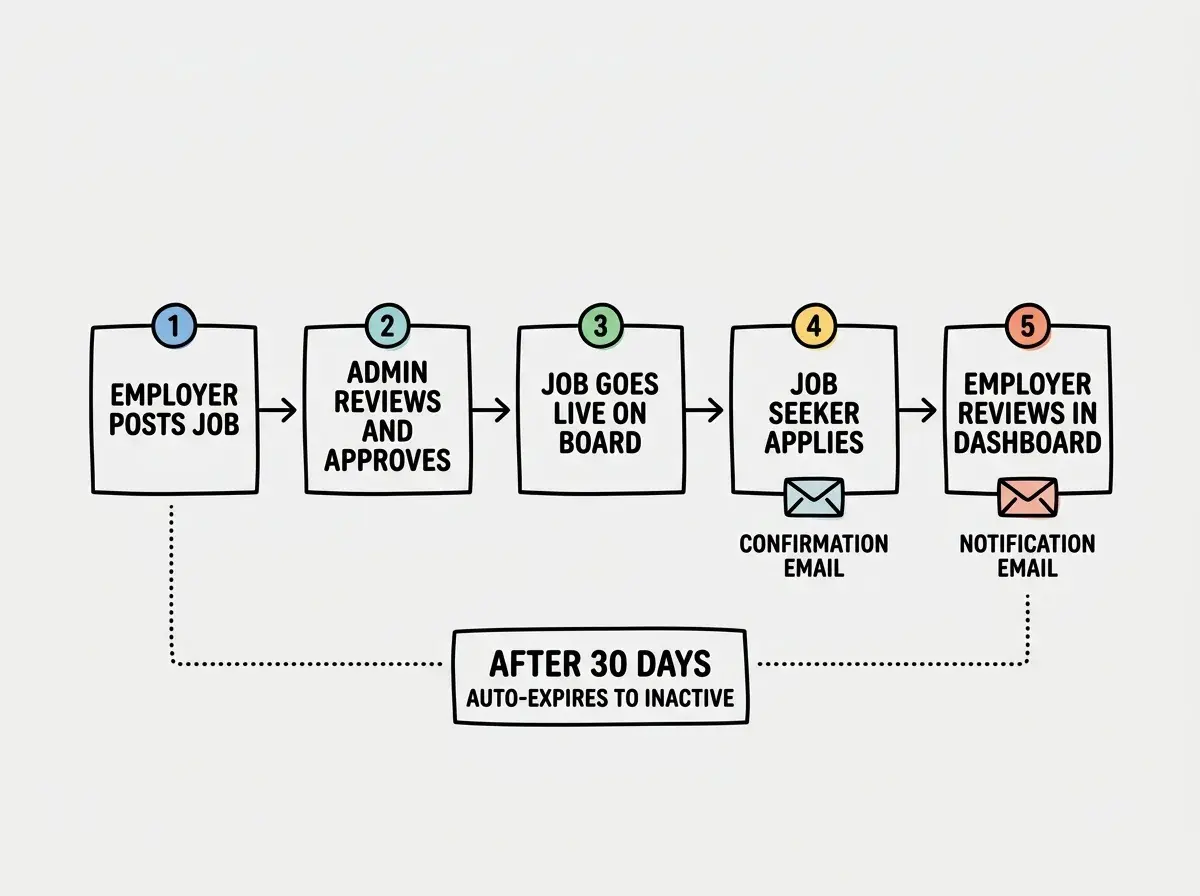
Start with the basicsOne detail most tutorials skip: job expiration. Add an expires_at field and build a mechanism to automatically move expired jobs to an "inactive" status. A simple cron job or a Supabase edge function that runs daily handles this cleanly. Without expiration, your board fills up with stale listings that erode trust with job seekers.
Step 4, Build the Application Flow
The application experience needs to be simple for job seekers and organized for employers. This is where many job boards either succeed or fail.
"Build an application form that appears when a user clicks Apply on a job listing. The form should collect name, email, a resume upload (PDF only, max 5MB), and an optional cover letter text field. Store the application in the applications table and send two emails via Resend: one to the applicant confirming their application was received, and one to the employer notifying them of a new applicant. After submission, show a confirmation page with the job title and a message that the employer will be in touch."
The email notifications are critical. Job seekers expect a confirmation that their application went through. Employers need to know when new applications arrive so they can respond quickly. Resend handles both of these with a simple API call, and you can add HTML email templates later to make the notifications look professional.
Skipping email confirmation for applicants. When someone submits a job application and sees no confirmation email, they assume the submission failed or the site is not legitimate. This single missing feature will tank your application conversion rate. Always send a confirmation email, even if it is just a plain-text message saying "We received your application for [Job Title] at [Company]. The employer will review it shortly." It takes ten minutes to implement with Resend and it dramatically increases trust.
For resume uploads, use Supabase Storage. The AI will generate the upload logic, but verify that it includes file type validation (PDF only) and size limits. You do not want someone uploading a 500MB file and blowing up your storage costs.
Step 5, Add Polish and Launch Features
With the core features working, focus on the details that separate a prototype from a product people trust.
SEO and metadata. Each job listing should have its own meta title and description generated from the job data. "Software Engineer at Acme Corp, Remote, $120k-$150k" is a much better page title than "Job Listing #4582." Ask the AI to generate structured data (JSON-LD) for each listing using the JobPosting schema so Google can display your listings as rich results.
Admin controls. Build a simple admin page where you can review and approve jobs before they go live, flag suspicious listings, and manage employer accounts. This prevents spam and maintains quality, which is everything for a marketplace.
Analytics. Track job views, application starts, and completed applications. These numbers tell you whether your board is working and give employers data they will pay for. Even a basic dashboard showing "Your job was viewed 340 times and received 12 applications" adds enormous perceived value.
Monetization and Growth
Once your job board has listings and traffic, monetization is straightforward. The most common model charges employers per listing ($50-$300 depending on your niche) with premium tiers for featured placement, social media promotion, or extended listing duration.
Start by posting jobs yourself. Scrape or manually add 50-100 relevant listings from other sources to seed your board. No one posts on an empty job board, and no one applies on one either. The initial seed content creates the appearance of an active marketplace, which attracts both sides.
Grow by becoming the go-to resource for your niche. Write content about salary trends, interview tips, and career transitions in your industry. Every piece of content brings organic traffic that discovers your job listings. The job board and the content feed each other.
Start your first AI-powered build session today.
Pick your toolsWhat This Means For You
You now have a complete blueprint for building a job board from database schema to email notifications. The entire project is achievable in a weekend using AI coding tools, and every feature described here follows patterns that AI handles reliably.
- If you are a founder testing a marketplace idea: A niche job board is one of the lowest-risk marketplace products you can build. The supply side (employers) has clear willingness to pay, and the demand side (job seekers) comes for free once you have quality listings. Build the board this weekend, seed it with 50 listings, and start testing whether your niche has real demand before investing further.
- If you are an indie hacker looking for a revenue project: Job boards generate recurring revenue with minimal ongoing maintenance once they reach critical mass. The hard part is not building the product. It is choosing the right niche and doing the initial work to seed both sides of the marketplace. Focus your energy on niche selection and early content, and let the AI handle the code.
- If you are a developer expanding into product building: This project exercises every skill that matters for product work: database design, authentication, file uploads, email integration, search, and admin tooling. Building it end-to-end with AI tools teaches you how to ship complete products, not just features. That is the skill gap between engineering and entrepreneurship, and this project closes it.