When you build a customer portal, you are building the part of your product that customers interact with after they pay you. Login, billing history, subscription management, invoice downloads. 92% of developers now use AI coding tools daily, and founders are discovering that portals like these can be assembled in days. Plinq reached $456K ARR built entirely by a non-coder.
But a customer portal is not a landing page or a simple CRUD app. It is the intersection of three systems that need to work together perfectly: authentication (who is this person), authorization (what are they allowed to see), and billing (what have they paid for). Get any one of these wrong and you have either a security hole, a broken experience, or both.
Think of a customer portal like the lobby of a members-only building. The front door is authentication, the key card scanner that verifies you belong here. The elevator buttons are authorization, you can only press floors you have access to. And the mailboxes are billing, neatly organized records of what you owe and what you have paid. All three systems are separate, but they share the same space, and a visitor interacts with all three within thirty seconds of walking through the door.
Setting Up Authentication That Actually Works
Authentication is your foundation. Everything else depends on knowing who the logged-in user is. For vibe-coded projects, you have two practical options: Clerk and Supabase Auth. Both give you pre-built login components, session management, and user profiles without writing auth logic from scratch.
Start with this prompt in your AI tool: "Set up Clerk authentication with email/password and Google OAuth. Create a sign-in page, a sign-up page, and a protected dashboard route that redirects unauthenticated users to sign-in. Use Next.js App Router middleware for route protection."
The AI will generate the middleware, auth pages, and route protection. But here is what you need to verify manually before moving forward.
Check the middleware matcher. The middleware file controls which routes require authentication. Make sure it protects your dashboard and billing routes but leaves your marketing pages, privacy policy, and terms of service publicly accessible. A common AI mistake is protecting every route, which locks visitors out of your homepage.
Check the redirect behavior. After login, users should land on their dashboard, not the homepage. After logout, they should land on the homepage, not a blank page. Test both flows in your browser.
Check the session persistence. Close the browser tab and reopen it. You should still be logged in. If you are not, the session configuration needs adjustment. Tell the AI: "Session is not persisting across browser tabs. Fix the session configuration to use persistent cookies."
Authentication is the one part of your customer portal where "good enough" is not good enough. A login flow that works 95% of the time means 5% of your paying customers cannot access what they paid for. Test every edge case: wrong password, expired session, browser back button after logout, opening the app in two tabs simultaneously. These are the scenarios where AI-generated auth code most often breaks, and they are exactly the scenarios your real users will hit.
Once authentication is solid, you have the user identity that powers everything else. Every billing query, every subscription check, every permission gate starts with "who is this user."
Connecting Stripe for Subscriptions and Payments
Stripe is the billing backbone. You will use three specific Stripe features: Checkout Sessions for initial payment, the Customer Portal for self-service subscription management, and Webhooks for keeping your database in sync with Stripe's records.
Prompt your AI tool: "Integrate Stripe subscriptions with three pricing tiers: Starter at $29/month, Pro at $79/month, and Enterprise at $199/month. Create a pricing page with subscription buttons. Use Stripe Checkout Sessions for payment. After successful payment, redirect to the dashboard and store the subscription status in the database."
The AI will generate checkout session routes, a pricing page, and redirect handlers. Here is the critical architecture decision.
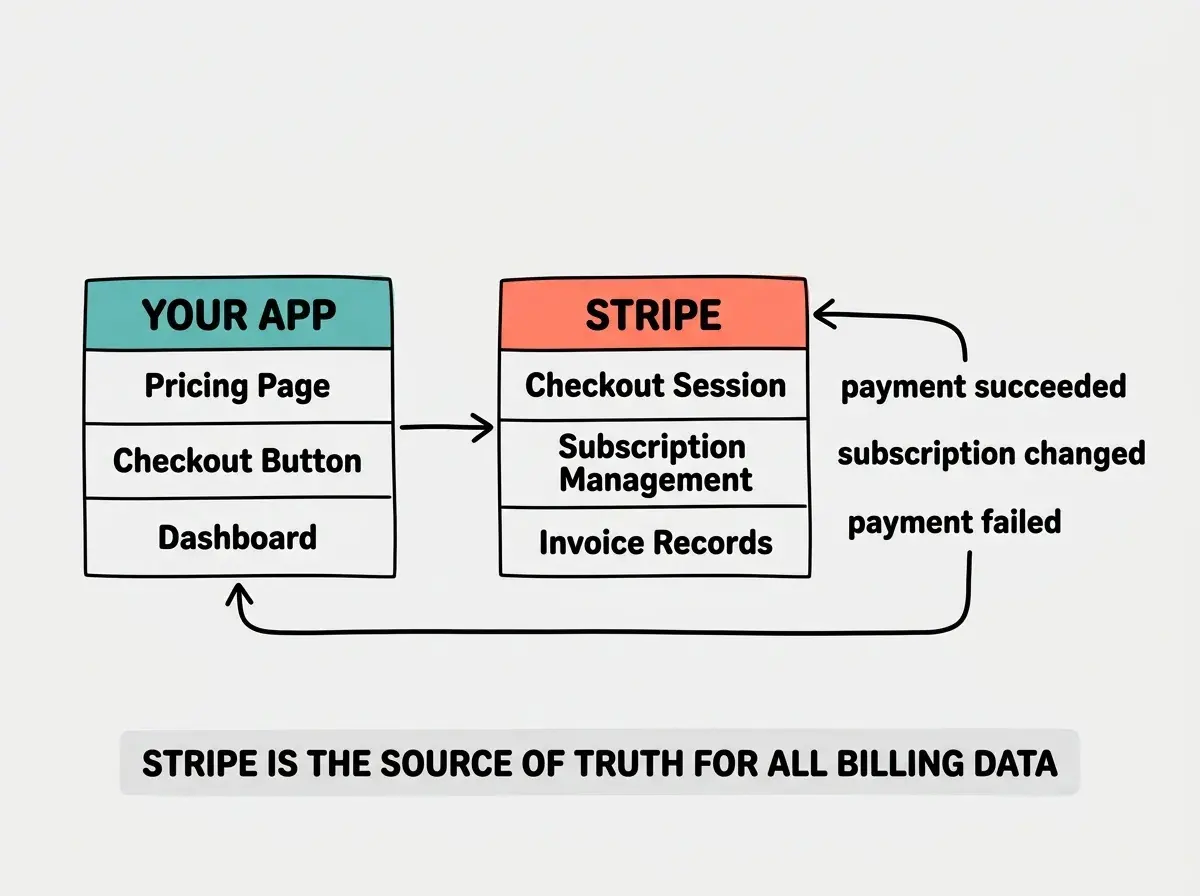
Your database is not the source of truth for billing. Stripe is. The AI might generate code that checks your database for subscription status. That is fine as a cache, but Stripe's records are the canonical source. If there is ever a conflict between what your database says and what Stripe says, Stripe wins.
This means you need webhooks. Webhooks are Stripe's way of telling your app "something just happened." A customer upgraded. A payment failed. A subscription was cancelled. Your app needs API routes that receive these webhook events and update your database accordingly.
Prompt: "Add Stripe webhook handling for these events: checkout.session.completed, customer.subscription.updated, customer.subscription.deleted, and invoice.payment_failed. Update the user's subscription status in the database when these events fire. Verify the webhook signature to prevent spoofing."
Testing webhooks locally. Stripe provides a CLI tool that forwards webhook events to your local machine. Run stripe listen --forward-to localhost:3000/api/webhooks/stripe while developing. Without this, you cannot test the billing flow end-to-end on your machine.
Building the Dashboard and Billing Views
Now you have a logged-in user with a Stripe subscription. The dashboard ties it all together.
Your customer portal dashboard needs four views: an overview page showing the current plan and next billing date, a billing history page showing past invoices with download links, a plan management page where customers can upgrade, downgrade, or cancel, and an account settings page for profile and password changes.
Prompt: "Create a customer dashboard with a sidebar navigation. Include these pages: Overview (showing current plan name, status, next billing date, and a usage summary), Billing (showing a table of past invoices with date, amount, status, and a download PDF link for each), Plan (showing the current plan highlighted among all available plans with upgrade/downgrade buttons), and Settings (profile information and password change form). Fetch subscription data from Stripe using the customer's stored Stripe customer ID."
For billing history, use Stripe's Invoice API directly rather than storing invoice records in your own database. This keeps your data fresh and avoids synchronization bugs.
For plan changes, use Stripe's Customer Portal instead of building upgrade/downgrade logic yourself. It handles proration, confirmation, and payment method updates automatically.
Prompt: "Add a Manage Subscription button on the billing page that creates a Stripe Customer Portal session and redirects the user to it. When the user finishes in the Stripe portal, redirect them back to /dashboard/billing."
Start with the fundamentals before tackling complex projects.
Learn the basicsHandling the Edge Cases That Break Customer Portals
The happy path covers maybe 60% of real-world usage. The other 40% is edge cases, and this is where most AI-generated portals fall apart.
Failed payments. When a credit card declines, Stripe retries automatically over a few days. During this retry period, you need to decide: does the user keep access or get locked out immediately? Most SaaS products give a grace period. Prompt: "When a subscription enters a past_due state, show a warning banner on the dashboard with a link to update payment information. Do not revoke access for 7 days after the first failed payment."
Cancelled subscriptions. When a user cancels, the subscription stays active until the end of the billing period. Your portal needs to show "Your plan is active until April 30, 2026. You will not be charged again." This is different from an expired subscription, where the period has ended and access should be revoked.
Multiple tabs and stale state. A user upgrades their plan in one tab. The other tab still shows the old plan. Use webhook-driven database updates combined with client-side revalidation to keep the displayed data current.
Building the entire billing UI from scratch instead of using Stripe's Customer Portal. Stripe gives you a fully hosted portal page where customers can update payment methods, switch plans, cancel subscriptions, and download invoices. It handles proration math, tax calculations, and receipt generation automatically. Every line of billing UI you build yourself is a line you have to maintain, debug, and keep compliant with payment regulations. Use Stripe's portal for subscription management and only build custom UI for your dashboard overview and status displays.
Security Checklist Before Going Live
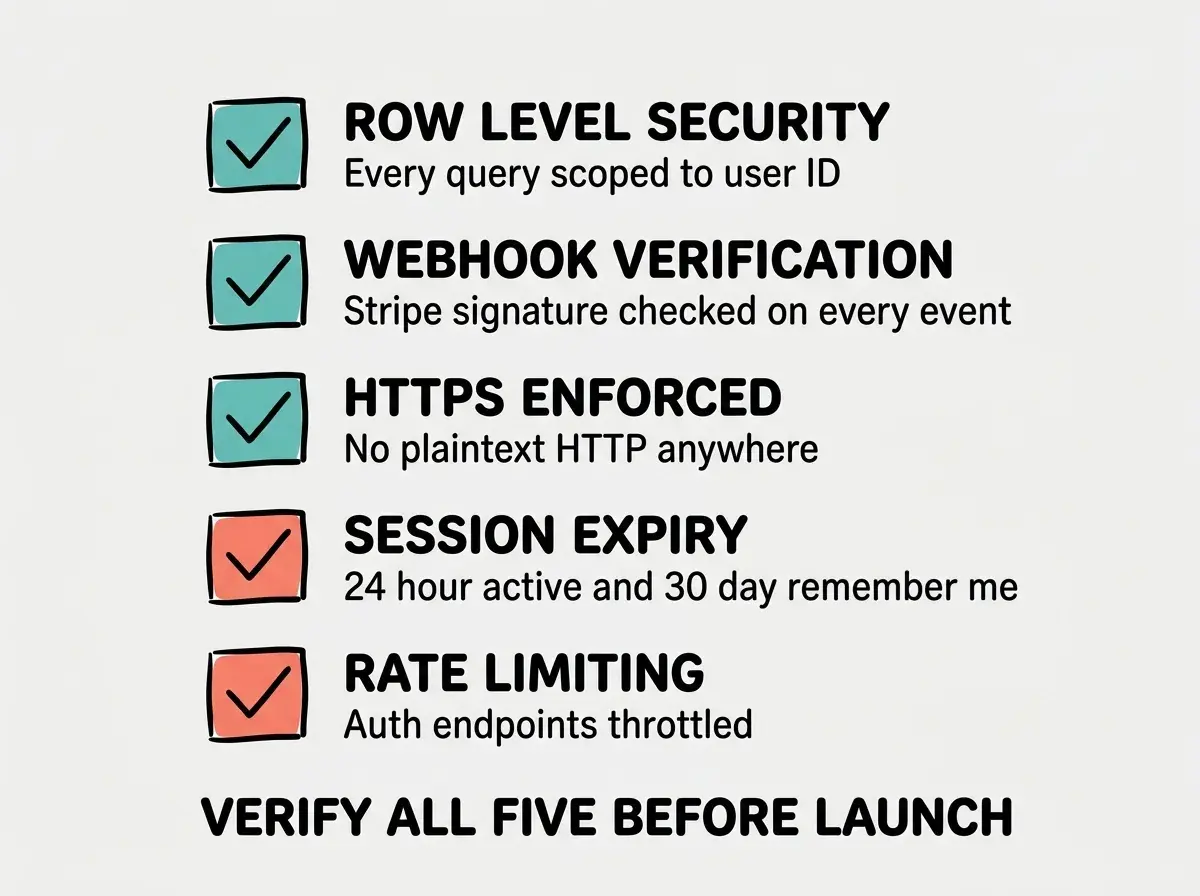
A customer portal handles sensitive data. Before you launch, verify these five things.
Row-level security. Every database query must be scoped to the authenticated user's ID. Test this by logging in as User A and manually changing any user ID in the URL to User B's ID. You should get an error, not User B's data.
Webhook signature verification. Your Stripe webhook endpoint must verify the signature header on every request. Without this, anyone can send fake events to your API and grant themselves a subscription.
HTTPS everywhere. Every page must be served over HTTPS. Vercel and Cloudflare handle this automatically, but verify that no API calls use http:// URLs.
Session expiry. Set a reasonable timeout (24 hours for active sessions, 30 days for "remember me") and force re-authentication before sensitive actions like changing email or cancelling a subscription.
Rate limiting on auth endpoints. Login and signup endpoints need rate limiting to prevent brute force attacks. Most auth providers handle this automatically, but if you rolled your own auth, add it yourself.
Dig deeper
A few hand-picked sources if you want to go further.
What This Means For You
You now have the blueprint for a customer portal with authentication, subscription billing, and a self-service dashboard. The three systems are separate but connected, and you know where the boundaries are.
- If you are a founder building a SaaS product: This customer portal is the infrastructure that turns a side project into a real business. Users who can manage their own subscriptions, download their own invoices, and update their own payment methods do not email you at 2 AM asking for help. Build this once and it scales with you to thousands of customers without additional support cost.
- If you are an indie hacker shipping fast: You do not need to build all four dashboard views on day one. Start with authentication and Stripe Checkout. That gives you login and payment. Add the dashboard overview next. Add billing history and plan management once you have paying customers who are asking for it. Ship the minimum viable portal now and expand it based on actual customer requests.
Get the foundational knowledge that makes complex projects manageable.
Explore tutorials