Every app eventually needs an admin panel. The moment you have real users, you need a way to build an admin panel that lets you manage accounts, moderate content, toggle feature flags, and investigate support issues without running raw database queries. IBM research shows AI tools reduce dev time for internal tools by roughly 60%, and with 92% of developers now using AI tools daily, building your own admin dashboard in an afternoon is not aspirational. It is the new baseline.
Think of an admin panel like the back office of a restaurant. Customers see the dining room, but the kitchen, inventory system, and scheduling board are what keep the operation running. Without a back office, the chef is shouting orders from memory and the manager is tracking reservations on a napkin. Your app without an admin panel is that same situation.
Why You Need a Dedicated Admin Panel
If you are currently managing your app by connecting to Supabase or running SQL queries in a terminal, you are creating two problems. First, one wrong query can destroy production data. A DELETE FROM users without a WHERE clause is a real thing that happens at 2 AM. Second, you cannot give support staff or co-founders access without teaching them SQL. An admin panel turns dangerous raw access into safe, guided workflows.
AI tools are particularly good at generating admin panels because admin UIs follow predictable patterns. Tables with pagination, filter bars, detail views, edit forms, confirmation modals. The AI has seen thousands of these patterns and can assemble them quickly. Your job is to specify what data you need to see and what actions you need to take.
An admin panel is not a nice-to-have feature you add once your app is mature. It is a safety requirement from the moment you have real user data. Every week you manage your app through raw database access is a week where one bad query can take down your entire product. Build the admin panel before you need it, not after something breaks.
Planning Your Admin Panel Structure
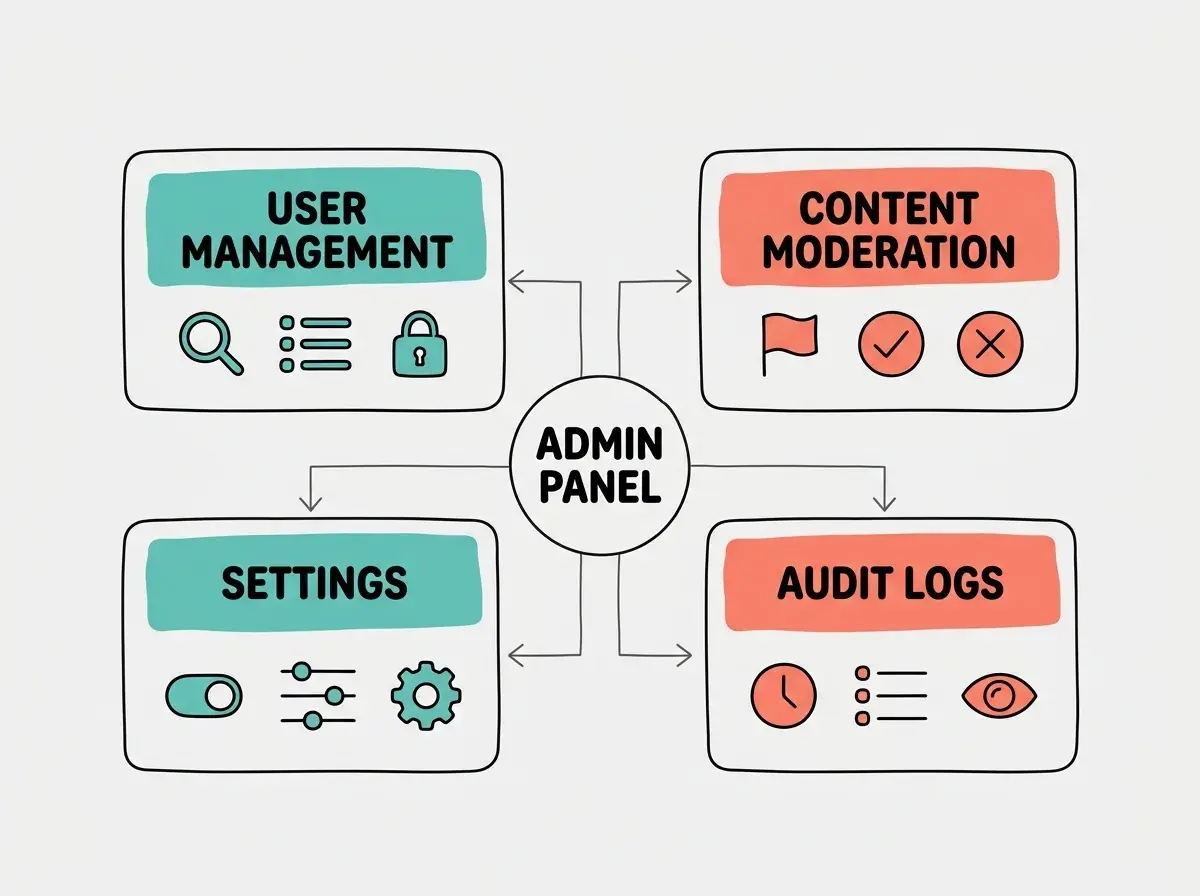
Before you open your AI coding tool, spend ten minutes listing what you actually need. Most admin panels for early-stage apps need four sections, and you can add more later.
User management is where you view all user accounts, search by email or name, see account status, and perform actions like suspending or deleting accounts. This is the section you will use most during the first year of your product.
Content moderation applies if your app has any user-generated content. Posts, comments, uploads, listings. You need a queue of flagged items, the ability to approve or remove content, and a way to see the context (who posted it, when, and what policy it might violate).
Settings and configuration covers feature flags, pricing tiers, notification templates, and any values you currently hardcode or store in environment variables. Moving these into an admin UI means you can change them without redeploying.
Audit logs record every action taken through the admin panel. Who did what, when, and to which record. This is not optional. Without audit logs, you cannot debug problems, you cannot prove compliance, and you have no accountability when multiple people have admin access.
Step 1, Scaffold the Admin Layout
Start with the shell. You need a sidebar navigation, a top bar with the current admin user's info, and a main content area. Here is the prompt to give your AI tool:
"Create an admin panel layout with a sidebar navigation on the left (240px wide, dark background) and a main content area. The sidebar should have navigation links for Dashboard, Users, Content, Settings, and Audit Log. Include a top bar showing the logged-in admin's name and a logout button. Use a clean, minimal design with good typography. The layout should be responsive, collapsing the sidebar into a hamburger menu on mobile."
The AI will generate a layout component. Before you move on, verify that the sidebar navigation works, meaning clicking each link changes the main content area. If you are using Next.js, the AI should create a nested layout in an /admin route group. If it generates everything as one giant component, ask it to split the layout from the page content.
Step 2, Build the User Management Table
User management is the most important section, so build it first. Give the AI this prompt:
"Build a user management page for the admin panel. Show a table with columns for name, email, role, status (active/suspended/deleted), and created date. Add a search bar that filters by name or email. Add pagination with 25 rows per page. Each row should have action buttons for View Details, Suspend Account, and Delete Account. Suspend and Delete should show confirmation modals before executing. The table should fetch data from a /api/admin/users endpoint."
This prompt works well because it specifies exact columns, filtering behavior, pagination size, and the API contract. The more specific you are, the less cleanup afterward.
One thing the AI will almost certainly skip: loading and error states. After it generates the table, follow up with: "Add a loading skeleton while the table data fetches, and an error state with a retry button if the API call fails." These small additions make the difference between a professional tool and a broken-feeling one.
Step 3, Add Role-Based Access Controls
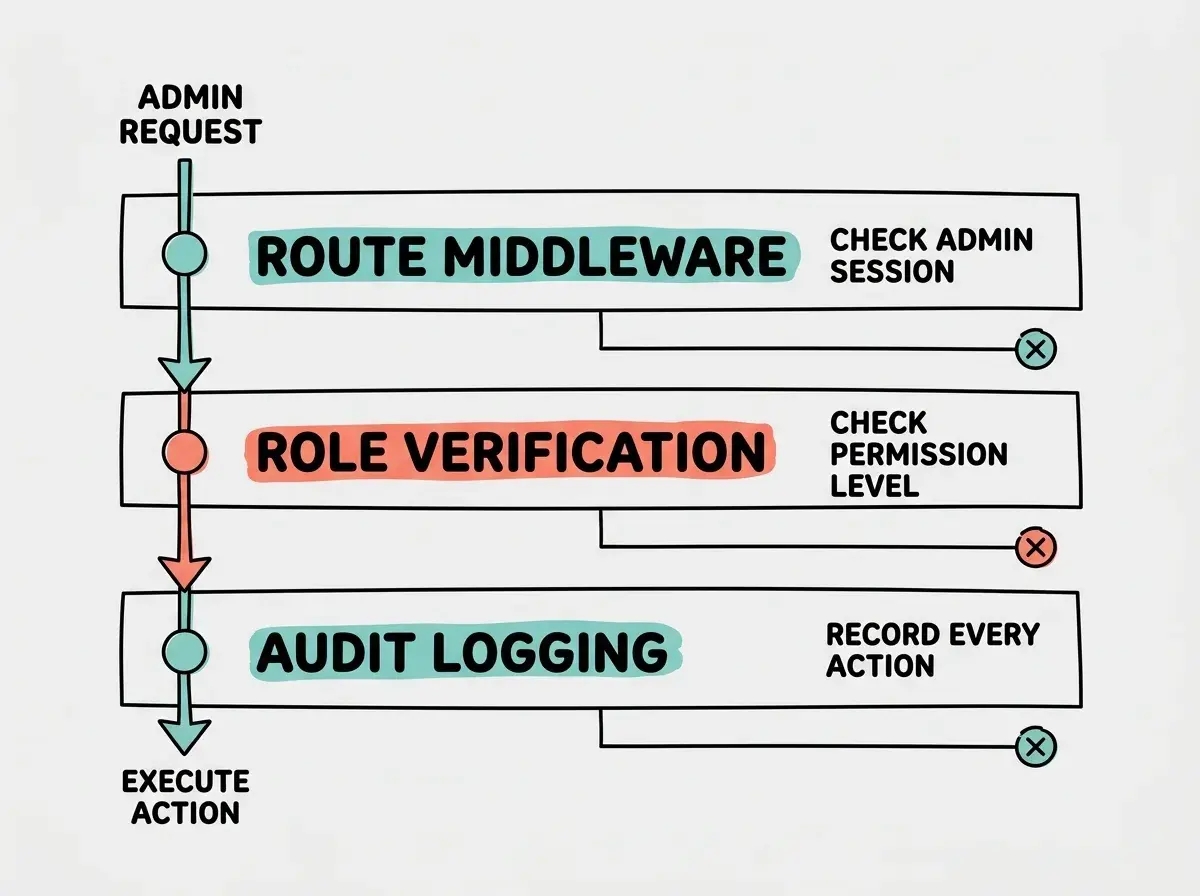
This is the step most people skip, and it is the step that matters most. Your admin panel needs to know who is using it and restrict actions accordingly. Not every admin should be able to delete user accounts.
Define at least three roles: super admin (can do everything, including managing other admins), admin (can manage users and content, cannot change settings or manage other admins), and viewer (read-only access to all sections, cannot take any actions).
// Admin role definitions
const ADMIN_ROLES = {
  super_admin: {
    canManageAdmins: true,
    canDeleteUsers: true,
    canModerateContent: true,
    canEditSettings: true,
    canViewAuditLog: true,
  },
  admin: {
    canManageAdmins: false,
    canDeleteUsers: true,
    canModerateContent: true,
    canEditSettings: false,
    canViewAuditLog: true,
  },
  viewer: {
    canManageAdmins: false,
    canDeleteUsers: false,
    canModerateContent: false,
    canEditSettings: false,
    canViewAuditLog: true,
  },
};
Prompt the AI to enforce these roles both in the UI (hide or disable buttons the current user cannot use) and in the API routes (reject requests from users without the required permission). UI-only enforcement is not security. Anyone with browser dev tools can re-enable a hidden button and send the request directly.
AI tools consistently implement role checks only in the frontend. They will hide a "Delete User" button for viewers, but the API endpoint /api/admin/users/delete will accept requests from anyone with a valid session. Always prompt the AI to add role checks in both the UI components and the API route handlers. If the check only exists in one place, it does not exist at all.
Role-based access is one part of a bigger security picture. Learn the foundations.
Browse security articlesStep 4, Implement Audit Logging
Every action taken through the admin panel should be recorded. When a support agent suspends a user account, the audit log should capture who performed the action, what action was taken, which record was affected, and the timestamp.
// Audit log entry structure
interface AuditLogEntry {
  id: string;
  adminId: string;
  adminEmail: string;
  action: 'user.suspend' | 'user.delete' | 'user.update' | 'content.remove' | 'settings.update';
  targetType: 'user' | 'content' | 'settings';
  targetId: string;
  metadata: Record<string, unknown>; // Additional context
  ipAddress: string;
  timestamp: Date;
}
Ask the AI to create a utility function that logs every admin action, then integrate it into every API route handler. The prompt: "Create an auditLog function that inserts a record into an admin_audit_logs table every time an admin action is performed. Add this function to every admin API route."
The audit log table should be append-only. No one, not even a super admin, should be able to edit or delete entries. If your database supports it, remove UPDATE and DELETE permissions on the audit log table entirely.
Step 5, Secure the Admin Routes
Your admin panel must be completely inaccessible to regular users. This requires two layers of protection.
First, add middleware that checks for admin authentication on every /admin route. Admin access should require a separate check against an admin roles table, not your regular user authentication.
// Middleware for admin routes
async function adminAuthMiddleware(req, res, next) {
  const session = await getSession(req);

  if (!session) {
    return res.redirect('/login');
  }

  const adminRecord = await db.query(
    'SELECT role FROM admin_users WHERE user_id = $1',
    [session.userId]
  );

  if (!adminRecord.rows.length) {
    return res.status(403).json({ error: 'Not an admin' });
  }

  req.adminRole = adminRecord.rows[0].role;
  next();
}
Second, make sure the admin path is not linked anywhere in your public-facing UI and add the admin routes to your robots.txt so search engines do not index them.
Common Patterns the AI Gets Wrong
AI tools make predictable mistakes when building admin panels. Knowing these saves hours of debugging.
Pagination offsets. The AI will often implement offset-based pagination that breaks when records change between page loads. Prompt it to use cursor-based pagination instead.
Bulk actions without confirmation. If you ask for a "select all" checkbox, the AI will wire bulk actions directly to the API without confirmation. Always follow up: "Add a confirmation modal for bulk actions showing how many records will be affected."
No rate limiting. Admin API routes are high-value targets. Ask the AI to add rate limiting to all admin endpoints.
Start with the foundations and work your way up to production-grade tools.
Explore tutorialsWhat This Means For You
You now have a complete blueprint for building a secure admin panel in an afternoon. The key is working through it in order: layout first, then the core user management table, then access controls, then audit logging, then route security.
- If you are a founder with a live product: Stop running SQL queries in production. Build the user management section this week and immediately reduce your risk of an accidental data loss. Once you have the scaffold, adding content moderation and settings pages is a few hours of additional prompting. The admin panel pays for itself the first time it prevents a bad database query.
- If you are a senior developer building internal tools: Use the role-based access pattern as your starting point and extend it. The permission object approach scales cleanly to teams of 20+ admins with different responsibility levels. Add the audit log from day one, because retrofitting it later means backfilling months of missing records. Ship the admin panel alongside the product, not as a separate project three months later.