API rate limiting at scale is the difference between an API that gracefully handles a traffic spike and one that falls over while your on-call engineer scrambles at 2 AM. If you have ever watched a database connection pool drain to zero because one integration partner decided to hammer your endpoints, you already know the pain. Rate limiting is not about saying "no" to users. It is about keeping the highway open for everyone.
Think of it like highway on-ramps with metering lights. Without metering, every car tries to merge at once during rush hour. The highway grinds to a halt. Nobody moves. With metering lights, cars enter at a controlled pace. Individual drivers wait a few seconds, but traffic flows smoothly and everyone arrives faster. API rate limiting at scale works the same way. You control how many requests enter your system per minute so the entire service keeps moving instead of collapsing under load.
92% of developers now use AI coding tools daily, generating APIs faster than ever. But shipping an endpoint is the easy part. Protecting it under real traffic is where engineering judgment matters.
Why Single-Server Rate Limiting Breaks Down
A simple in-memory rate limiter works fine when your API runs on one server. You track request counts in a dictionary, reset them every window, and reject anything over the threshold. Clean, fast, and completely useless once you add a second server.
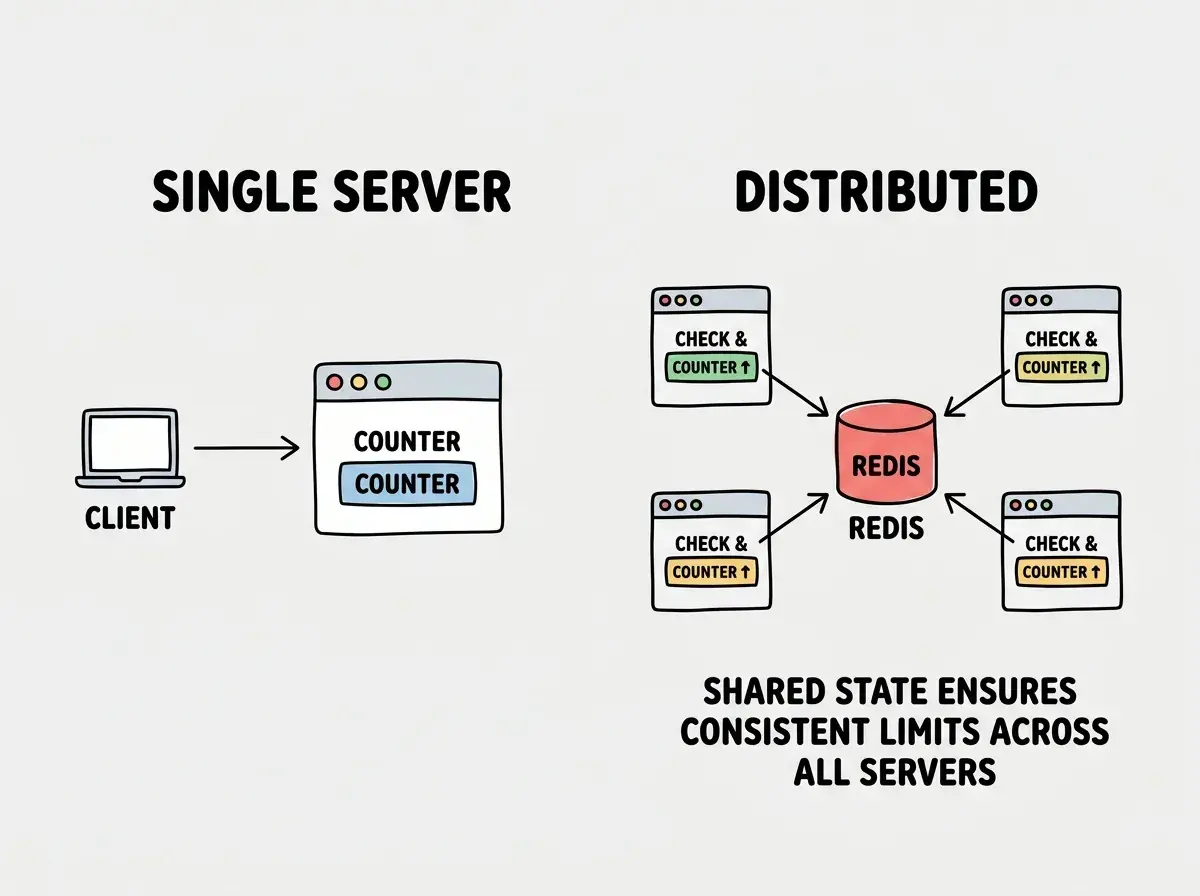
The moment you scale horizontally (two app servers behind a load balancer), each server tracks its own counts independently. A user sending 100 requests hits Server A fifty times and Server B fifty times. Each server thinks the user sent only fifty. Your limit of sixty requests per minute is now effectively doubled. Multiply this across four or twenty servers and your rate limits become meaningless.
This is where distributed rate limiting enters the picture. You need a shared, fast data store that every server can read from and write to on every single request. That store is almost always Redis.
Distributed Rate Limiting with Redis
Redis is the backbone of most production rate limiting systems. It is single-threaded (so operations are naturally atomic), it operates in memory (sub-millisecond latency), and it supports the exact primitives you need: INCR, EXPIRE, and Lua scripting for atomic multi-step operations.
The two most common algorithms are the fixed window counter and the sliding window log. Here is a sliding window approach using Redis that avoids the burst problem at window boundaries.
import Redis from 'ioredis';

const redis = new Redis(process.env.REDIS_URL);

async function checkRateLimit(
  identifier: string,
  maxRequests: number,
  windowSeconds: number
): Promise<{ allowed: boolean; remaining: number; resetAt: number }> {
  const now = Date.now();
  const windowMs = windowSeconds * 1000;
  const windowStart = now - windowMs;
  const key = `ratelimit:${identifier}`;

  // Atomic operation using Redis pipeline
  const pipeline = redis.pipeline();
  pipeline.zremrangebyscore(key, 0, windowStart); // Remove old entries
  pipeline.zadd(key, now, `${now}-${Math.random()}`); // Add current request
  pipeline.zcard(key); // Count requests in window
  pipeline.expire(key, windowSeconds + 1); // Auto-cleanup

  const results = await pipeline.exec();
  const requestCount = results[2][1] as number;

  return {
    allowed: requestCount <= maxRequests,
    remaining: Math.max(0, maxRequests - requestCount),
    resetAt: now + windowMs,
  };
}
This uses a Redis sorted set where each request is scored by its timestamp. On every request, you remove entries older than the window, add the new request, and count. The pipeline executes atomically, so race conditions between servers are eliminated.
Per-User vs Per-IP vs Per-API-Key Limits
Not all traffic is equal, and your rate limiting strategy should reflect that. The three most common identifiers each solve different problems.
Per-IP limiting is your first line of defense. It catches brute-force attacks, credential stuffing, and basic abuse. But it is imprecise. Users behind corporate NATs or VPNs share IP addresses, so a limit of 100 requests per minute per IP might throttle an entire office. Use per-IP limits as a generous outer boundary, not as your primary control.
Per-API-key limiting is the standard for authenticated APIs. Each integration partner or application gets a key, and that key has explicit limits tied to their plan or agreement. This is clean, predictable, and easy to communicate. "Your plan includes 1,000 requests per minute" is a sentence that maps directly to a Redis key.
Per-user limiting adds granularity within API keys. A single API key might serve thousands of end users, and you want to prevent one noisy user from consuming the entire allocation. Per-user limits layer on top of per-key limits, creating a two-tier system that protects both your infrastructure and your customers' fair usage.
The best systems combine all three. Per-IP as the outer shield, per-API-key as the contractual limit, per-user as the fairness layer. Check them in that order and reject at the first violation.
Layer your rate limits from broad to specific. Per-IP catches abuse before it reaches your auth layer. Per-API-key enforces the contractual agreement. Per-user ensures fairness within each key's allocation. A request must pass all three checks before it reaches your application logic.
Adaptive Rate Limiting
Static limits are a starting point, but production traffic is not static. You get traffic spikes during product launches, seasonal surges, and the occasional viral moment. Adaptive rate limiting adjusts thresholds based on current system health rather than relying on fixed numbers.
The core idea is straightforward. Monitor your system's key health metrics (CPU usage, response latency, error rate, database connection pool utilization) and tighten limits when the system is under stress.
interface SystemHealth {
  cpuUsage: number;      // 0-100
  p99Latency: number;    // milliseconds
  errorRate: number;     // 0-1
  dbPoolUsage: number;   // 0-1
}

function calculateAdaptiveLimit(
  baseLimit: number,
  health: SystemHealth
): number {
  let multiplier = 1.0;

  // Reduce limits as system stress increases
  if (health.cpuUsage > 80) multiplier *= 0.7;
  if (health.p99Latency > 2000) multiplier *= 0.6;
  if (health.errorRate > 0.05) multiplier *= 0.5;
  if (health.dbPoolUsage > 0.85) multiplier *= 0.6;

  // Never drop below 20% of base limit
  const floor = baseLimit * 0.2;
  return Math.max(floor, Math.round(baseLimit * multiplier));
}
When your database connection pool hits 85% utilization, the system automatically tightens API limits to reduce load. When the system recovers, limits relax back to normal. This is the metering light adjusting its timing based on actual highway congestion rather than running on a fixed schedule.
The floor is important. Even under extreme load, you want to serve some traffic. Completely shutting off the API creates a thundering herd problem when it comes back, because every queued client retries simultaneously.
Graceful Degradation and Client Communication
A rate limiter that returns a bare 429 Too Many Requests with no additional information is doing half the job. Good rate limiting communicates clearly so clients can adapt their behavior without guessing.
Always include these headers in every response, not just rejected ones.
HTTP/1.1 200 OK
X-RateLimit-Limit: 1000
X-RateLimit-Remaining: 847
X-RateLimit-Reset: 1712448000
Retry-After: 30
X-RateLimit-Limit tells the client their total allocation. X-RateLimit-Remaining tells them how much is left. X-RateLimit-Reset gives the Unix timestamp when the window resets. And Retry-After (on 429 responses) tells them exactly how long to wait before retrying.
Clients that respect these headers self-regulate. They slow down before hitting the wall. Without these headers, clients retry immediately and aggressively, making the overload worse. You are either helping clients cooperate with your limits or forcing them to guess.
For graceful degradation beyond headers, consider serving cached or reduced responses instead of hard rejections. A slightly stale cached dashboard is better than a 429 error. Degrade quality before you degrade availability.
Start with the architecture patterns that handle real traffic from day one.
Explore scaling patternsMonitoring and Alerting on Rate Limit Violations
Rate limiting without monitoring is like installing metering lights on a highway and never checking if traffic is flowing. You need visibility into what your rate limiter is doing so you can tune limits, detect abuse patterns, and respond to incidents.
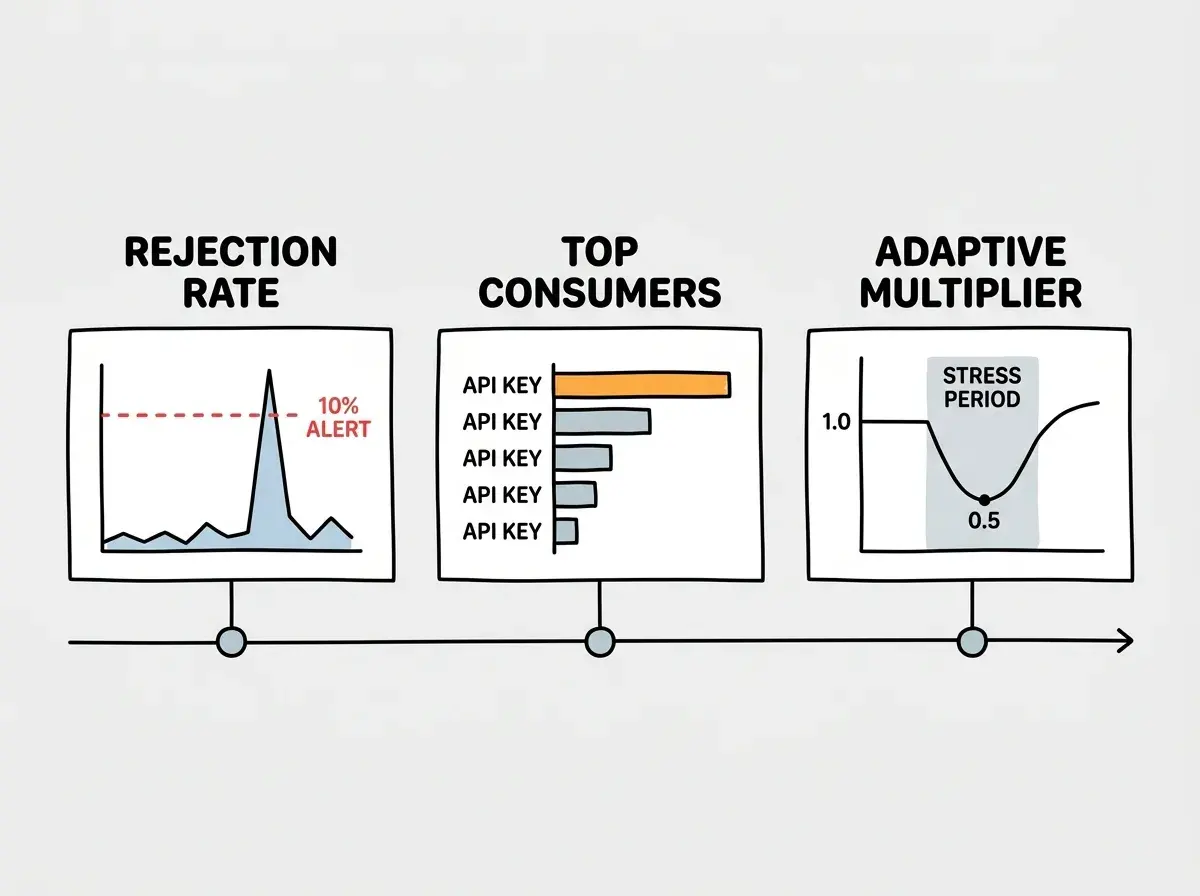
Track these metrics at minimum. Total requests per endpoint per minute. Rejection rate (percentage of requests returning 429). Top consumers by API key and by IP. And latency added by the rate limiting check itself.
Set alerts for key conditions. If rejection rate exceeds 10% globally, something unusual is happening. If a single API key accounts for more than 30% of total traffic, investigate. If the rate limiter's own latency exceeds 5ms, your Redis layer might be struggling.
// Example: Track rate limit metrics
function recordRateLimitDecision(
  identifier: string,
  endpoint: string,
  allowed: boolean,
  remaining: number
) {
  metrics.increment('rate_limit.total', { endpoint });
  metrics.increment(
    allowed ? 'rate_limit.allowed' : 'rate_limit.rejected',
    { endpoint, identifier_type: getIdentifierType(identifier) }
  );

  if (!allowed) {
    metrics.increment('rate_limit.rejected_by_key', {
      key: identifier,
      endpoint,
    });
  }
}
Build a dashboard showing rejection rates over time, overlaid with your adaptive limit multiplier. When the multiplier drops and rejections spike simultaneously, you have a real capacity problem, not just a noisy client.
Setting rate limits once and never revisiting them. Traffic patterns change as your product grows. The limits you chose at launch become either too restrictive (blocking legitimate users during growth) or too generous (providing no protection) within a few months. Review your rate limit metrics monthly and adjust based on actual usage patterns, not guesses from six months ago.
Putting It All Together
Here is the practical sequence for adding API rate limiting at scale to a growing application.
Start with per-IP limits at a generous threshold. This stops the worst abuse with minimal risk of blocking real users. Add Redis-backed distributed counting so your limits work consistently across all servers. Layer in per-API-key limits that match your pricing tiers or usage agreements. Add rate limit headers to every response so clients can self-regulate. Implement adaptive limits that tighten when your system is stressed. Build monitoring dashboards and alerts so you can see what your rate limiter is doing. Then review and adjust monthly based on real traffic data.
Each layer builds on the one before it. You do not need everything on day one. But as your API grows from hundreds of requests per minute to hundreds of thousands, each layer becomes essential.
The highway analogy holds all the way through. Metering lights start simple, add sensors to adapt to real-time conditions, give drivers wait time estimates, and get adjusted by traffic engineers reviewing data. Your rate limiter follows the same progression. Control entry, adapt to conditions, communicate with clients, and refine based on observations.
Get the complete guide to scaling patterns for AI-built applications.
Read the scaling guide