AI tools write code fast. Sometimes very fast. Fast enough that you push 300 lines without reading every one of them. Linting and formatting are the automated safety net that catches what you miss. This tutorial covers ESLint, Prettier, and Biome: what each one does, how to set them up, and which combination to use.
Why AI Code Needs Stricter Linting
Hand-written code has one author who knows the codebase. AI-generated code has no author in that sense. The model does not know what you broke last week, what patterns your codebase already uses, or whether the function it just wrote duplicates one that already exists. It writes syntactically correct code that compiles cleanly, but correctness and quality are different things.
Linting is automated code review. It scans your source files and flags patterns that are technically valid but problematic in practice: unused variables that clutter the code, implicit type coercions that produce surprising results, missing dependencies in React hooks that cause stale closure bugs. A linter catches these before they reach production.
Formatting is simpler. It enforces consistent whitespace, indentation, and punctuation across every file. It sounds trivial until you have an AI tool that uses double quotes one time and single quotes the next, two-space indentation here and four-space there. Inconsistent formatting creates noisy diffs, makes code review harder, and creates merge conflicts over nothing.
The combination matters because AI tools output a lot of code quickly, and that volume amplifies inconsistency. One human writing 50 lines a day stays pretty consistent. An AI producing 500 lines across 10 files in a single session will not.
ESLint Setup for AI Projects
ESLint is the standard JavaScript and TypeScript linter. It uses a plugin system, which means you install rule sets for whatever stack you use: TypeScript, React, Next.js, accessibility. It is highly configurable and has the largest rule library of any JavaScript linter.
Install it:
npm install --save-dev eslint @eslint/js typescript-eslint
Create eslint.config.js (the flat config format, current as of ESLint 9):
// eslint.config.js
import js from "@eslint/js";
import tseslint from "typescript-eslint";

export default tseslint.config(
  js.configs.recommended,
  ...tseslint.configs.recommended,
  {
    rules: {
      "@typescript-eslint/no-unused-vars": "error",
      "@typescript-eslint/no-explicit-any": "warn",
      "no-console": "warn",
    },
  }
);
Add a lint script to package.json:
{
  "scripts": {
    "lint": "eslint .",
    "lint:fix": "eslint . --fix"
  }
}
For React and Next.js projects, add the relevant plugins:
npm install --save-dev eslint-plugin-react eslint-plugin-react-hooks
Then extend the config:
import reactPlugin from "eslint-plugin-react";
import hooksPlugin from "eslint-plugin-react-hooks";

export default tseslint.config(
  js.configs.recommended,
  ...tseslint.configs.recommended,
  {
    plugins: {
      react: reactPlugin,
      "react-hooks": hooksPlugin,
    },
    rules: {
      "react-hooks/rules-of-hooks": "error",
      "react-hooks/exhaustive-deps": "warn",
      "@typescript-eslint/no-unused-vars": "error",
    },
  }
);
The react-hooks/exhaustive-deps rule deserves special mention. AI tools frequently generate React hooks with missing dependency arrays. This causes subtle stale closure bugs where a callback references an old version of a variable. That rule catches those before they cause confusing behavior in production.
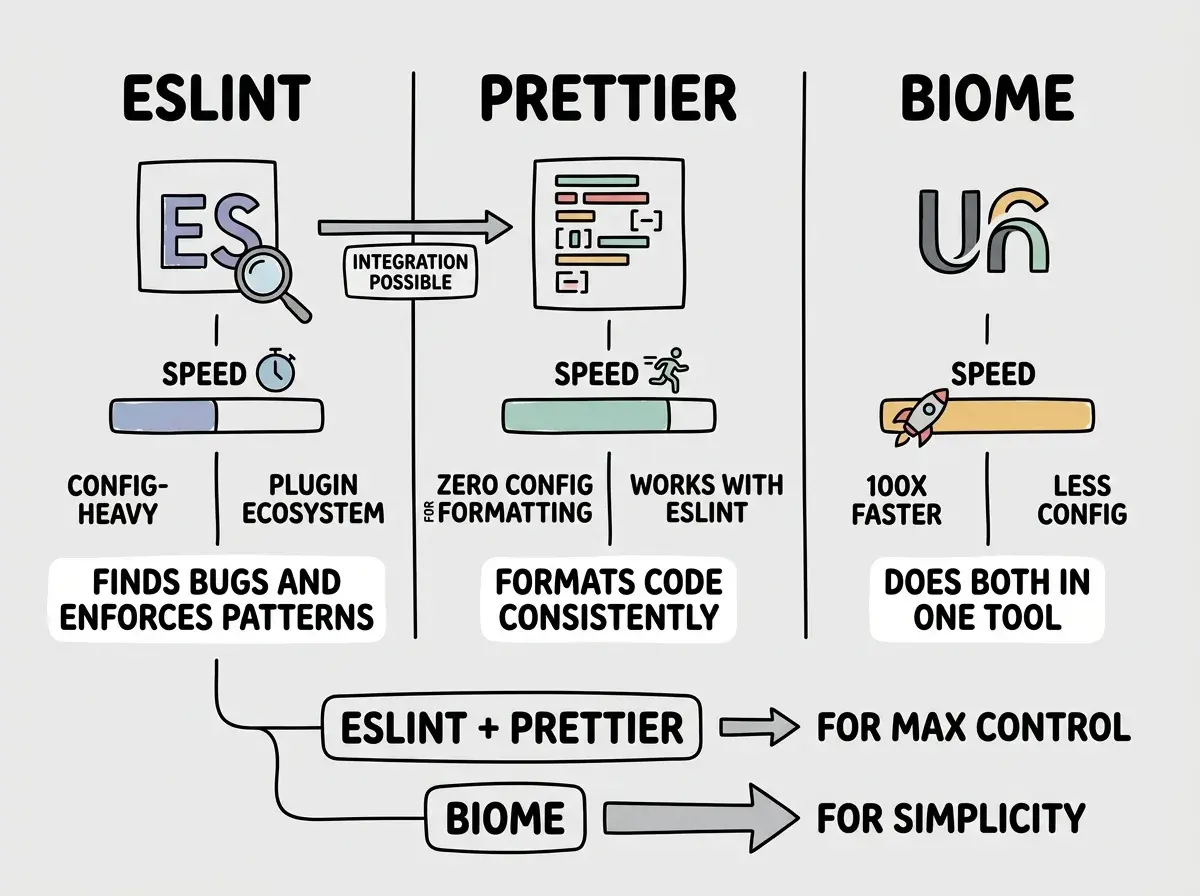
Prettier for Consistent Formatting
Prettier is an opinionated code formatter. It does not lint for bugs. It reformats your code to a consistent style and makes zero compromises about it. You do not configure the rules, you configure a few preferences (tab width, quote style, semicolons) and Prettier handles everything else.
Install it:
npm install --save-dev prettier
Create .prettierrc:
{
  "semi": true,
  "singleQuote": false,
  "tabWidth": 2,
  "trailingComma": "es5",
  "printWidth": 80
}
Add format scripts:
{
  "scripts": {
    "format": "prettier --write .",
    "format:check": "prettier --check ."
  }
}
The key workflow is running prettier --write . before committing. That reformats every file so your diff only contains real changes, not whitespace noise.
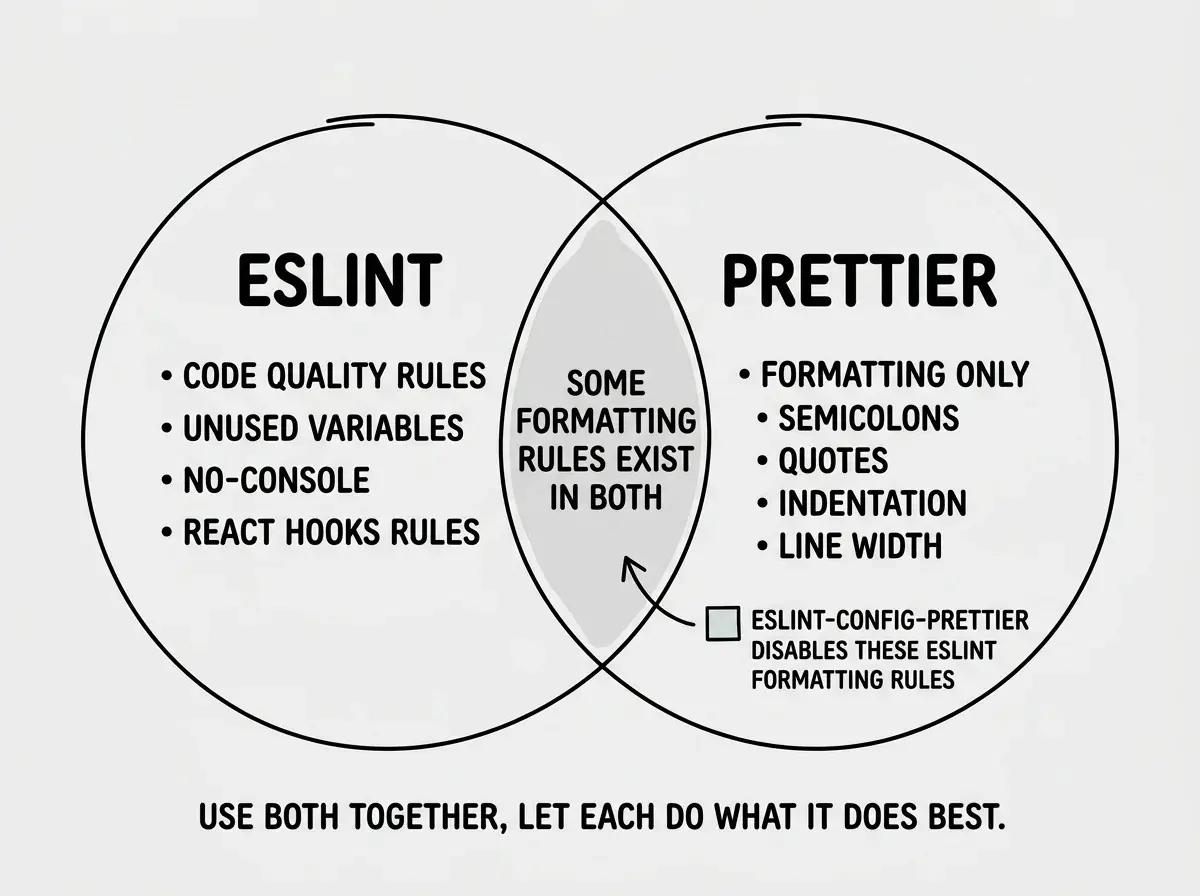
Prettier and ESLint serve different purposes. ESLint finds bugs. Prettier enforces style. Use both together. The one issue is that some ESLint rules conflict with Prettier's formatting. Resolve this by installing eslint-config-prettier, which disables any ESLint rules that would conflict:
npm install --save-dev eslint-config-prettier
Then add it to your ESLint config as the last item (so it overrides conflicting rules):
import prettier from "eslint-config-prettier";

export default tseslint.config(
  js.configs.recommended,
  ...tseslint.configs.recommended,
  prettier // must be last
);
ESLint catches bugs and code quality issues. Prettier enforces consistent formatting. They solve different problems and work well together. Install eslint-config-prettier to prevent them from conflicting. Run Prettier on every save or commit, and ESLint in your CI pipeline to block bad code from shipping.
Biome as the All-in-One Alternative
Biome is a Rust-based tool that does both linting and formatting in a single binary with no plugin system required. It is dramatically faster than ESLint plus Prettier, simpler to configure, and increasingly compatible with the same rule sets.
Install it:
npm install --save-dev --save-exact @biomejs/biome
Initialize the config:
npx @biomejs/biome init
This creates biome.json:
{
  "$schema": "https://biomejs.dev/schemas/1.9.0/schema.json",
  "organizeImports": {
    "enabled": true
  },
  "linter": {
    "enabled": true,
    "rules": {
      "recommended": true
    }
  },
  "formatter": {
    "enabled": true,
    "indentStyle": "space",
    "indentWidth": 2,
    "lineWidth": 80
  }
}
Add scripts:
{
  "scripts": {
    "check": "biome check .",
    "check:fix": "biome check --write ."
  }
}
biome check runs both the linter and formatter in one pass. biome check --write fixes everything it can automatically. It handles imports, formatting, and many lint rules in a single command.
The speed difference is real. On a medium-sized Next.js project with ~200 files, ESLint plus Prettier takes 8 to 15 seconds. Biome takes under a second. That is the difference between a check you run on every save versus one you skip because it slows you down.
Which Combo to Choose
Here is a direct comparison:
| Factor | ESLint + Prettier | Biome |
|---|---|---|
| Speed | 8 to 15s on medium projects | Under 1s |
| Configuration | Moderate (two tools, plugin installs) | Simple (one config file) |
| Rule coverage | Extensive (huge plugin ecosystem) | Good (growing, covers most common rules) |
| TypeScript support | Excellent via typescript-eslint | Good, improving fast |
| React hooks rules | eslint-plugin-react-hooks | Built-in |
| Accessibility rules | eslint-plugin-jsx-a11y | Partial |
| Conflict potential | Possible (needs eslint-config-prettier) | None (same tool) |
| Migration effort | None if you already use it | Low for new projects |
| Community maturity | Established, widely documented | Newer, less documentation |
The practical decision comes down to two scenarios.
Use ESLint plus Prettier if you are working on an existing project that already has them configured, if you need specific plugins like eslint-plugin-security or eslint-plugin-jest, or if you rely on custom rules your team has written. The ecosystem is more mature and there is more documentation available when you hit an edge case.
Use Biome if you are starting a new project, if build speed matters (monorepos feel this most), or if you want zero configuration overhead. It is the better default for greenfield vibe coding projects where you want fast feedback and simple setup.
One middle path worth knowing: Biome can replace Prettier even if you keep ESLint for linting. You get faster formatting without losing the ESLint rule set you depend on. This hybrid approach is increasingly common for larger codebases.
Configuring ESLint and Prettier separately without installing eslint-config-prettier. Without it, the two tools will fight over formatting rules. ESLint will flag things Prettier just reformatted, and vice versa. The fix is one install and one line in your ESLint config. Do it at setup time or you will spend an afternoon debugging why your linter is angry about code that looks perfectly formatted.
What This Means For You
Pick one setup and add it to your project today. For a new project, Biome is the fastest path: one install, one config file, one command that does everything. For an existing project already using ESLint, add Prettier and eslint-config-prettier, then add your lint script to your CI pipeline so it runs on every push.
The specific tool matters less than having the habit. Run linting before you push. Add it to your CI pipeline so it blocks deployments when AI-generated code slips in something problematic. The five-minute setup pays for itself the first time it catches a missing hook dependency or a variable that was used before it was defined.
AI tools are not going to lint their own output. That job is yours, and these tools make it automatic.
See how linting fits into a complete CI/CD workflow for vibe coders.
Read the CI/CD guideOne last thing. Whatever you choose, configure your editor to run it on save. VS Code has Biome and ESLint extensions. Cursor respects them. The fastest feedback loop is the one that does not require you to switch to a terminal. Catch the problem in the same moment you introduce it, and it costs you nothing to fix.
Get practical tutorials on tooling, deployment, and shipping faster.
Explore the blog