API rate limiting is the difference between an API that survives a bad day and one that goes down the moment someone writes a while(true) loop against your endpoints. 92% of US developers now use AI coding tools daily, and those tools generate API routes that accept anything, authenticate nothing, and have zero protection against abuse. Your AI built the happy path. Nobody built the defenses.
Veracode's 2025 research found that 45% of AI-generated code contains security vulnerabilities. API routes are where those vulnerabilities concentrate, because every API endpoint is a door into your application that anyone on the internet can knock on. Your frontend might look polished. Your API routes are probably wide open.
I have reviewed dozens of AI-generated API routes across Next.js and Express projects. The pattern is always the same. The route accepts a POST request, reads the body, does the thing, returns a response. No validation on the input. No check on who is calling. No limit on how often they can call. The AI built what you asked for and skipped everything you did not ask for.
Why AI Tools Skip API Security
AI coding tools optimize for "working code." You ask for an endpoint that creates a user, and you get an endpoint that creates a user. It works. You test it. It works again. You ship it.
The problem is that "works when I test it" and "works when 10,000 strangers hit it" are fundamentally different standards. AI tools do not add rate limiting because you did not ask for rate limiting. They do not validate input because your test data was always valid. They do not add authentication because your development environment did not need it.
This is not a flaw in AI tools. It is a gap in how we use them. Security is not a feature you add. It is a layer that wraps every feature. If you do not explicitly ask for it, you will not get it.
Rate Limiting Your API Routes
Rate limiting controls how many requests a client can make in a given time window. Without it, a single attacker (or a buggy client, or a bot) can overwhelm your server, drain your database connections, or rack up thousands of dollars in third-party API costs.
The Upstash Redis Approach (Production)
For production applications, use Upstash Redis with the @upstash/ratelimit package. It works at the edge, survives server restarts, and handles distributed deployments where multiple server instances need to share rate limit state.
import { Ratelimit } from "@upstash/ratelimit";
import { Redis } from "@upstash/redis";
import { NextRequest, NextResponse } from "next/server";

const ratelimit = new Ratelimit({
  redis: Redis.fromEnv(),
  limiter: Ratelimit.slidingWindow(10, "60 s"),
  analytics: true,
});

export async function POST(request: NextRequest) {
  const ip = request.headers.get("x-forwarded-for") ?? "anonymous";
  const { success, limit, remaining, reset } = await ratelimit.limit(ip);

  if (!success) {
    return NextResponse.json(
      { error: "Too many requests. Try again later." },
      {
        status: 429,
        headers: {
          "X-RateLimit-Limit": limit.toString(),
          "X-RateLimit-Remaining": remaining.toString(),
          "X-RateLimit-Reset": reset.toString(),
        },
      }
    );
  }

  // Your actual route logic here
}
This gives each IP address 10 requests per 60-second sliding window. The sliding window is important. A fixed window lets someone fire 10 requests at second 59 and 10 more at second 61. A sliding window prevents that burst.
The In-Memory Approach (Prototypes)
If you are prototyping and do not want to set up Redis, a simple in-memory Map works. It will reset when the server restarts and will not share state across multiple instances, but it is better than nothing.
const rateLimitMap = new Map<string, { count: number; resetTime: number }>();

function checkRateLimit(ip: string, maxRequests = 10, windowMs = 60000) {
  const now = Date.now();
  const record = rateLimitMap.get(ip);

  if (!record || now > record.resetTime) {
    rateLimitMap.set(ip, { count: 1, resetTime: now + windowMs });
    return { allowed: true, remaining: maxRequests - 1 };
  }

  if (record.count >= maxRequests) {
    return { allowed: false, remaining: 0 };
  }

  record.count++;
  return { allowed: true, remaining: maxRequests - record.count };
}
Use the in-memory approach for development and early prototypes. Switch to Upstash before you have real users.
Rate limiting is the single cheapest security measure you can add. Ten lines of code prevent brute-force attacks, API abuse, and runaway costs. If you ship one API route today, add rate limiting to it. The Upstash free tier handles 10,000 requests per day, which covers most indie projects.
Input Validation With Zod
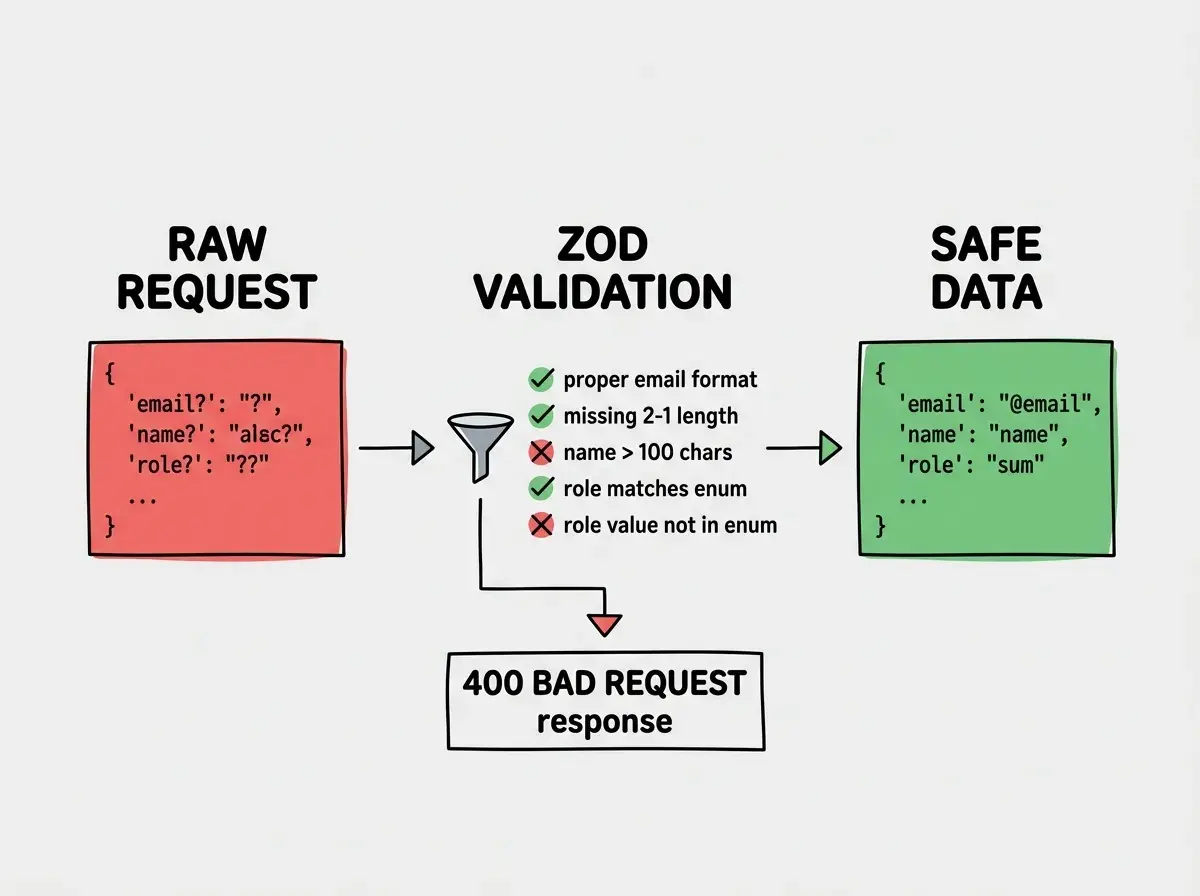
Every piece of data that enters your API through a request body, query parameter, or header is untrusted input. AI-generated routes typically read request.json() and pass whatever they get straight to a database query or external API call. This is how injection attacks happen.
Zod is the standard for runtime validation in TypeScript. Define a schema, parse the input, and handle the error if it does not match.
import { z } from "zod";
import { NextRequest, NextResponse } from "next/server";

const CreateUserSchema = z.object({
  email: z.string().email().max(255),
  name: z.string().min(1).max(100).trim(),
  role: z.enum(["user", "admin"]).default("user"),
});

export async function POST(request: NextRequest) {
  const body = await request.json();
  const result = CreateUserSchema.safeParse(body);

  if (!result.success) {
    return NextResponse.json(
      { error: "Invalid input", details: result.error.flatten() },
      { status: 400 }
    );
  }

  const { email, name, role } = result.data;
  // Now email, name, and role are guaranteed to be
  // the correct types with the constraints you defined
}
Always use safeParse (not parse, which throws), set maximum lengths, trim strings, and validate enum values against a whitelist. An attacker sending { "role": "superadmin" } should get a 400, not a new superadmin account.
Start with the fundamentals before diving into API-specific patterns.
Read the basicsAPI Authentication Patterns
Rate limiting stops volume attacks. Validation stops malformed input. Authentication stops unauthorized access. You need all three.
API Keys for Service-to-Service
API keys are the simplest authentication method. The client includes a secret key in the request header, and your server checks it against a known value. Use this for internal services, webhooks, and admin endpoints.
export async function POST(request: NextRequest) {
  const apiKey = request.headers.get("x-api-key");

  if (!apiKey || apiKey !== process.env.BLOG_API_SECRET) {
    return NextResponse.json({ error: "Unauthorized" }, { status: 401 });
  }

  // Authenticated request, proceed
}
Never put API keys in query parameters (they appear in server logs and browser history). Always use headers. Store the key in environment variables, not in your codebase.
JWT Verification for User Sessions
If your app uses JWTs for user authentication, verify them on every API request. Do not just check that a token exists. Verify the signature, check the expiration, and validate the claims.
import { jwtVerify } from "jose";

async function verifyAuth(request: NextRequest) {
  const token = request.cookies.get("session-token")?.value;

  if (!token) return null;

  try {
    const { payload } = await jwtVerify(
      token,
      new TextEncoder().encode(process.env.JWT_SECRET)
    );
    return payload;
  } catch {
    return null;
  }
}
The jose library works on Cloudflare Workers, Vercel Edge Functions, and Node.js. Avoid jsonwebtoken if you deploy to edge runtimes since it depends on Node.js crypto APIs that are not available everywhere.
Session Tokens With a Database
For apps that need instant revocation (admin panels, financial apps), store session tokens in a database instead of using JWTs. Generate a random token on login, store it with the user ID, and set it as an httpOnly cookie. Slower than JWT verification but gives you instant session invalidation.
AI tools almost always store JWTs in localStorage. This exposes the token to any JavaScript running on your page, including third-party scripts and XSS attacks. Always store authentication tokens in httpOnly cookies. They are invisible to JavaScript and automatically sent with every request. If your AI-generated code uses localStorage.setItem("token", ...), move it to an httpOnly cookie immediately.
CORS Configuration for API Routes
Cross-Origin Resource Sharing (CORS) controls which domains can call your API from a browser. Without proper CORS configuration, any website on the internet can make requests to your API using your users' cookies.
export async function OPTIONS() {
  return new Response(null, {
    headers: {
      "Access-Control-Allow-Origin": "https://yourdomain.com",
      "Access-Control-Allow-Methods": "GET, POST, OPTIONS",
      "Access-Control-Allow-Headers": "Content-Type, Authorization",
      "Access-Control-Max-Age": "86400",
    },
  });
}
Never set Access-Control-Allow-Origin: * on routes that use cookies or authentication. The wildcard means any site can call your API. For public, read-only endpoints (like a public product catalog), the wildcard is fine. For anything that writes data or requires authentication, specify your exact domain.
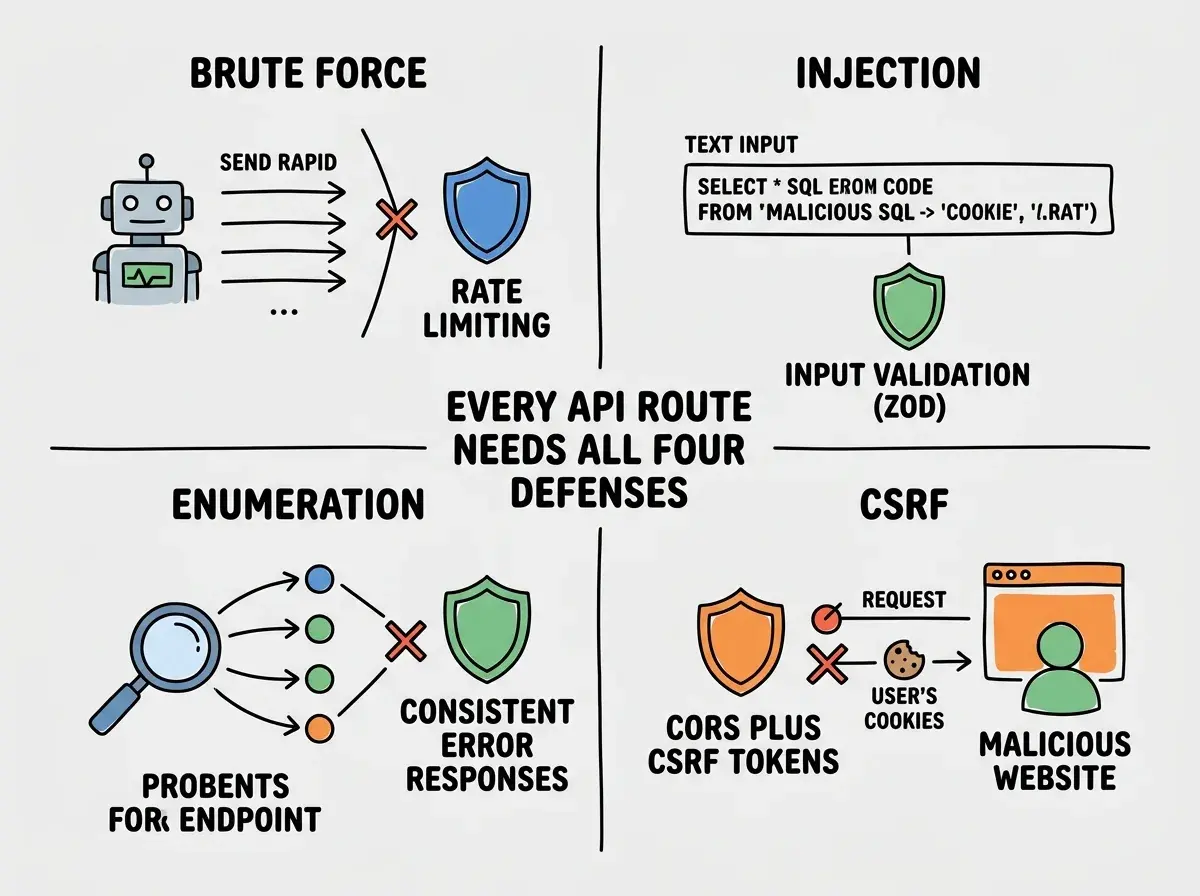
Common Attacks Your API Faces
Understanding the attacks helps you understand why each defense matters.
Brute force attacks try thousands of combinations per second. Rate limiting stops them.
Injection attacks embed malicious commands in form fields. Input validation with Zod rejects anything that does not match your schema.
Enumeration attacks probe your API to discover valid usernames or IDs. Always return the same error response whether a resource exists or not.
CSRF attacks trick authenticated users into making unwanted API calls. CORS configuration and anti-CSRF tokens stop them.
Putting It All Together
Every protected API route should follow this order: rate limit first, authenticate second, validate third. The order matters because rate limiting is cheapest (no database call), authentication is next (one lookup), and validation is last (parse the body only after confirming the request is legitimate).
What This Means For You
Every API route you ship needs three things: a rate limit, input validation, and an authentication check. Start with your most sensitive endpoint (login or payments), then work outward.
- If you are a founder: Add rate limiting to your login and payment endpoints today. It takes 15 minutes with Upstash and prevents the attacks that would destroy user trust in your MVP.
- If you are changing careers: Understanding API security separates you from developers who only know how to build features. Add these patterns to your portfolio projects.
- If you are a student: Learn Zod validation and rate limiting now. Every production app needs them, and most bootcamps skip them entirely.
Start with the fundamentals of protecting your vibe-coded endpoints.
Get started